My Dog Grooming Guide 2 nd Edition
|
|
|
- Isaac Shields
- 5 years ago
- Views:
Transcription

1 My Dog Grooming Guide 2 nd Edition Produced By: G. Constantine Tannous Edited By: Michelle Gillette 1 st Edition Breanna Martuicc 2 nd Edition Wag-On Publishing House First Edition July 2010 Published in the United States of America Copyright July All Rights Reserved No Copying or Reproduction of This Entire Book, or any Part Thereof, is Allowed Without the Written Permission of the Publisher Global Rights Reserved! If you just purchased this book, you are welcome to sign up at and watch FREE grooming videos.
2 Table of Contents Table of Contents ii Bulldog 96 Tools & What is Needed iv Bullmastiff 98 Introduction v Cairn Terrier 100 Know Your Dog vi Canaan Dog 104 The Basics of Bathing & Grooming vii Cardigan Welsh Corgi 106 Breeds 1 Cavalier King Charles Spaniel 108 Affenpicher 2 Chesapeake Bay Retriever 112 Afghan Hound 6 Chihuahua 114 Airedale Terrier 8 Chinese Crested 118 Akita 12 Chinese Shar-Pei 120 Alaskan Malamute 14 Chow Chow 122 American Eskimo 16 Clumber Spaniel 126 American Staffordshire Terrier 18 Cocker Spaniel 130 American Water Spaniel 20 Collie 134 Anatolian Shepherd Dog 22 Coonhound (Black & Tan) 140 Australian Cattle Dog 24 Curly-Coated Retriever 142 Australian Shepherd 26 Dachshund 144 Australian Terrier 28 Dalmatian 146 Basenji 32 Dandie Dinmont Terrier 148 Basset Hound 34 Doberman Pinscher 152 Beagle 36 English Cocker Spaniel 154 Bearded Collie 38 English Setter 158 Beauceron 42 English Springer Spaniel 162 Bedlington Terrier 44 English Toy Spaniel 166 Belgian Malinois 48 Field Spaniel 170 Belgian Sheepdog 50 Finnish Spitz 174 Belgian Tervuren 52 Flat-Coated Retriever 176 Bernese Mountain Dog 54 Fox Terrier 178 Bichon Frise 56 Foxhound American 180 Bloodhound 60 Foxhound English 182 Bluetick Coonhound 62 French Bull Dog 184 Border Collie 64 German Pinscher 186 Border Terrier 66 German Shepherd Dog 188 Borzoi 70 German Shorthaired Pointer 190 Boston Terrier 72 German Wirehaired Pointer 192 Bouvier Des Flandres 74 Glen of Imaal Terrier 194 Boxer 78 Golden Retriever 198 Boykin Spaniel 80 Gordon Setter 200 Briard 82 Great Dane 204 Brittany 86 Great Pyrennes 206 Brussels Griffon 90 Greater Swiss Mountain Dog 208 Bull Terrier 94 Greyhound 210 ii
3 Table of Contents Continued: Harrier 212 Pomeranian 324 Havanese 214 Poodle (Kennel, Puppy, Summer) 326 Ibizan Hound 216 Portuguese Water Dog & Lion 340 Irish Red & White Setter 218 Pug 346 Irish Setter 222 Puli 348 Irish Terrier 226 Pyrenean Shepherd 352 Irish Water Spaniel 230 Redbone Coonhound 356 Irish Wolfhound 234 Rhodesian Ridgeback 358 Italian Greyhound 236 Rottweiler 360 Jack Russell Terrier 238 Saint Bernard 362 Japanese Chin 244 Saluki 364 Keeshond 246 Samoyed 366 Kerry Blue Terrier 248 Schipperke 368 Komondor 252 Schnauzer 372 Kuvasz 254 Scottish Deerhound 376 Labrador Retriever 256 Scottish Terrier 380 Lakeland Terrier 258 Sealyham Terrier 384 Leonberger 262 Shetland Sheepdog 388 Lhasa Apso 264 Shiba Inu 390 Löwchen 268 Shih Tzu 392 Maltese 272 Siberian Husky 396 Manchester Terrier 276 Silky Terrier 398 Mastiff 278 Skye Terrier 402 Miniature Pinscher 280 Spinone Italiano 406 Newfoundland 282 Staffordshire Bull Terrier 408 Norfolk Terrier 284 Sussex Spaniel 410 Norwegian Buhund 288 Swedish Vallhund 414 Norwegian Elkhound 290 Tibetan Mastiff 416 Norwich Terrier 292 Tibetan Spaniel 418 Nova Scotia Duck Tolling Retriever 294 Tibetan Terrier 420 Old English Sheepdog 296 Toy Fox Terrier 422 Otterhound 300 Vizsla 424 Papillon 304 Weimaraner 426 Parson Russell Terrier 306 Welsh Springer Spaniel 428 Pekingese 308 Welsh Terrier 432 Pembroke Welsh Corgi 310 West Highland White Terrier 436 Petit Basset Griffon Vendeen 312 Wheaten Terrier 440 Pharaoh Hound 314 Whippet 444 Plott Hound 316 Wire Fox Terrier 446 Pointer 318 Wirehaired Pointing Griffon 450 Polish Lowland Sheepdog 320 Yorkshire Terrier 452 iii
4 TOOLS OF THE TRADE Following is our suggested grooming tools. These items can be purchased at We have listed the item numbers for your convenience. The item numbers mentioned below and the prices are as of June 27, AD22360 Andis 2 speed clipper $135 TP14217 value kit three shears 7 ½ straight and 8 ½ straight, and thinning shears $90 #DD ½ curved shears $60 #WA878 cordless clipper $125 (optional) Pink or Grey #TP244 box $49.95 #MF226 small slicker brush $10.99 #MF226 large slicker brush $12.99 #TP19133 flea comb $2.99 #TP25106 undercoat rake $9.99 #AD129 small clip on combs $9.95 #AD129 large clip on combs $9.95 #TP085 de matt tool $4.99 #TP085 fine/course comb $9.99 #MF1319 hemostat $6.99 #TP157 4 grooming loops $8.00 #AD64123 (2) 4fc blades $22.00 each #AD64076 (1) 40 blade $$15.59 #AD64075 (1) 30 blade $15.59 #AD64071 (1) 10 blade $15.59 #AD64090 (1) 4 skipped tooth $ #AD64121 (2) 7fc blades $17.29 each #AD64122 (2) 5fc blades $18.99 each #OS86835 (1) 3fc blade $28.29 We also recommend you purchase a grooming table with a grooming arm and a grooming loop, a forced dryer, the Groomers Helper, and shampoo and conditioner. iv
5 INTRODUCTION Wag My Tail pet grooming salon & School is widely viewed as one of Los Angeles premiere pet grooming businesses due to its highly-successful business model. Wag My Tail opened its doors in August 2004 as a full - service pet salon providing head-to-toe spot treatments, pet hygiene and styling. In October 2005, Wag My Tail became a Registered Pet Grooming School ( and in January 2010, it became the first federally-approved training facility under the Obama Administration to provide those who are out of work with a brand new career. OnlineGroomingSchool.com, Wag My Tail s virtual curriculum for training and certifying pet groomers provides an in-depth instructional program to students, aged 18 or older, using an online curriculum, instructional videos and DVDs. Students complete the interactive program by submitting documentation of completed grooming exercises and by passing a final test within the required testing score. Once a student successfully completes the course, they receive certification as a Pet Hygienist & a Certified Pet Groomer. To assist graduates in starting their new career, Tannous invites graduates to call her if they have any questions. Her willingness to help others succeed in this highly-competitive industry is one of the qualities that have made her business a leader in the pet grooming trade. By teaching her students to treat animals with the same love, respect and compassion as people, she is making great strides in helping to elevate the quality of care for pets and pet owners worldwide through this new generation of pet grooming professionals. We are hopeful that you will enjoy this grooming guide for years to come. Best of Luck, MyDogGroomingGuide.com Team v

6 Know your Dog vi
7 THE BASICS OF BATHING AND GROOMING *Make Sure to See End of Chapter for Teddy Head Clip 1. INTAKE/EXAMINATION: You should always start with any animal you meet by checking with their owner for concerns such as allergies to shampoos. By asking this simply question, you will find out whether they require hypoallergenic shampoo. The client may have a preferred shampoo of their own that they want you to use. Check also to see what type of haircut is desired. Check for the age of the dog. Finally, check for anything that may require special attention, such as aggression, cage fright, prefers females, etc. During the examination process you should feel for any noticeable mats in the pet's coat. If you find that the coat is heavily matted, then this would be the time to express it to the owner. Discuss what type of hairstyle is best for the pet. Most owners have an idea as to what they want their pet to look like. In some cases, it is impossible or inappropriate to give the pet a certain type of hairstyle because of the dog s age or coat condition. Examine the ears of the pet. A foul-smelling ear discharge will be a good indication that the pet may have an infection. During the grooming process, the pet will put up plenty of resistance if you attempt to clean its ears. It is my opinion that if you do find that the pet has a possible ear infection, it would be best not to clean the ear in its entirety. By leaving some discharge in the ear, you will aid the veterinarian in properly diagnosing the problem. Checking the pet's teeth is also a good idea. If the pet has tooth decay, it will be very painful for the pet if you attempt to shave around the muzzle. The mouth tissue is very tender and painful when this is the case. This is usually a problem in older pets. If you notice anything on the pet such as moles, bald patches or injuries, mark them down on your examination card and ask the owner how it happened or if they know about the injures. If you are the one taking in the pet and you are done filling out the card, ask the owner if there is anything else they may want you to be aware of. Be cautious with any animal, if you are not the person who checked them in and you now have to retrieve them from a cage. Some dogs can experience cage fright. There is a technique in retrieving cage fright dogs. It is also important that you are aware of any of the pet s physical ailments. For example, if he has a hip or back problem, you need to be more careful when handling him. vii

8 2. PLUCK THE EAR HAIR OUT OF THE EAR IF BREED APPROPRIATE. Some breeds have more hair in their ears than others. In these cases you will remove the ear hair with a special ear powder that helps liquefy the ear hair. This medicated ear powder also aids the bather in grasping the hair. Most ear hair is covered with earwax and may be difficult to properly grasp without the powder. In these cases you will sprinkle the ear canal with the powder and with your fingers or hemostats you will quickly pull out tiny bits of hair. How do you know if it is breed appropriate to remove hair? If the dog does not shed, it requires the ear hair to be removed. Examples of such breeds are Poodles, Bichons, Shih Tzus, Yorkies, and Lhasa Apsos. If the pet sheds, such as a Cocker or Golden Retriever, it will require that you shave the inside ear leather with a #10 blade. Not all shedding breeds require this, for example, Pugs and German Shepherds do not. Cleaning the ears is a very important step in the grooming process. It is important to identify what a healthy ear looks like verses an unhealthy ear. A healthy ear is dry and light pink with NO foul odor. An unhealthy ear is tender to the touch. They are usually dark red, swollen and moist. Some pets may even seem to appear to have ear mites. Ear mites look like a dark reddish brown wax that resembles coffee grounds. Please note that even a veterinarian must examine the specimen under a scope before determining that the pet has ear mites. Nevertheless, if you suspect ear mites, treat it as such. You may still groom the pet, but make sure that you disinfect your tools prior to using them on another pet. viii


9 Remember, you cannot make a diagnosis, we can only make observations. If you suspect an infection, advise the client that it would be a good idea for a vet check and let the veterinarian make the diagnosis. 3. CLEAN THE EARS WITH ANTISEPTIC SOLUTION. Gently take a cotton swab and apply ear cleaning solution to it then wipe away any dirt or wax on the ear leather or canal. Only go in as far as you can see. 4. CLIP THE NAILS IF NEEDED. How do you know if you need to clip the nails? A good rule of thumb is if the nails are not touching the ground, don t clip them. The following pictures are good examples of nails that should be clipped. To most new bathers and groomers, this is the most intimidating process of grooming a pet. In order to make the process a little less troublesome, there are special handling techniques, tools and diagrams to assist the bather or groomer in nail clipping. Using the proper tools and handling techniques, start at the back legs and then work your way to the front legs. If the pet gets aggressive with you, you may, at this time, need to muzzle the pet or ask for assistance. Once you have finished clipping the nails then you may remove the muzzle. ix


10 The following are techniques to handle a pet when clipping nails. Front approach; arm over body. Front approach; arm under body. Back approach; arm over body. Wrestler hold; one person holds While other clips nails. Not all the nails need clipping. Just clip the ones that need it. As a rule, the back nails are shorter than the front ones. Remember to always check the dew claw. This nail often gets missed and as a result, ingrown dew claws sometimes need to be surgically removed by a veterinarian. Courtesy of x


11 White Nail: The easiest nails to clip are those with white nails. With white nails you can see where the quick begins. Only clip the small tip just under the quick. Courtesy of blog.luckydogbiscuits.com Black Nail: With dark or black nails, you will need to estimate where the quick is. Usually three fourths of the nail is the quick. If you accidentally cut the quick you may use styptic powder (quick stop) to stop the bleeding. P i c Courtesy of Only use clippers that are designed to clip dog nails; do not use human nail clippers. Always cut the nails before bathing so that if you accidentally cut the quick and it bleeds soiling the coat, it can be washed. Very rough or sharp nails should be filed after clipping. There are times when it is easier to clip the nails in the tub after the pet has been bathed. This works particularly well if the pet has thick, brittle nails. The warm water will soften the nail, thereby keeping the nail from splitting when clipping. Another advantage to this is that some pets are more relaxed in the tub making the nail trimming less traumatic for them and you. xi


12 5. DO THE SANITATION TRIM, ONLY ON CERTAIN BREEDS. The purpose of a sanitation trim is to keep the belly and private area clean of hair and debris. Sanitation trims are most popular for smaller breeds such as Shih Tzu, Maltese, Pomeranian, etc. When doing the sanitation trim on the belly area, be sure to only use a #10 blade. This reduces the chances of clipper irritation, cuts and nicks. When doing the sanitation trim, shave against the grain. If the dog is prone to clipper irritation, then go with the grain. Side approach; lifting the leg. Front approach. When doing the sanitation trim on the anal area, DO NOT put the blade directly on the anal area. Again only use a #10 blade. Sanitation clip around anal area. xii
13 6. SHAVE OFF ANY MATS THAT YOU ARE UNABLE TO BRUSH OUT PRIOR TO BATHING. It is better to shave out a mat before getting it wet. Once you add water to a mat, it makes it very difficult to remove. The best blades to remove a very tight mat are a #10 or a #7 skipped tooth (More on blade lengths later). Never use scissors to removes mats, especially around the ears. Only experienced groomers can attempt such a task and even then it is not recommended. Some mats can be removed and taken apart with a detangler, cornstarch, hair splitters or mat breakers, slicker brush, and thinning shears. Only a mat that is very tight to the skin should be shaved off. There will be times that no amount of dematting will remove mats. At this point, you will need to consider shaving all the hair off. Pulling and brushing the dog's coat will only cause him pain and anguish. Humanity before vanity, we always say. Before shaving the hair, it is a good idea to call the owner first. When you call the owner, explain to them that it is uncomfortable and painful for the dog and could only dampen his spirits if you continue to try and comb out the mats. Remind him that the dog's coat will be grown out in 8-10 weeks and that by brushing it regularly; the mats will not occur again. 7. SHAVE THE HAIR ON THE V PADS, IF BREED APPROPRIATE. The V-pad on the bottom of all feet is easy to shave. Remember that there is a tiny tendon at the point of the V. Be careful not to nick the tendon. Dogs such as Golden Retrievers and Cocker Spaniels grow excessive amounts of hair on their pads. There are times when you may find gum or other debris attached to the hair. If the hair is left unattended, it could lead to infection and pain when walking. xiii


14 Shaving the pads prior to bathing is a good habit to get into. a. First, select the proper blade. I like to use a #40 blade. Do not use anything lower than a #10 blade. b. Locate the V on the underside of the pet s paw. c. Shave the lower side of the pads to give it a clean foot. 8. SHAVING THE POODLE FOOT. Poodles should have their feet completely shaved. Some Poodles owners do not like this look. The following are the steps that should be taken. a. Shave the V Pad. b. Shave the top of the foot from the toes to where the foot joins the leg. c. Shave in-between each individual toe. Be sure to spread the toes apart. d. Be careful not to catch the webbing between the toes when shaving. Only use the corner of the blade when shaving this area. 9. SHAVING THE ENTIRE COAT. There will be times when you will need to shave a dog prior to bathing him. There is no need to wash a coat that will be shaved short anyway. In addition, a dog with a heavily matted coat should not be bathed. If a pet is being shaved to ½ inch or less, you should clip before bathing. What to watch out for when shaving a dog: a. In the armpits, only use a #10 or higher blade. b. Never use a skipped tooth blade in the armpit area. c. Be very careful around the 5 danger areas: 1. Nipples 2. Flank 3. Ears xiv
15 4. Anus 5. Hock d. Be careful not to let the blade get hot. If you are unable to handle the heat of the blade on your wrist, then it is too hot for the pet. Apply coolant spray to the blade and then continue. Using blades that are too hot may result in clipper burn. If clipper burns occurs on a pet, it is always the fault of the groomer. Clipper burn looks like a sun burn. 10. BRUSHING OUT OR BLOWING OUT THE UNDERCOAT There are certain breeds, such as the Chow, Siberian Husky, Akita, etc., that have a thick, heavy undercoat. You must get all this hair raked out or blown out before the bath. The undercoat is hair that is turning loose so the new coat can grow in. Raking it out or blowing it out prior to bathing, will give you better results when you dry the dog. When brushing a dog always us a downward flicking stroke. With a slicker brush, always begin at the base of the skull working your way to the tail. Continue to the legs by starting at the bottom and brush as you move upwards. When using any brush, always apply light pressure and don t go over the same area so much that the skin becomes irritated; this is called brush burn. Brush burn is always the groomers fault. You should always brush a coat that exhibits a lot of undercoat and matting before bathing. If you wet a coat with tangles or it is in bad condition, it will be much more difficult to remove any mats and dry the hair. By creating a habit to do these steps prior to bathing, it will help improve your speed and will keep you from forgetting to do them. Nothing makes a client more unhappy than when details are missed. There will be times that you will be very busy and details will be overlooked if you do not get into the habit of doing them at the start. Giving the dogs a once over at the end of grooming is also a good idea. Not every breed requires all 10 steps prior to bathing. But with all breeds, step one and step two should always be done. BATHING: A dog is prepped and ready for a bath when all (if breed appropriate) is completed: 1. All excess hair is removed and the pattern is set. 2. The toenails are cut ( if needed) 3. The ears are cleaned. xv
16 4. All mats (tangles) are removed, brushed out or combed out. If you are unable to split the mat, you may have to spot shave them with a #10 or #7 skipped tooth. 5. The sanitation trim has been done ( if breed appropriate) 6. The pads have been shaved ( if breed appropriate), FOLLOWING ARE THE STEPS YOU SHOULD TAKE WHEN YOU BATHE THE PET. Read the intake card for any special instructions such as specialty shampoo. If it says hypoallergenic shampoo, you should use only that shampoo. Secure the pet in the tub. Turn the water on and check to see that the temperature is okay. A comfortable temperature is a little cooler than you would like your bath water to be. Wet the body but not the head. Check and/or express the anal glands. The anal sacs are found on both side of the anus, which discharge their contents into the rectum. During the bathing process, this would be the time to check to see if they are working properly. This is quite a simple procedure once you have located them and it only takes a few seconds to complete. The anal glands are located inside the anus. These glands are filled with liquid and secrete a foul odor. They should be emptied or expressed while grooming. ON HEALTHY DOGS ONLY: To relieve the glands, begin in the tub by lifting the dog's tail. Place an index finger and thumb on each side of anus at the 5 o'clock and 7 o'clock position, then gently squeeze and expel the content. A good three squeezes are sufficient. (There is no need to strike gold). If you observe any swelling or abnormal condition of the anal area, don't do this procedure. Recommend to the owner that they take their pet to a veterinarian. The discharge should be yellowish to brown in color. If any other color exists, inform the owner. Some pets will start to scoot if their anal glands are impacted. If scooting continues for more than a few days after sac emptying, the sacs should be rechecked. For some individuals, it takes several sac emptying before the sacs stay emptied. If the sacs are empty and scooting persists there may be another cause (such as itchy skin, tapeworms, or even lower back pain). xvi
17 ANAL GLANDS HAVE MANY FUNCTIONS: 1. They lubricate the anus. 2. They are used as a scent marker for identification. 3. Many dogs expel the gland to deter another dog. 4. They secrete when they are afraid. Please refer to the following link for more details on anal glands. Youtube has many videos you can watch to help you get an idea on how to do this properly. Apply the shampoo and start to rub it all over the body. This will create a nice lather. While bathing, pay special attention to the feet, belly and rectum - these areas get are usually the dirtiest - then rinse thoroughly. If soap is left on the pet, it will cause an itchy, flaky dull coat. When fleas are present, allow the flea shampoo to sit on the pet for 5 to 10 minutes and use a flea comb to remove the fleas. If the water turns red when bathing, it means that you are washing away flea feces. If the pet is really dirty, do this procedure twice. Once you have rinsed the body thoroughly, apply conditioner to the coat. Please note, not all hair types should have conditioner applied. Here are some guide lines on using conditioner- long hair breeds like Maltese, Yorkies, Aphgans are proned to mattes. Dogs with undercoats have thicker courser hair (like Labs) tend to repel dirt therefore not needing conditioner. Dogs that are washed frequently or have dry skin or coat will benefit from a good conditioning treatment. Allow the conditioner to set into the coat while you move to bathe the head and muzzle. Ears MUST be protected with cotton so that water does not get in the ear canal. When getting close to the pets eyes, make sure to cover their eyes. Even though we use tearless shampoo, it can still irritate the pet's eyes. On dogs with wrinkles, pay extra attention to those areas since they tend to smell. Make sure to wash the muzzle area. If the pet has eye matter, you could use a flea comb to remove the eye matter. The warm water softens the matter making it easier to remove. As you rinse the face, be careful to avoid getting water in the nose. Try to keep the muzzle in a downward position. Once you have finished with the head, you can proceed to rinse the conditioner off the body. Remember: over rinse if you have to. I always like to apply eye drops to clear the eye from possible soap contact. Many customers will ask you if you clean the dog's teeth; yes we do with a toothbrush and toothpaste, but we cannot remove tartar. Many customers think that is what you are going to do. Removing tartar is xvii
18 very technical. Tooth brushing only removes particles and debris from the teeth and gums. Brushing with a regular toothbrush is sufficient. Always use baking soda or natural toothpaste made for DOGS ONLY. DO NOT USE FLUORIDE TOOTHPASTE ON DOGS; it is not good for them. What causes bad breath? 1. Pets over the age of four years old can develop tooth decay and gum disease. 2. Chewing at the fur or fleas can cause hair to get trapped in the teeth and become mixed with food causing a foul odor. 3. Pets that eat mainly canned food will develop plaque much faster. Drying can be done while the dog is still in the bathtub. Dogs with long hair or Poodles and Poodle mixes should be fluff dried. Fluff drying simply means that while you are dry the hair, you are fluffing the hair upward with a slicker brush. You can dry a pet by using a forced air dryer, stand-up drying, or in a cage. Drying the dog is one of the most important steps. If not done properly, it makes it impossible to do your scissor work correctly. Most dogs can be hand dried. Poodles and Bichon Frise should NOT be over dried. What this means is that if they look dry, do not dry them more. Start on the topknot, and then the legs, tail, ears and body. The object is not to let the hair dry curly. You may need to cover part of the body with a towel as you dry other parts of the body so that area doesn't get dry curly. Before drying always towel dry to the almost dry stage. It saves time blowdrying. Always secure the pet to the table when drying. When fluff drying, keep the dryer pointing in the direction the brush is working. Make sure the dryer is not too hot. Use the brush to dry the hair as straight as possible. Do not use your hand to shake the hair dry. Using your hands will cause waves and tangles. Do not brush ears against the grain. Brush WITH the grain so you won't damage or tear the ear leather. Most short hair pets can be cage dried. Pets that are being cage-dried should be monitored every few minutes. Check to make sure the pet is not displaying Heat Stress. xviii
19 SOME PETS OVERHEAT FASTER THAN OTHERS Older pets, Puppies, Overweight Pets, Nervous Pets, Excited Pets, and Flat-face pets may have trouble breathing in warm air. Bubbled-eyed pets may suffer eye injury with too much heat. Signs of Heat Stress 1. Excessive panting 2. Noisy breathing 3. Heavy salivation 4. Weakness Always inform the owner about the symptoms and write them down on the pet s record. Once you have finished drying the pet, if it is a long hair or curly hair breed, make sure that a comb can get through the coat with almost no snagging. It is at this point that the pet is ready for styling. CHEMICAL FLEA DIPS Some pets may require a chemical flea and tick dip. This does not mean that you submerge the pet in water. This just means that a special solution needs to be applied to kill the fleas and ticks. The dip must be prepared according to the manufacture's instructions. NOTE: Making the solution stronger can make a dog sick. If the pet does require a chemical flea dip and the pet is a Poodle, make sure to let the client know that their pet will go home curly and slightly damp. Once the dip is applied, the dog should not be dried with a forced dryer or cage dryer. It must dry naturally, therefore, not allowing for styling of the pet. Always ask for permission from the customer before applying any dips. Before applying the dip, take notice of the pet s eyes; make sure they are not red, make sure the gums are pink in color and make sure their breathing is normal. Before starting, apply a small amount of Vaseline on the vulva or penis area to protect it from accidental contact with the fluid. Wearing gloves, take the dip and fully saturate the coat, starting from the back of the head and neck and work the dip down the back of the neck, over the back, and down the legs, making sure to get between the toes. It is best to create a barrier around the neck, because fleas will naturally head for higher ground and want to run to the face. Dab the dip with a cotton swab and dab around the face being very careful not to get any on the pet's eyes, nose, mouth, or ear canal. Also, as previously mentioned, avoid the penis or vulva. xix


20 Once you have applied the dip, wait a few moments and watch for any reaction the pet may have. Some pets will have a reaction to dips. If you find this to be the case, rewash the dog immediately. With most reactions, the skin turns very red or the dog acts lethargic, starts to drool and displays labored breathing. If a reaction occurs, rinse the dip off, mention it to the owner so that they can watch the dog carefully for any further complications. Following are some pictures to help you identify them: FLEA TICK It is also important to understand the flea lifecycle. A single female flea may produce up to 2,000 eggs over her lifetime. Eggs hatch and can develop into adults within only three weeks. Adult female fleas feed by ingesting blood from your pet and subsequently lay eggs, which drop off your pet's coat. Within days, larvae hatch from the eggs and live undetected in your pet's surroundings, such as the carpet, bedding and other protected areas. Flea larvae spin a cocoon and when appropriately stimulated, a young adult flea emerges and jumps onto your pet to continue the life cycle. Dark specs that do not move on the pet indicate flea feces. xx
21 FLEAS Fleas can cause many problems to the pet such as: 1. Skin Eruptions 2. Dull Coat 3. Anemia 4. Dry Skin 5. Flea bite allergies 6. Internal parasites (worms) 7. Hot spots (moist eczema) 8. Extreme cases can cause death. SHEDDING TREATMENTS Some pets lose their undercoat twice a year while others shed regularly. This process is a natural event that allows the new coat to come in. All dogs shed; - some more then others. There is no such thing as a non-shedding dog; however shedding varies greatly from breed to breed. Dogs that shed less are more prone to getting matted if not properly groomed on a regular basis. How do you reduce shedding? Regular grooming will control the shedding. Most owners won t take the time to do regular brushing. Since the hair is going to fall out anyways, it is better for the owner to brush regularly to not to allow hair to end up all over the house. There are several products and supplements out there that help reduce shedding. A popular product is The Furminator. The basic steps are as follows: 1. Blow out the coat with a high-velocity dryer. 2. Use the shedding blade to remove most of the loose undercoat. 3. Apply the Furminator shampoo and let sit for about 5 minutes. 4. Rinse shampoo thoroughly from fur. 5. Apply Furminator conditioner and let sit for about 5 minutes. 6. Rinse conditioner thoroughly from fur. 7. Dry coat and use shedding blade to remove rest of loose undercoat. Dogs that are sprayed by a skunk Did you know that it takes up to two full weeks for the skunk smell to go away? Did you also know that humid or wet days can re-activate the skunk odor? What does this mean to a groomer? It means money in the pocket. Over 50% of people who have a pet sprayed by a skunk will take their pet to get a treatment. xxi
22 Washing or bathing a dog in tomato juice to remove skunk smell is a popular myth. It does have a small neutralizing effect, but all it really does is create a big mess. There is nothing more frustrating than having to remove tomatoes juice from all the walls after a dog shakes it off. Removing skunk spray is most effective during the first few hours after spraying. The following is an effective home remedy. Step 1 Mix 4 cups of hydrogen peroxide with 4 tablespoons of baking soda and 1 teaspoon of dish-washing liquid. Step 2 Put cotton balls in your pet's ears to protect the inner-ear tissue from the cleaning mixture which could easily drip in. Step 3 Wear rubber gloves to protect your hands during this process. Step 4 Start with the pet's head, taking care not to get the solution into his eyes, ears or mouth. Apply a drop of olive or baby oil to his eyes to prevent irritation. Step 5 Rub the mixture evenly into your pet's coat. Step 6 Rinse the coat with clean water. Step 7 Repeat if the smell persists. Use the solution immediately after preparation. Do not store unused solution. There are also many professional products out that are also effective. The most popular ones are: Skunk Off, PPP Skunk Odor Removal Shampoo and Nature s Miracle Skunk Odor Remover. xxii


.")
23 PET IS CLEAN, NOW WHAT? A key to steady hand scissoring is scissor exercises. The following pictures demonstrate scissor exercises that help you have a steady hand. The purpose of the exercises is to eliminate chopping work. The goal is to only move your thumb while other fingers keep the scissors steady. Practice this technique every night for at least 10 minutes. Put scissors under a table and push up as you open and close the scissors. You should be able to apply pressure against the table. Only your thumb should move. Be sure that your thumb does not slip all the way in the thumb ring. (Your ring finger and small finger should not be allowed to slip far into the ring either). Your middle and index finger should support the shaft of the scissor. Horizontal Exercise Horizontal Exercise This exercise will come in handy when trimming legs. Apply pressure towards the table. Vertical Exercise Vertical Exercise xxiii


24 Practice Cutting Straight Horizontal Lines Practice Cutting Straight Vertical Lines BLADE AND EQUIPMENT MAINTENANCE: We suggest that you maintain and clean your blades and clippers ONCE A WEEK: If you groom a dog that was especially dirty, clean your equipment prior tousing it on the next pet. Following is a link to educate you further on clipper and blade maintenance. Following is a link to educate you further on clipper and blade maintenance. CLIPPER BURN: This occurs when clippers are allowed to get too hot and the blade skimming against the pet s skin is shaved. You must learn to check the temperature of the blade often by laying the flat side of it on the inside of your wrist, just like you would check the temperature of a baby's milk bottle. To cool off a blade, use Kool Lube and spray on the blade for a few seconds, before you continue grooming. Having two sets of clipper blades is a good idea; this way you can switch back and forth. CLIPPER IRRITATION: This may occur after clipping a pet that has never been clipped before or is not groomed frequently enough to get the skin conditioned to be shaved. There are four ways you can cause irritation: xxiv
25 1. Shaving against the grain WITH a SHORT BLADE LIKE THE 10, 15, 30, or Shaving over and over in one spot too many times with a short blade, like a 15 or shorter. 3. Using a hot blade. 4. Using a dull blade. BLADES: #10: This is the most commonly used blade. You should have more than one of these blades. This blade is very good for clipping the under body and other sensitive areas. It is commonly used for stripping a dog as this blade leaves about 1/8th of hair on the dog. #7F: This is designed to finish clipper work and leave a nice smooth finish. It is a very handy blade to work on dog s faces with extremely sensitive skin. This blade leaves about 1/4th of hair on the dog. #7: This is a popular one for stripping down dogs with matted hair. The blade is a skipped tooth and should only be used by experienced groomers. There is a large gap between the teeth; therefore there is a higher chance of accidentally getting skin caught in them and having the cutting part of the blade nick the dog. #5F: This blade leaves a much smoother finish - about ½ of hair on the dog. #4F: This blade leaves about ¾ of hair on the dog. #3F: This blade leaves about 1 inch of a hair on the coat. HANDLING PROBLEM DOGS If you encounter a problem pet, this is what to do: 1. Hold the leash and head away from you and put your hand under the farthest end of the pet's body, lifting the pet to the table. 2. Use an Elizabethan collar or muzzle to keep it from biting you. 3. If you ve tried to calm the pet and it still does not cooperate, call the owner to come pick up the pet. NEVER ADMINISTER DRUGS: You are not a Veterinarian. Many owners will swear that their pet has never bit anyone. NEVER say NEVER! Give the pet the proper respect and offer a kind hand and a friendly voice; you will have a greater chance of not getting bit. If the pet does not cooperate, tell the owner to obtain a muzzle or suggest that the owner have the pet sedated. xxv
26 CLIPPING AGAINST THE GRAIN Sometimes you have to go against the grain with your clipper to get it right. To briefly explain, there are times when the hair is too short or lays too flat to allow for the blade to clip the hair at the desired length. When this is the case, it is time to reverse clip. Let s assume that you are asked to leave a ½ inch on the body and you find that the blade is not picking up all the hair evenly. Then the solution to the problem would be to use a 3F against the grain instead of the 5F with the grain. This technique also comes in handy when you find yourself with a dull 5F and you haven t finished the job. The following is a guideline for blades and reverse clipping. 3F 4F 5F 7F Reverse Blade Guideline Leaves 1 inch Against Grain Same As 5F With Grain with the Grain Leaves ¾ inch Against Grain Same As A little longer with the grain than 7F With Leaves1/2 inch with the grain Leaves ¼ inch with the grain Grain Against Grain Same As 7F With Grain Against Grain Same As 10 With Grain EAR INFECTIONS: PET HEALTH You will need to know the difference between a healthy ear and an unhealthy ear. an unhealthy ear is wet or damp and has a foul odor. They are usually DARK pink in color. Breeds with floppy ears are more susceptible to ear infections. A healthy ear is dry and free of odor. Breeds with erect ears usually do not suffer from chronic ear infections. KENNEL COUGH: Kennel Cough is a highly contagious disease. It can last from two weeks to two months at times. You should not accept a dog with kennel cough into your grooming area. Some dogs get excited and will start coughing especially if they are on a choke chain. Take the choke chain off and if he continues, ask the owner how long he has been coughing this way. If he says he's been acting like this for some time, then do NOT accept the dog into your shop. He needs to go to the veterinarian. xxvi
27 PARVO The canine parvo virus can be transmitted by direct contact or indirectly by contact with vomit, diarrhea or any contaminated discharges from an infected dog. It strikes with a quick vengeance and pet owners often make the comment that their dog was up and playing a few hours prior to the animal becoming extremely ill. Unfortunately, parvo is often fatal. The symptoms of parvo include. a sudden onset of vomiting, bloody diarrhea, dehydration, lethargy, high temperature and sometimes sudden death. Symptoms are similar in adults although they can be less acute. Because parvo attacks swiftly, time is of the essence. If you feel a dog has been exposed to parvo or is showing symptoms, contact your veterinarian or an emergency veterinary hospital immediately. THE FOLLOWING ARE SKIN DISORDERS YOU SHOULD BECOME FAMILIAR WITH. Dermatitis: Dermatitis is considered to be any form of skin inflammation. It may appear as scales or scabs. The pet will itch and scratch on the areas. The skin can become infected and can be treated with antibiotics. Eczema: This is known as hot spots or dry skin. A veterinarian will prescribe ointments. Hematoma: This appears when a blood vessel is broken. The skin swells and appears as a soft, red bump. Mange: There are two types of mange: demodectic mange, sometimes known as red mange, and sarcoptic mange, also called scabies. Most dogs with demodectic mange also called Red Mange have some form of mites. This mange is not contagious has three forms, Localized, Generalized, and Pododermatis. The mange has a scaly looking coat or loss of hair around the eyes, mouth and front legs. Along with loss of hair, the skin will turn red and become thick and wrinkled. The skin does not itch. xxvii


28 DEMODECTIC MANGE Pictures courtesy of Localized Generalized Pododermatitis Refer to the following link for further education on Demodectic mange: Sarcoptic mange attacks the entire body of the dog. This particular mange is highly contagious. Dogs with this condition have red, crusty skin with moist areas. There is a musty order and an intense itch. SARCOPTIC MANGE PICTURE COURTESY OF: If you notice these conditions on a dog, notified the owner and tell him the dog shou ld see a veterinarian. A dog with demodectic mange can be groomed, but you should be careful and make sure to disinfect everything after you use them. A DOG WITH SARCOPTIC MANGE SHOULD NOT ENTER YOUR GROOMING AREA. IT IS HIGHLY CONTAGIOUS AND CAN BE TRANSMITTED TO DOGS AND HUMANS For further education on sarcoptic mange, please click on the following link: Be sure to view the Pet Hygiene Videos as there is a wealth of information within them! xxviii
29 Teddy Head Clip This is a finished Teddy head for Yorkies, Maltese, Shih Tzu, Lhasa Apso, and other small mixed breeds. xxix
30 xxx
31 xxxi
32 Notes xxxii
33 Dog Breeds Step By Step Grooming 1

34 AFFENPINSCHER Tools Needed Slicker Brush, Comb, Nail Clipper, Straight Shears Thinning Shears (for a more natural look) or Curved Shears Clipper, #10 blade, #15 or #40 blade Additional Items: Ear cleaner, shampoo, conditioner, spray cologne, ribbon or bandana First Step: Use cotton balls dampened with ear cleaner to clean the insides of the ears. 2
35 Second Step: Use your nail clippers to cut the nails. Cut the tip of the nails being careful not to cut the quick. If you cut the quick, use your gel or powder blood stopper to stop the bleeding. Third Step: Use your #15 blade (Yvonne prefers #40 blade) on your clipper to remove the hair from between the pads. Use thinning shears to remove any straggly hair between and around paws. Fourth Step: For the sanitary trim, use your #10 blade on your clipper and clip the hair from the rectal area ½ inch on all sides of the rectum. Be careful not to touch the rectum area! Fifth Step: Use your slicker brush and brush entire coat thoroughly. If you encounter any matted areas on the body or beard, use your comb and remove all mats before bathing. Sixth Step: Bath Time Use your favorite shampoo. Wet the dog first and then apply the shampoo. Shampoo the dog creating a nice lather on entire body, head, legs, and feet. (Be careful not to get any water inside the ears.) Rinse the dog until lather is completely gone. Condition (if desired) after rinsing, making sure you rinse the conditioner out before drying. As part of the dog s bath make sure you: Brush teeth to remove food debris. Seventh Step: After bathing, use a towel to remove any excess water. Then use your blow dryer to dry the dog thoroughly or cage dry. Eighth Step: Comb and Fluff. Use thinning shears to smooth out coat. Ninth Step: Use your shears and round the hair on the outside edges of all feet. Tenth Step: Use your #10 blade to trim the ears, from the base to the tips. Use your shears to trim the outside edges of the ears for neatness. 3
36 Eleventh Step: Use your shears so the eyebrows appear like a visor with no space between them. Make sure they are even on both sides starting from the center of the eyebrows to the outside. Use thinning shears to trim the hair from the outside of the eyebrows to the base of the ears. Twelfth Step: Use your shears and round out outside edges of beard, keeping the fullness. Thirteenth Step: Hand rub conditioner onto coat. cologne. You may also want to lightly spray coat with Final Step: Step away from the dog and take a final look at your work to make sure you are satisfied. After completing any finishing touches, place a bandana around the neck if a boy, or a ribbon if a girl. Make sure you compliment the dog on what a good dog they have been, and how handsome or beautiful he or she looks. Call the owner to have him/her picked up. You re done! Become a Certified Pet Groomer Hands On Wag My Tail Pet Grooming School Wag-MyTail Online Order DVDs 4
37 Notes 5

38 AFGHAN HOUND Tools Needed Slicker Brush, Comb, Brush (soft), Dematting Comb or Rake Nail Clipper, Straight Shears Thinning Shears (for a more natural look) or Curved Shears Clipper, #10 blade, #15 or #40 blade Additional Items: Ear cleaner, medicated ear powder, shampoo, cream rinse, conditioner, spray cologne, ribbon or bandana First Step: Use medicated powder lightly to dry ears. Gently pull out any dead hair. Use cotton balls dampened with ear cleaner to clean the inside of the ears. Second Step: Use your nail clippers to cut the nails. Cut the tip of the nails being careful not to cut the quick. If you cut the quick, use your gel or powder blood stopper to stop the bleeding. 6
39 Third Step: Use your #15 blade (Yvonne prefers #40 blade) on your clipper to remove the hair from between the pads. Fourth Step: For the sanitary trim, use your #10 blade on your clipper and clip the hair from the rectal area ½ inch on all sides of the rectum. Be careful not to touch the rectum area! Fifth Step: Use your #10 blade to trim hair from the groin to the naval. Sixth Step: Use your slicker brush and brush entire coat thoroughly. If you encounter any matted areas, use your dematting comb or rake and remove all mats before bathing. Seventh Step: Bath Time Use your favorite shampoo. Wet the dog first and then apply the shampoo. Shampoo the dog creating a nice lather on entire body, head, legs, and feet. (Be careful not to get any water inside the ears.) Rinse the dog until lather is completely gone. Crème Rinse (if desired) after rinsing shampoo out. Leave on for a few minutes and rinse thoroughly before drying. As part of the dog s bath make sure you: Brush teeth to remove food debris. Eighth Step: After bathing, use a towel to remove any excess water. Then use your blow dryer to dry the dog thoroughly or cage dry. Ninth Step: The hocks on the back legs can be shown off by brushing the hair close to the leg. The bend in the stifle on the rear legs, can be shown off by brushing the hair forward. Tenth Step: Part the hair on the head down the middle, from the base of the skull to the top of the skull where it ends naturally. Comb hair down on both sides of the head. Alternative topknot styling: Comb hair forward and upward for a natural appearance. Eleventh Step: Spray coat with conditioner. Comb through. You may also want to spray coat with cologne. Final Step: Step away from the dog and take a final look at your work to make sure you are satisfied. If satisfied call mom or dad and have him/her picked up. 7

40 AIREDALE TERRIER Tools Needed Rubber Brush, Dematting Comb or Rake Nail Clipper, Straight Shears Thinning Shears (for a more natural look) or Curved Shears Clipper, #15 or #40 Blade, #10 blade, #5F blade, #7F or #8 ½ blade Additional Items: Ear cleaner, medicated ear powder, shampoo, conditioner, spray cologne, ribbon or bandana 8
41 First Step: Use medicated powder lightly to dry ears. Gently pull out any dead hair. Use cotton balls dampened with ear cleaner to clean the inside of the ears. Second Step: Use your nail clippers to cut the nails. Cut the tip of the nails being careful not to cut the quick. If you cut the quick, use your gel or powder blood stopper to stop the bleeding. Third Step: Use your #15 blade (Yvonne prefers #40 blade), on your clipper to remove the hair from between the pads. Fourth Step: For your sanitary trim, use your #10 blade on your clipper and clip the hair from the rectal area ½ inch on all sides of the rectum. Be careful not to touch the rectum area! Fifth Step: Use your slicker brush and brush entire coat thoroughly. If you encounter any matted areas, use your dematting comb or rake and remove all mats before bathing. Sixth Step: Bath Time Use your favorite shampoo. Wet the dog first and then apply the shampoo. Shampoo the dog creating a nice lather on entire body, head, legs, and feet. (Be careful not to get any water inside the ears.) Rinse the dog until lather is completely gone. Condition (if desired) after rinsing, making sure you rinse the conditioner out before drying. As part of the dog s bath make sure you: Brush teeth to remove food debris. Seventh Step: After bathing, use a towel to remove any excess water. Then use your blow dryer to dry the dog thoroughly or cage dry. Comb and fluff. Eighth Step: BODY Use either your #5F, #7F or #8 ½ blade and follow the natural direction of the hair growth. Using the breastbone as your guide, clip in this order: 1) Base of skull down to back of the base of the tail. 2) Clip the entire tail. 3) Down the sides of the neck to the shoulder and ending at the elbow in front. 4) Down the sides of the body past the flank at rear and ending at the hip on the hind legs. 5) Down the chest and shoulders to the front arm and the elbow at the side. 9
42 Ninth Step: FACE Use your #10 blade. 1) Comb hair forward around eyes. Clip from the upper part of the eye socket to the base of the skull. 2) Clip from the outside part of the eye to the base of the ear. 3) Clip cheek starting at outside corner of the eye. Tenth Step: EARS Use your #10 blade. 1) Clip both sides of the ears starting at base of ears. 2) Use shears to even out edges of ears. Eleventh Step: EYEBROWS Use your thinning shears/comb. 1) Comb eyebrows forward and create a V shape with thinning shears by removing extra hair. 2) Diagonally trim eyebrows from the outside to the center. A triangular shape is desired. Twelfth Step: MUZZLE/BEARD Use your thinning shears. 1) Trim extra hair from top of muzzle. 2) Comb beard forward and thin from corner of mouth to corner of eyebrow. Line should appear straight. 3) Shape beard into a barrel shape. Thin if necessary. 10
43 Thirteenth Step: UNDERCHEST/FORECHEST/LEGS Use your shears/thinning shears. 1) With shears trim underchest hair from elbow pointing toward flank and following body lines. 2) Use your shears to shape front legs. They should be straight with legs full and rounded. 3) Use thinning shears to shape rear legs. The hip and leg should be smoothly blended. 4) Use your thinning shears to smooth out forechest. 5) Use your shears to round off feet. Fourteenth Step: Hand rub conditioner into coat. You may also want to spray coat with cologne. Final Step: Step away from the dog and take a final look at your work to make sure you are satisfied. Call mom or dad and have him/her picked up. 11

44 AKITA Tools Needed Slicker Brush, Comb, Dematting Comb or Rake, Shedding Blade Nail Clipper, Straight Shears Thinning Shears (for a more natural look) or Curved Shears Additional Items: Ear cleaner, shampoo, spray cologne, ribbon or bandana First Step: Use cotton balls dampened with ear cleaner to clean the inside of the ears. 12
45 Second Step: Use your nail clippers to cut the nails. Cut the tip of the nails being careful not to cut the quick. If you cut the quick, use your gel or powder blood stopper to stop the bleeding. Third Step: Use your slicker brush and brush entire coat thoroughly. If you encounter any matted areas, use your dematting comb or rake and remove all mats before bathing. Remove any dead hair with your shedding blade. Fourth Step: Bath Time Use your favorite shampoo. Wet the dog first and then apply the shampoo. Shampoo the dog creating a nice lather on entire body, head, legs, and feet. (Be careful not to get any water inside the ears.) Rinse the dog until lather is completely gone. Condition (if desired) after rinsing, making sure you rinse the conditioner out before drying. As part of the dog s bath make sure you: Brush teeth to remove food debris. Option: De-shed Treatment Fifth Step: After bathing, use a towel to remove any excess water. Then use your blow dryer to dry the dog thoroughly or cage dry. Sixth Step: Use your shears and clean up the whiskers and any long hair on the face, over the eyes and on the muzzle. Seventh Step: Use thinning shears or curved shears to remove any straggly hair between and around paws. Final Step: Step away from the dog and take a final look at your work to make sure you are satisfied. After completing any finishing touches, place a bandana around the neck if a boy, or a ribbon if a girl. You can also lightly spray cologne on the coat. Make sure you compliment the dog on what a good dog they have been, and how handsome or beautiful he or she looks. Call the owner to have him/her picked up. You re done! 13
 or Curved Shears Additional Items: bandana Ear cleaner, shampoo, conditioner, spray cologne, ribbon or")
46 ALASKAN MALAMUTE Tools Needed Slicker Brush, Comb, Dematting Comb or Rake Nail Clipper, Straight Shears Thinning Shears (for a more natural look) or Curved Shears Additional Items: bandana Ear cleaner, shampoo, conditioner, spray cologne, ribbon or 14
47 First Step: Use cotton balls dampened with ear cleaner to clean the inside of the ears. Second Step: Use your nail clippers to cut the nails. Cut the tip of the nails being careful not to cut the quick. If you cut the quick, use your gel or powder blood stopper to stop the bleeding. Third Step: Use your slicker brush and brush entire coat thoroughly. If you encounter any matted areas, use your dematting comb or rake and r Option: De-shed Treatment emove all mats before bathing. Fourth Step: Bath Time Use your favorite shampoo. Wet the dog first and then apply the shampoo. Shampoo the dog creating a nice lather on entire body, head, legs, and feet. (Be careful not to get any water inside the ears.) Rinse the dog until lather is completely gone. Condition after rinsing (optional), making sure you rinse the conditioner out before drying. As part of the dog s bath make sure you: Brush teeth to remove food debris. Option: De-shed Treatment Fifth Step: After bathing, use a towel to remove any excess water. Then use your blow dryer to dry the dog thoroughly or cage dry. Sixth Step: Comb and fluff. Seventh Step: Use thinning shears or curved shears to remove any straggly hair between and around paws. Eighth Step: Use your shears and clean up the whiskers and any long hair on the face, over the eyes and on the muzzle. Ninth Step: You may want to lightly spray coat with cologne. Final Step: Step away from the dog and take a final look at your work to make sure you are satisfied. After completing any finishing touches, place a bandana around the neck if a boy, or a ribbon if a girl. Call the owner to have him/her picked up. You re done! 15

48 AMERICAN ESKIMO Tools Needed Slicker Brush, Dematting Comb or Rake, Comb Nail Clipper, Straight Shears Thinning Shears (for a more natural look) or Curved Shears Additional Items: bandana Ear cleaner, shampoo, conditioner, spray cologne, ribbon or First Step: Use cotton balls dampened with ear cleaner to clean the inside of the ears. Second Step: Use your nail clippers and cut the nails. Cut the tip of the nails and be careful not to cut the quick. If you cut the quick, use your gel or powder blood stopper to stop the bleeding. 16
49 Third Step: Use your slicker brush and brush entire coat thoroughly. If you encounter any matted areas, use your dematting comb or rake and re Option: De-shed Treatment move all mats before bathing. Fourth Step: Bath Time Use your favorite shampoo. Wet the dog first and then apply the shampoo. Shampoo the dog creating a nice lather on entire body, head, legs, and feet. (Be careful not to get any water inside the ears.) Rinse the dog until lather is completely gone. Condition (if desired) after rinsing, making sure you rinse the conditioner out before drying. As part of the dog s bath make sure you: Brush teeth to remove food debris. Option: De-shed Treatment Fifth Step: After bathing, use a towel to remove any excess water. Then use your blow dryer to dry the dog thoroughly or cage dry. Sixth Step: Comb and fluff. Seventh Step: Use your shears and clean up the whiskers and any long hair on the face, over the eyes and on the muzzle. Eighth Step: Use you thinning shears (for a more natural look) or curved shears to clean up straggly hair around and between the toes and paws. Ninth Step: Spray coat with conditioner. Comb through. You may also want to lightly spray coat with cologne. Final Step: Step away from the dog and take a final look at your work to make sure you are satisfied. After completing any finishing touches, place a bandana around the neck if a boy, or a ribbon if a girl. Make sure you compliment the dog on what a good dog they have been, and how handsome or beautiful he or she looks. Call the owner to have him/her picked up. You re done! 17

50 AMERICAN STAFFORDSHIRE TERRIER Tools Needed Rubber Brush Nail Clipper, Straight Shears Additional Items: bandana Ear cleaner, shampoo, conditioner, spray cologne, ribbon or First Step: Use cotton balls dampened with ear cleaner to clean the inside of the ears. Second Step: Use your clippers to cut the nails. Cut the tip of the nails and be careful not to cut the quick. If you cut the quick, use your gel or powder blood stopper to stop the bleeding. 18
51 Third Step: Use your rubber brush and brush entire coat thoroughly. Fourth Step: Bath Time Use your favorite shampoo. Wet the dog first and then apply the shampoo. Shampoo the dog creating a nice lather on entire body, head, legs, and feet. (Be careful not to get any water inside the ears.) Rinse the dog until lather is completely gone. Condition after rinsing, making sure you rinse the conditioner out before drying. As part of the dog s bath make sure you: Brush teeth to remove food debris. Option: De-shed Treatment Fifth Step: After bathing, use a towel to remove any excess water. Then use your blow dryer to dry the dog thoroughly or cage dry. Sixth Step: Use your shears and clean up the whiskers and any long hair on the face, over the eyes and on the muzzle. Seventh Step: Hand rub conditioner onto coat. Massage to create sheen. You may also want to lightly spray coat with cologne. Final Step: Step away from the dog and take a final look at your work to make sure you are satisfied. After completing any finishing touches, place a bandana around the neck if a boy, or a ribbon if a girl. Make sure you compliment the dog on what a good dog they have been, and how handsome or beautiful he or she looks. Call the owner to have him/her picked up. You re done! 19

52 AMERICAN WATER SPANIEL Tools Needed Slicker Brush, Comb Straight Shears, Nail Clipper, Thinning Shears (for a more natural look) or Curved Shears Clipper, #10 blade, #15 or #40 Blade Additional Items: Ear cleaner, medicated ear powder, shampoo, conditioner, spray cologne, ribbon or bandana First Step: Use medicated powder to lightly dry ears and pull out any dead hair. Use cotton balls dampened with ear cleaner to clean the inside of the ears. 20
53 Second Step: Use your nail clippers and cut the nails. Cut the tip of the nails and be careful not to cut the quick. If you cut the quick, use your gel or powder blood stopper to stop the bleeding. Third Step: Use your #15 blade (Yvonne prefers #40 blade) on your clipper to remove the hair from between the pads. Use thinning shears to remove any straggly hair between and around paws. Fourth Step: For the sanitary trim, use your #10 blade on your clipper and clip the hair from the rectal area ½ inch on all sides of the rectum. Be careful not to touch the rectum area! Fifth Step: Use your slicker brush and brush entire coat thoroughly. If you encounter any matted areas, use your dematting comb and remove all mats before bathing. Sixth Step: Bath Time Use your favorite shampoo. Wet the dog first and then apply the shampoo. Shampoo the dog creating a nice lather on entire body, head, legs, and feet. (Be careful not to get any water inside the ears.) Rinse the dog until lather is completely gone. Condition (if desired) after rinsing, making sure you rinse the conditioner out before drying. As part of the dog s bath make sure you: Brush teeth to remove food debris. Seventh Step: After bathing, use a towel to remove any excess water. Then use your blow dryer to dry the dog completely or cage dry. Eighth Step: Use your shears and round the hair on the outside edges of the feet. Use shears to clean up the whiskers and any long hair on the face, over the eyes and on the muzzle. Ninth Step: Use your thinning shears to shorten any uneven hair on the head, body and tail. Tenth Step: Spray coat with conditioner. Use comb to create sheen. You may also want to lightly spray coat with cologne. You re Done! 21

54 ANATOLIAN SHEPHERD Tools Needed Rubber Brush, Bristle Brush (stiff) Nail Clipper, Straight Shears Additional Items: bandana Ear cleaner, shampoo, conditioner, spray cologne, ribbon or First Step: Use cotton balls dampened with ear cleaner to clean the inside of the ears. 22
55 Second Step: Use your nail clippers and cut the nails. Cut the tip of the nails and be careful not to cut the quick. If you cut the quick, use your gel or powder blood stopper to stop the bleeding. Third Step: Use your rubber brush and brush entire coat thoroughly. Fourth Step: Bath Time. Use your favorite shampoo. Wet the dog first and then apply the shampoo. Shampoo the dog creating a nice lather on entire body, head, legs, and feet. (Be careful not to get any water inside the ears.) Rinse the dog until lather is completely gone. Clean wrinkles on body. Wash any folds on face. Condition (if desired) after rinsing, making sure you rinse the conditioner out before drying. As part of the dog s bath make sure you: Brush teeth to remove food debris. Option: De-shed Treatment Fifth Step: After bathing, use a towel to remove any excess water. Then use your blow dryer to dry the dog thoroughly or cage dry. Sixth Step: Use your shears to clean up the whiskers. Seventh Step: Spray coat with conditioner. You may also want to lightly spray coat with cologne. Final Step: Step away from the dog and take a final look at your work to make sure you are satisfied. After completing any finishing touches, place a bandana around the neck if a boy, or a ribbon if a girl. Make sure you compliment the dog on what a good dog they have been, and how handsome or beautiful he or she looks. Call the owner to have him/her picked up. You re done! 23

56 AUSTRALIAN CATTLE DOG Tools Needed Slicker Brush, Comb, Shedding Blade Nail Clipper Additional Items: Ear cleaner, shampoo, conditioner, spray cologne, ribbon or bandana First Step: Use cotton balls dampened with ear cleaner to clean the inside of the ears. Second Step: Use your nail clippers and cut the nails. Cut the tip of the nails and be careful not to cut the quick. If you cut the quick, use your gel or powder blood stopper to stop the bleeding. 24
57 Third Step: Use your slicker brush and brush entire coat thoroughly. shedding hair use your shedding blade. For large amounts of Fourth Step: Bath Time Use your favorite shampoo. Wet the dog first and then apply the shampoo. Shampoo the dog creating a nice lather on entire body, head, legs, and feet. (Be careful not to get any water inside the ears.) Rinse the dog until lather is completely gone. Condition (if desired) after rinsing, making sure you rinse the conditioner out before drying. As part of the dog s bath make sure you: Brush teeth to remove food debris. Option: De-shed Treatment Fifth Step: After bathing, use a towel to remove any excess water. Then use your blow dryer to dry the dog thoroughly or cage dry. Sixth Step: Spray coat with conditioner and comb through. You may also want to lightly spray coat with cologne. Final Step: Step away from the dog and take a final look at your work to make sure you are satisfied. After completing any finishing touches, place a bandana around the neck if a boy, or a ribbon if a girl. Make sure you compliment the dog on what a good dog they have been, and how handsome or beautiful he or she looks. Call the owner to have him/her picked up. You re done! 25

58 AUSTRALIAN SHEPHERD Tools Needed Slicker Brush, Comb, Dematting Comb or Rake Nail Clipper, Straight Shears Thinning Shears (for a more natural look) or Curved Shears Additional Items: bandana Ear cleaner, shampoo, conditioner, spray cologne, ribbon or First Step: Use cotton balls dampened with ear cleaner to clean the inside of the ears. Second Step: Use your nail clippers and cut the nails. Cut the tip of the nails and be careful not to cut the quick. If you cut the quick, use your gel or powder blood stopper to stop the bleeding. 26
59 Third Step: Use thinning shears or curved shears to remove any straggly hair between and around paws. Fourth Step: Use your slicker brush and brush entire coat thoroughly. If you encounter any matted areas, use your dematting comb or rake and remove all mats before bathing. Fifth Step: Bath Time Use your favorite shampoo. Wet the dog first and then apply the shampoo. Shampoo the dog creating a nice lather on entire body, head, legs, and feet. (Be careful not to get any water inside the ears.) Rinse the dog until lather is completely gone. Condition (if desired) after rinsing, making sure you rinse the conditioner out before drying. As part of the dog s bath make sure you: Brush teeth to remove food debris. Option: De-shed Treatment Sixth Step: After bathing, use a towel to remove any excess water. Then use your blow dryer to dry the dog thoroughly or cage dry. Seventh Step: Use your shears and clean up the whiskers and any long hair on the face, over the eyes and on the muzzle. Eighth Step: Comb and fluff. Ninth Step: Spray coat with conditioner and comb through. You may also want to lightly spray coat with cologne. Final Step: Step away from the dog and take a final look at your work to make sure you are satisfied. After completing any finishing touches, place a bandana around the neck if a boy, or a ribbon if a girl. Make sure you compliment the dog on what a good dog they have been, and how handsome or beautiful he or she looks. Call the owner to have him/her picked up. You re done! 27

60 AUSTRALIAN TERRIER Tools Needed Slicker Brush, Comb, Dematting Comb or Rake Nail Clipper, Straight Shears Thinning Shears (for a more natural look) or Curved Shears Clipper, #10 blade, #15 or #40 blade Additional Items: bandana Ear cleaner, shampoo, conditioner, spray cologne, ribbon or First Step: Use cotton balls dampened with ear cleaner to clean the inside of the ears. Second Step: Use your nail clippers to cut the nails. Cut the tip of the nails being careful not to cut the quick. If you cut the quick, use your gel or powder blood stopper to stop the bleeding. 28
61 Third Step: Use your #15 blade (Yvonne prefers #40 blade), on your clipper to remove the hair from between the pads. Fourth Step: For the sanitary trim, use your #10 blade on your clipper and clip the hair from the rectal area ½ inch on all sides of the rectum. Be careful not to touch the rectum area! Fifth Step: Use your #10 blade to trim hair from the groin to the navel. Sixth Step: Use your slicker brush and brush entire coat thoroughly. If you encounter any matted areas, use your dematting comb or rake and remove all mats before bathing. Seventh Step: Bath Time Use your favorite shampoo. Wet the dog first and then apply the shampoo. Shampoo the dog creating a nice lather on entire body, head, legs, and feet. (Be careful not to get any water inside the ears.) Rinse the dog until lather is completely gone. Condition (if desired) after rinsing, making sure you rinse the conditioner out before drying. As part of the dog s bath make sure you: Brush teeth to remove food debris. Eighth Step: After bathing, use a towel to remove any excess water. Then use your blow dryer to dry the dog thoroughly or cage dry. Ninth Step: Comb and Fluff. Tenth Step: Use your thinning shears and clean up the neck, body, tail and hair under eyes. Eleventh Step: Use your #10 blade to trim hair off back of ears. Twelfth Step: Use your thinning shears to feather the front legs up to the elbow. Leave feathering on the back of legs above the hocks. Thirteenth Step: Use your shears to feather the tail evenly. Leave hair on tip. 29
62 Fourteenth Step: Use a brush and comb to train the topknot upward. Use shears to blend hair between eyes into topknot. Fifteenth Step: Use your shears to round off edges of feet. Sixteenth Step: Spray coat with conditioner. Comb through. You may also want to lightly spray coat with cologne. Final Step: Place a bandana around the neck if a boy, or a ribbon if a girl. Call the owner to have him/her picked up. You re done! *Make sure to register at and watch streaming videos on selected dog breeds! Become a Certified Pet Groomer Hands On Wag My Tail Pet Grooming School Wag-MyTail Online Order DVDs 30
63 Notes 31

64 BASENJI Tools Needed Rubber Brush Nail Clipper, Straight Shears Additional Items: bandana Ear cleaner, shampoo, conditioner, spray cologne, ribbon or 32
65 First Step: Use cotton balls dampened with ear cleaner to clean the inside of the ears. Second Step: Use your clippers and cut the nails. Cut the tip of the nails and be careful not to cut the quick. If you cut the quick, use your gel or powder blood stopper to stop the bleeding. Third Step: Use your rubber brush and brush entire coat thoroughly. Fourth Step: Bath Time Use your favorite shampoo. Wet the dog first and then apply the shampoo. Shampoo the dog creating a nice lather on entire body, head, legs, and feet. (Be careful not to get any water inside the ears.) Rinse the dog until lather is completely gone. Condition (if desired) after rinsing, making sure you rinse the conditioner out before drying. As part of the dog s bath make sure you: Brush teeth to remove food debris. Option: De-shed Treatment Fifth Step: After bathing, use a towel to remove any excess water. Then use your blow dryer to dry the dog thoroughly or cage dry. Sixth Step: Use your shears and clean up the whiskers and any long hair on the face, over the eyes and ears and on the muzzle. Seventh Step: Hand rub conditioner onto coat. Massage to increase natural gloss. You may also want to lightly spray coat with cologne. Final Step: Step away from the dog and take a final look at your work to make sure you are satisfied. After completing any finishing touches, place a bandana around the neck if a boy, or a ribbon if a girl. Make sure you compliment the dog on what a good dog they have been, and how handsome or beautiful he or she looks. Call the owner to have him/her picked up. You re done! 33

66 BASSET HOUND Tools Needed Rubber Brush Nail Clipper, Straight Shears Additional Items: Ear cleaner, shampoo, conditioner, spray cologne, ribbon or bandana 34
67 First Step: Use cotton balls dampened with ear cleaner to clean the inside of the ears. Second Step: Use your nail clippers and cut the nails. Cut the tip of the nails and be careful not to cut the quick. If you cut the quick, use your gel or powder blood stopper to stop the bleeding. Third Step: Use your rubber brush and brush entire coat thoroughly. Fourth Step: Bath Time Use your favorite shampoo. Wet the dog first and then apply the shampoo. Shampoo the dog creating a nice lather on entire body, head, legs, and feet. Clean wrinkles on body. Wash any folds on face. (Be careful not to get any water inside the ears.) Rinse the dog until lather is completely gone. Condition (if desired) after rinsing, making sure you rinse the conditioner out before drying. As part of the dog s bath make sure you: Brush teeth to remove food debris. Option: De-shed Treatment Fifth Step: After bathing, use a towel to remove any excess water. Then use your blow dryer to dry the dog thoroughly or cage dry. Sixth Step: Use your scissors and clean up the whiskers. Seventh Step: Hand rub conditioner onto coat. Massage to create a natural gloss. You may also want to lightly spray coat with cologne. Final Step: Step away from the dog and take a final look at your work to make sure you are satisfied. After completing any finishing touches, place a bandana around the neck if a boy, or a ribbon if a girl. Make sure you compliment the dog on what a good dog they have been, and how handsome or beautiful he or she looks. Call the owner to have him/her picked up. You re done! 35

68 BEAGLE Tools Needed Rubber Brush Nail Clipper, Straight Shears Additional Items: bandana Ear cleaner, shampoo, conditioner, spray cologne, ribbon or 36
69 First Step: Use cotton balls dampened with ear cleaner to clean the inside of the ears. Second Step: Use your clippers and cut the nails. Cut the tip of the nails and be careful not to cut the quick. If you cut the quick, use your gel or powder blood stopper to stop the bleeding. Third Step: Use your rubber brush and brush entire coat thoroughly. Fourth Step: Bath Time Use your favorite shampoo. Wet the dog first and then apply the shampoo. Shampoo the dog creating a nice lather on entire body, head, legs, and feet. (Be careful not to get any water inside the ears.) Rinse the dog until lather is completely gone. Condition (if desired) after rinsing, making sure you rinse the conditioner out before drying. As part of the dog s bath make sure you: Brush teeth to remove food debris. Option: De-shed Treatment Fifth Step: After bathing, use a towel to remove any excess water. Then use your blow dryer to dry the dog thoroughly or cage dry. Sixth Step: Use your shears and clean up the whiskers on the muzzle. Seventh Step: Hand rub conditioner onto coat. Massage to create a natural gloss. You may also want to spray coat with cologne. Final Step: Step away from the dog and take a final look at your work to make sure you are satisfied. After completing any finishing touches, place a bandana around the neck if a boy, or a ribbon if a girl. Make sure you compliment the dog on what a good dog they have been, and how handsome or beautiful he or she looks. Call the owner to have him/her picked up. You re done! 37

70 BEARDED COLLIE Tools Needed Slicker Brush, Comb, Dematting Comb or Rake, Pin Brush Nail Clipper, Straight Shears Clipper, #10 blade, #15 or #40 blade Additional Items: Ear cleaner, medicated ear powder, shampoo, crème rinse, conditioner, spray cologne, ribbon or First Step: Use medicated powder lightly to dry ears. Gently pull out any dead hair. Use cotton balls dampened with ear cleaner to clean the inside of the ears. 38
71 Second Step: Use your nail clippers to cut the nails. Cut the tip of the nails being careful not to cut the quick. If you cut the quick, use your gel or powder blood stopper to stop the bleeding. Third Step: Use your #15 blade (Yvonne prefers #40 blade), on your clipper to remove the hair from between the pads. Fourth Step: For the sanitary trim, use your #10 blade on your clipper and clip the hair from the rectal area ½ inch on all sides of the rectum. Be careful not to touch the rectum area! Fifth Step: Use your #10 blade to trim the hair from the groin to the navel. Sixth Step: Use your slicker brush and brush entire coat thoroughly. If you encounter any matted areas, use your dematting comb or rake and remove all mats before bathing. Seventh Step: Bath Time Use your favorite shampoo. Wet the dog first and then apply the shampoo. Shampoo the dog creating a nice lather on entire body, head, legs, and feet. (Be careful not to get any water inside the ears.) Rinse the dog until lather is completely gone. Crème Rinse after rinsing shampoo out, making sure you rinse the crème rinse out before drying. As part of the dog s bath make sure you: Brush teeth to remove food debris. Eighth Step: After bathing, use a towel to remove any excess water. Then use your blow dryer to dry the dog thoroughly or cage dry. Ninth Step: Comb and fluff. Tenth Step: Use your shears to round off feet. 39
72 Eleventh Step: Spray coat with conditioner. Comb through. Brush with your pin brush to create a fluffy look. Brush the legs and the sides down. You may also want to lightly spray coat with cologne. Final Step: Step away from the dog and take a final look at your work to make sure you are satisfied. After completing any finishing touches, place a bandana around the neck if a boy, or a ribbon if a girl. Make sure you compliment the dog on what a good dog they have been, and how handsome or beautiful he or she looks. Call the owner to have him/her picked up. You re done! *Make sure to register at and watch streaming videos on selected dog breeds! Become a Certified Pet Groomer Hands On Wag My Tail Pet Grooming School Wag-MyTail Online Order DVDs 40
73 Notes 41

74 BEAUCERON Tools Needed Rubber Brush Nail Clipper, Straight Shears Additional Items: Ear cleaner, shampoo, conditioner, spray cologne, ribbon or bandana 42
75 First Step: Use cotton balls dampened with ear cleaner to clean the inside of the ears. Second Step: Use your nail clippers to cut the nails. Cut the tip of the nails being careful not to cut the quick. If you cut the quick, use your gel or powder blood stopper to stop the bleeding. Third Step: Use your rubber brush and brush entire coat thoroughly. Fourth Step: Bath Time Use your favorite shampoo. Wet the dog first and then apply the shampoo. Shampoo the dog creating a nice lather on entire body, head, legs, and feet. (Be careful not to get any water inside the ears.) Rinse the dog until lather is completely gone. Condition (if desired) after rinsing, making sure you rinse the conditioner out before drying. As part of the dog s bath make sure you: Brush teeth to remove food debris. Option: De-shed Treatment Fifth Step: After bathing, use a towel to remove any excess water. Then use your blow dryer to dry the dog thoroughly or cage dry. Sixth Step: Use your shears to clean up the whiskers and any long hair on the face, over the eyes and on the muzzle. Seventh Step: Hand rub conditioner onto coat. Massage into coat to create sheen. You may also want to lightly spray coat with cologne. Final Step: Step away from the dog and take a final look at your work to make sure you are satisfied. After completing any finishing touches, place a bandana around the neck if a boy, or a ribbon if a girl. Make sure you compliment the dog on what a good dog they have been, and how handsome or beautiful he or she looks. Call the owner to have him/her picked up. You re done! 43

76 BEDLINGTON TERRIER Tools Needed Slicker Brush, Comb Nail Clipper, Straight Shears Clipper, #5F blade, #10 blade, #15 or #40 blade, #30 blade Additional Items: Ear cleaner, medicated ear powder, shampoo, conditioner, spray cologne, ribbon or bandana First Step: Use medicated powder lightly to dry ears. Gently pull out any dead hair. Use cotton balls dampened with ear cleaner to clean the inside of the ears. 44
77 Second Step: Use your nail clippers to cut the nails. Cut the tip of the nails being careful not to cut the quick. If you cut the quick, use your gel or powder blood stopper to stop the bleeding. Third Step: Use your #15 blade (Yvonne prefers #40 blade), on your clipper to remove the hair from between the pads. Fourth Step: For the sanitary trim, use your #10 blade on your clipper and clip the hair from the rectal area ½ inch on all sides of the rectum. Be careful not to touch the rectum area! Fifth Step: Use your #10 blade to trim the hair from the groin to the navel. Sixth Step: Use your slicker brush and brush entire coat thoroughly. If you encounter any matted areas, use your comb and remove all mats before bathing. Seventh Step: Bath Time Use your favorite shampoo. Wet the dog first and then apply the shampoo. Shampoo the dog creating a nice lather on entire body, head, legs, and feet. (Be careful not to get any water inside the ears.) Rinse the dog until lather is completely gone. Condition (if desired) after rinsing, making sure you rinse the conditioner out before drying. As part of the dog s bath make sure you: Brush teeth to remove food debris. Eighth Step: After bathing, use a towel to remove any excess water. Then use your blow dryer to dry the dog thoroughly or cage dry. Ninth Step: Comb and fluff. Tenth Step: BODY/ 1) Use your #5F blade and clip (making a line) starting at the withers (between the shoulder blades) down to the middle of the back and stop. Take your blade from the point of where you stopped and move one blade width over to the side and proceed to clip down to the back of the hip and stop and the base of the tail. Repeat this procedure on the other side. 45
78 2) Use your #5F blade to clip both sides to the hip line, so it is smooth and blends. Clip down to the hips, blending in with the legs. 3) Use your #5F to clip the side of the body towards the front down to the elbow. 4) Use your #5F blade to clip the chest starting at the throat and going to the sternum. 5) Use your shears to blend the chest and along the sides. 6) Use your shears to blend the hips and front legs with the body to give it a more nature look. Eleventh Step: LEGS 1) Use your shears to trim the front legs so they look tubular (straight and rounded). 2) Use your shears to trim the rear legs so the stifle shows a slight bend. 3) Use your shears to round off the feet. Twelfth Step: TAIL 1) Use your #10 or #15 blade against the grain and clip all the hair off the tail starting at the tip of the tail, leaving 1/3 of the tail un-shaved. 2) The 1/3 near the base of the tail should be blended in smoothly with the body and slightly tapering it. Thirteenth Step: THROAT/FACE/NECK 1) Use your #5F blade and clip starting at the lobe of the ear and clip all the way down the sides of the neck and the front of the neck. 2) Continue with the #5F and shave the back of the neck to the withers, creating a V shape from the base of the skull to the withers. 3) Use your #10 or #15 blade to mirror the V on the back of the head, on the throat. To do this, start at the lobe of the ear and clip down the throat and angle the clip towards the middle of the throat, creating the point of the V. 4) Use your #10 or #15 blade to cleanup the hair on the face, starting at the inside corner of the ear and ending at the outside corner of the eye. Continue from the corner of the eye to right down behind the corner of the mouth. 5) Use your #10 or #15 blade to trim under the jaw. Clean up around the lips by stretching them back. Do not clip the muzzle above the jaw. Fourteenth Step: EARS 1) Use your #30 blade and trim both sides of the ears, going with the grain. Start at the base stop about 1 ½ inch before the tip, leaving a diamond shaped tassel at the end of each ear. 2) Use your shears to neaten up the outside edges of the ears and to repeat your V shape at the end of the tassels. 46
 Use your shears to trim the muzzle so it blends in with the topknot. Trim it close on the sides and leave it full on the top.")
79 Fifteenth Step: HEAD 1) Use your shears to trim the head flat on the sides. It should blend smoothly up into a topknot. The topknot should blend into the neck at the back. 2) Use your shears to trim the muzzle so it blends in with the topknot. Trim it close on the sides and leave it full on the top. 3) Use your shears to create a rounded top which blends in with the muzzle and the V shaped neck. Blend the V shape on the back of the neck to give it a seamless look. Final Step: Step away from the dog and take a final look at your work to make sure you are satisfied. After completing any finishing touches, place a bandana around the neck if a boy, or a ribbon if a girl. Make sure you compliment the dog on what a good dog they have been, and how handsome or beautiful he or she looks. Call the owner to have him/her picked up. You re done! 47

80 BELGIAN MALINOIS Tools Needed Slicker Brush, Comb, Shedding Blade Straight Shears, Nail Clipper Thinning Shears (for a more natural look) or Curved Shears Additional Items: bandana Ear cleaner, shampoo, conditioner, spray cologne, ribbon or First Step: Use cotton balls dampened with ear cleaner to clean the inside of the ears. 48
81 Second Step: Use your nail clippers and cut the nails. Cut the tip of the nails and be careful not to cut the quick. If you cut the quick, use your gel or powder blood stopper to stop the bleeding. Third Step: Use your slicker brush and brush entire coat thoroughly. Remove any dead hair with shedding blade. Use thinning shears to remove any straggly hair between and around paws. Fourth Step: Bath Time Use your favorite shampoo. Wet the dog first and then apply the shampoo. Shampoo the dog creating a nice lather on entire body, head, legs, and feet. (Be careful not to get any water inside the ears.) Rinse the dog until lather is completely gone. Condition (if desired) after rinsing, making sure you rinse the conditioner out before drying. As part of the dog s bath make sure you: Brush teeth to remove food debris. Option: De-shed Treatment Fifth Step: After bathing, use a towel to remove any excess water. Then use your blow dryer to dry the dog thoroughly or cage dry. Sixth Step: Use your shears and clean up the whiskers and any long hair on the face, over the eyes and on the muzzle. Seventh Step: Use your thinning shears or curved shears to clean up the hair around the paws. Eighth Step: Spray coat with conditioner. Comb through. You may also want to lightly spray coat with cologne. Final Step: Step away from the dog and take a final look at your work to make sure you are satisfied. After completing any finishing touches, place a bandana around the neck if a boy, or a ribbon if a girl. Make sure you compliment the dog on what a good dog they have been, and how handsome or beautiful he or she looks. Call the owner to have him/her picked up. You re done! 49

82 BELGIAN SHEEPDOG Tools Needed Slicker Brush, Comb, Shedding Blade Straight Shears, Nail Clipper Thinning Shears (for a more natural look) or Curved Shears Additional Items: bandana Ear cleaner, shampoo, conditioner, spray cologne, ribbon or First Step: Use cotton balls dampened with ear cleaner to clean the inside of the ears. 50
83 Second Step: Use your nail clippers to cut the nails. Cut the tip of the nails and be careful not to cut the quick. If you cut the quick, use your gel or powder blood stopper to stop the bleeding. Third Step: Use thinning shears or curved shears to remove any straggly hair between and around paws. Fourth Step: Use your slicker brush and brush entire coat thoroughly. Remove any dead hair with your shedding blade. Fifth Step: Bath Time Use your favorite shampoo. Wet the dog first and then apply the shampoo. Shampoo the dog creating a nice lather on entire body, head, legs, and feet. (Be careful not to get any water inside the ears.) Rinse the dog until lather is completely gone. Condition (if desired) after rinsing, making sure you rinse the conditioner out before drying. As part of the dog s bath make sure you: Brush teeth to remove food debris. Option: De-shed Treatment Sixth Step: After bathing, use a towel to remove any excess water. Then use your blow dryer to dry the dog thoroughly or cage dry. Seventh Step: Comb and fluff. Eighth Step: Use your shears and clean up the whiskers and any long hair on the face, over the eyes and on the muzzle. Ninth Step: Spray coat with conditioner. Comb through. You may also want to lightly spray coat with cologne. Final Step: Step away from the dog and take a final look at your work to make sure you are satisfied. After completing any finishing touches, place a bandana around the neck if a boy, or a ribbon if a girl. Make sure you compliment the dog on what a good dog they have been, and how handsome or beautiful he or she looks. 51

84 BELGIAN TEVUREN Tools Needed Slicker Brush, Comb, Shedding Blade Nail Clipper, Straight Shears Thinning Shears (for a more natural look) or Curved Shears Additional Items: bandana Ear cleaner, shampoo, conditioner, spray cologne, ribbon or First Step: Use cotton balls dampened with ear cleaner to clean the inside of the ears. 52
85 Second Step: Use your nail clippers and cut the nails. Cut the tip of the nails and be careful not to cut the quick. If you cut the quick, use your gel or powder blood stopper to stop the bleeding. Third Step: Use thinning shears or curved shears to remove any straggly hair between and around paws. Fourth Step: Use your slicker brush and brush entire coat thoroughly. Remove any dead hair with your shedding brush. Fifth Step: Bath Time Use your favorite shampoo. Wet the dog first and then apply the shampoo. Shampoo the dog creating a nice lather on entire body, head, legs, and feet. (Be careful not to get any water inside the ears.) Rinse the dog until lather is completely gone. Condition (if desired) after rinsing, making sure you rinse the conditioner out before drying. As part of the dog s bath make sure you: Brush teeth to remove food debris. Option: De-shed Treatment Sixth Step: After bathing, use a towel to remove any excess water. Then use your blow dryer to dry the dog thoroughly or cage dry. Seventh Step: Use your shears and clean up the whiskers and any long hair on the face, over the eyes and on the muzzle. Eighth Step: Spray coat with conditioner. Comb through. You may also want to spray coat with cologne. Final Step: Step away from the dog and take a final look at your work to make sure you are satisfied. After completing any finishing touches, place a bandana around the neck if a boy, or a ribbon if a girl. Make sure you compliment the dog on what a good dog they have been, and how handsome or beautiful he or she looks. Call the owner to have him/her picked up. You re done! 53
 or Curved Shears Additional Items: bandana Ear cleaner, shampoo, conditioner, spray cologne, ribbon")
86 BERNESE MOUNTAIN DOG Tools Needed Slicker Brush, Comb, Dematting Comb or Rake Nail Clipper, Straight Shears Thinning Shears (for a more natural look) or Curved Shears Additional Items: bandana Ear cleaner, shampoo, conditioner, spray cologne, ribbon or 54
87 First Step: Use cotton balls dampened with ear cleaner to clean the inside of the ears. Second Step: Use your nail clippers to cut the nails. Cut the tip of the nails and be careful not to cut the quick. If you cut the quick, use your gel or powder blood stopper to stop the bleeding. Third Step: Use thinning shears or curved shears to remove any straggly hair between and around paws. Fourth Step: Use your slicker brush and brush entire coat thoroughly. If you encounter any matted areas, use your dematting comb or rake and remove all mats before bathing. Fifth Step: Bath Time Use your favorite shampoo. Wet the dog first and then apply the shampoo. Shampoo the dog creating a nice lather on entire body, head, legs, and feet. Wash any folds on face. (Be careful not to get any water inside the ears.) Rinse the dog until lather is completely gone. Condition (if desired) after rinsing, making sure you rinse the conditioner out before drying. As part of the dog s bath make sure you: Brush teeth to remove food debris. Option: De-shed Treatment Sixth Step: After bathing, use a towel to remove any excess water. Then use your blow dryer to dry the dog or cage dry. Seventh Step: Use your shears and clean up the whiskers and any long hair on the face, over the eyes and on the muzzle. Eighth Step: Spray coat with conditioner. Comb through. You may also want to lightly spray coat with cologne. Final Step: Step away from the dog and take a final look at your work to make sure you are satisfied. After completing any finishing touches, place a bandana around the neck if a boy, or a ribbon if a girl. Make sure you compliment the dog on what a good dog they have been, and how handsome or beautiful he or she looks. 55

88 BICHON FRISE Tools Needed Slicker Brush, Comb, Dematting Comb or Rake Nail Clipper, Straight Shears Thinning Shears (for a more natural look) Clipper, #10 blade, #15 or #40 blade Additional Items: Ear cleaner, medicated ear powder, shampoo, conditioner, spray cologne, ribbon or bandana First Step: Use medicated powder lightly to dry ears. Gently pull out any dead hair. Use cotton balls dampened with ear cleaner to clean the inside of the ears. Second Step: Use your nail clippers to cut the nails. Cut the tip of the nails being careful not to cut the quick. If you cut the quick, use your gel or powder blood stopper to stop the bleeding. 56
89 Third Step: Use your #15 blade (Yvonne prefers #40 blade), on your clipper to remove the hair from between the pads. Fourth Step: For the sanitary trim, use your #10 blade on your clipper and clip the hair from the rectal area ½ inch on all sides of the rectum. Be careful not to touch the rectum area! Fifth Step: Use your #10 blade to trim the hair from the groin to the navel. Sixth Step: Use your slicker brush and brush entire coat thoroughly. If you encounter any matted areas, use your dematting comb or rake and remove all mats before bathing. Seventh Step: Bath Time Use your favorite shampoo. Wet the dog first and then apply the shampoo. Shampoo the dog creating a nice lather on entire body, head, legs, and feet. (Be careful not to get any water inside the ears.) Rinse the dog until lather is completely gone. Condition (if desired) after rinsing, making sure you rinse the conditioner out before drying. As part of the dog s bath make sure you: Brush teeth to remove food debris. Eighth Step: After bathing, use a towel to remove any excess water. Then use your blow dryer to dry the dog thoroughly or cage dry. Ninth Step: Comb and fluff as much as possible the legs, body and head. Tenth Step: BODY/LEGS Use your shears. 1) Start at the base of the tail and trim the body about ½ to neaten up, but leaving the coat full and round. 2) Even out the underchest following the natural body lines. 3) After trimming and rounding the shoulders, blend into the front legs. 4) The hair on the back of the neck should flow smoothly into the shoulders. The shoulders should be rounded to blend into the legs. 5) Trim the front and rear legs so they are tubular. 57
90 Eleventh Step: THROAT 1) Use your shears and following the shape of the skull, trim the back of the head fuller so it blends in with the surrounding areas. 2) Use your thinning shears to even out the throat area. Twelfth Step: EYES/FACE/BEARD/HEAD/EARS 1) Use your shears to clean up the bridge of the nose, but do not trim under the eyes. 2) Following the shape of the skull, trim the head leaving fullness in the back so it blends smoothly into the neck. The goal is to shape the head into a circle. 3) The ears should smoothly flow into the sides of the head. The side of the head meshes with the ears without visible separation. 4) Use thinning shears to trim under the ears so the ears fall flat. Thirteenth Step: Spray coat with conditioner. Comb through. You may also want to lightly spray coat with cologne. Final Step: Step away from the dog and take a final look at your work to make sure you are satisfied. After completing any finishing touches, place a bandana around the neck if a boy, or a ribbon if a girl. Make sure you compliment the dog on what a good dog they have been, and how handsome or beautiful he or she looks. Call the owner to have him/her picked up. You re done! *Make sure to register at and watch streaming videos on selected dog breeds! And watch the Bichon streaming video. 58
91 Notes 59

92 BLOODHOUND Tools Needed Rubber Brush Nail Clipper, Straight Shears Additional Items: Ear cleaner, pad moisturizer, shampoo, conditioner, spray cologne, ribbon or bandana First Step: Use medicated powder lightly to dry ears. Gently pull out any dead hair. Use cotton balls dampened with ear cleaner to clean the inside of the ears. Second Step: Use your nail clippers to cut the nails. Cut the tip of the nails and be careful not to cut the quick. If you cut the quick, use your gel or powder blood stopper to stop the bleeding. 60
93 Third Step: Use your rubber brush and brush entire coat thoroughly. Fourth Step: Bath Time Use your favorite shampoo. Wet the dog first and then apply the shampoo. Shampoo the dog creating a nice lather on entire body, head, legs, and feet. Clean wrinkles on body. Wash any folds on face. (Be careful not to get any water inside the ears.) Rinse the dog until lather is completely gone. Condition (if desired) after rinsing, making sure you rinse the conditioner out before drying. As part of the dog s bath make sure you: Brush teeth to remove food debris. Option: De-shed Treatment Fifth Step: After bathing, use a towel to remove any excess water. Then use your blow dryer to dry the dog thoroughly or cage dry. Sixth Step: Use your shears and clean up the whiskers and any long hair on the face, over the eyes and on the muzzle. Seventh Step: Use pad moisturizer to help soothe sore or bald spots on elbows, joints and pasterns. Eighth Step: Hand rub conditioner onto coat to bring out natural sheen. You may also want to lightly spray coat with cologne. Final Step: Step away from the dog and take a final look at your work to make sure you are satisfied. After completing any finishing touches, place a bandana around the neck if a boy, or a ribbon if a girl. Make sure you compliment the dog on what a good dog they have been, and how handsome or beautiful he or she looks. Call the owner to have him/her picked up. You re done! 61

94 BLUETICK COONHOUND Tools Needed Rubber Brush Nail Clipper, Straight Shears Additional Items: Ear cleaner, shampoo, conditioner, spray cologne, ribbon or bandana First Step: Use cotton balls dampened with ear cleaner to clean the inside of the ears. 62
95 Second Step: Use your nail clippers to cut the nails. Cut the tip of the nails being careful not to cut the quick. If you cut the quick, use your gel or powder blood stopper to stop the bleeding. Third Step: Use your rubber brush and brush entire coat thoroughly. Fourth Step: Bath Time Use your favorite shampoo. Wet the dog first and then apply the shampoo. Shampoo the dog creating a nice lather on entire body, head, legs, and feet. (Be careful not to get any water inside the ears.) Rinse the dog until lather is completely gone. Condition (if desired) after rinsing, making sure you rinse the conditioner out before drying. As part of the dog s bath make sure you: Brush teeth to remove food debris. Option: De-shed Treatment Fifth Step: After bathing, use a towel to remove any excess water. Then use your blow dryer to dry the dog thoroughly or cage dry. Sixth Step: Use your shears to clean up the whiskers and any long hair on the face, over the eyes and on the muzzle. Seventh Step: Hand rub conditioner onto coat to create sheen. You may also want to lightly spray coat with cologne. Final Step: Step away from the dog and take a final look at your work to make sure you are satisfied. After completing any finishing touches, place a bandana around the neck if a boy, or a ribbon if a girl. Make sure you compliment the dog on what a good dog they have been, and how handsome or beautiful he or she looks. Call the owner to have him/her picked up. You re done! 63
 or Curved Shears Additional Items: Ear cleaner, shampoo, conditioner, spray cologne, ribbon or bandana")
96 BORDER COLLIE Tools Needed Slicker Brush, Comb, Dematting Comb or Rake Nail Clipper, Straight Shears Thinning Shears (for a more natural look) or Curved Shears Additional Items: Ear cleaner, shampoo, conditioner, spray cologne, ribbon or bandana 64
97 First Step: Use cotton balls dampened with ear cleaner to clean the inside of the ears. Second Step: Use your nail clippers to cut the nails. Cut the tip of the nails and be careful not to cut the quick. If you cut the quick, use your gel or powder blood stopper to stop the bleeding. Third Step: Use thinning shears or curved shears to remove any straggly hair between and around paws. Fourth Step: Use your slicker brush and brush entire coat thoroughly. If you encounter any matted areas, use your dematting comb or rake and remove all mats before bathing. Fifth Step: Bath Time Use your favorite shampoo. Wet the dog first and then apply the shampoo. Shampoo the dog creating a nice lather on entire body, head, legs, and feet. (Be careful not to get any water inside the ears.) Rinse the dog until lather is completely gone. Condition (if desired) after rinsing, making sure you rinse the conditioner out before drying. As part of the dog s bath make sure you: Brush teeth to remove food debris. Option: De-shed Treatment Sixth Step: After bathing, use a towel to remove any excess water. Then use your blow dryer to dry the dog thoroughly or cage dry. Seventh Step: Comb and fluff. Eighth Step: Use your shears and clean up the whiskers and any long hair on the face, over the eyes and on the muzzle. Ninth Step: Spray coat with conditioner. Comb through. You may also want to lightly spray coat with cologne. Final Step: Step away from the dog and take a final look at your work to make sure you are satisfied. Call mom or dad and have him/her picked up. 65

98 BORDER TERRIER Tools Needed Slicker Brush, Comb Nail Clipper, Straight Shears Thinning Shears (for a more natural look) or Curved Shears Clipper, #10 blade, #15 or #40 blade Additional Items: Ear cleaner, medicated ear powder, shampoo, conditioner, spray cologne, ribbon or bandana 66
99 First Step: Use medicated powder lightly to dry ears. Gently pull out any dead hair. Use cotton balls dampened with ear cleaner to clean the inside of the ears. Second Step: Use your nail clippers to cut the nails. Cut the tip of the nails being careful not to cut the quick. If you cut the quick, use your gel or powder blood stopper to stop the bleeding. Third Step: Use your #15 blade (Yvonne prefers #40 blade), on your clipper to remove the hair from between the pads. Fourth Step: For the sanitary trim, use your #10 blade on your clipper and clip the hair from the rectal area ½ inch on all sides of the rectum. Be careful not to touch the rectum area! Fifth Step: Use your slicker brush and brush entire coat thoroughly. Sixth Step: Bath Time Use your favorite shampoo. Wet the dog first and then apply the shampoo. Shampoo the dog creating a nice lather on entire body, head, legs, and feet. (Be careful not to get any water inside the ears.) Rinse the dog until lather is completely gone. Condition (if desired) after rinsing, making sure you rinse the conditioner out before drying. As part of the dog s bath make sure you: Brush teeth to remove food debris. Seventh Step: After bathing, use a towel to remove any excess water. Then use your blow dryer to dry the dog thoroughly or cage dry. Eighth Step: Comb and fluff. Ninth Step: Use your thinning shears to lightly trim hair on cheeks, blending it into the throat. 67
100 Tenth Step: Use you thinning shears to thin between the ears. Use your shears to trim the outside edges of the ears. Eleventh Step: Use your shears to trim outer eyebrow area, jutting away from the eye. Twelfth Step: Use your shears to trim a straight edge on the legs. Thirteenth Step: Use your shears to taper the tail to a rounded point at the end, leaving the base heavy. Fourteenth Step: Use your shears to round off the feet. Fifteenth Step: Spray coat with conditioner. Comb through. You may also want to lightly spray coat with cologne. Final Step: Step away from the dog and take a final look at your work to make sure you are satisfied. After completing any finishing touches, place a bandana around the neck if a boy, or a ribbon if a girl. Make sure you compliment the dog on what a good dog they have been, and how handsome or beautiful he or she looks. Call the owner to have him/her picked up. You re done! 68
101 Notes 69

102 BORZOI Tools Needed Slicker Brush, Comb, Dematting Comb or Rake Nail Clipper, Straight Shears Thinning Shears (for a more natural look) or Curved Shears Clipper, #15 or #40 blade Additional Items: Ear cleaner, shampoo, conditioner, spray cologne, ribbon or bandana First Step: Use cotton balls dampened with ear cleaner to clean the inside of the ears. 70
103 Second Step: Use your nail clippers to cut the nails. Cut the tip of the nails and be careful not to cut the quick. If you cut the quick, use your gel or powder blood stopper to stop the bleeding. Third Step: Use your #15 blade (Yvonne prefers #40 blade) on your clipper to remove the hair from between the pads. Use thinning shears to remove any straggly hair between and around paws. Fourth Step: Use your slicker brush and brush entire coat thoroughly. If you encounter any matted areas, use your dematting comb or rake and remove all mats before bathing. Make sure you comb around the rectum/tail area. Fifth Step: Bath Time Use your favorite shampoo. Wet the dog first and then apply the shampoo. Shampoo the dog creating a nice lather on entire body, head, legs, and feet. (Be careful not to get any water inside the ears.) Rinse the dog until lather is completely gone. Condition (if desired) after rinsing, making sure you rinse the conditioner out before drying. Option: De-shed Treatment As part of the dog s bath make sure you: Brush teeth to remove food debris. Sixth Step: After bathing, use a towel to remove any excess water. Then use your blow dryer to dry the dog thoroughly or cage dry. Seventh Step: Use your shears and clean up the whiskers and any long hair on the face, over the eyes and on the muzzle. Eighth Step: Brush and fluff hair in the direction of growth. Ninth Step: Spray coat with conditioner. Brush through. You may also want to lightly spray coat with cologne Final Step: Step away from the dog and take a final look at your work to make sure you are satisfied. Call mom or dad and him/her picked up. 71

104 BOSTON TERRIER Tools Needed Rubber Brush Nail Clipper, Straight Shears Additional Items: Ear cleaner, shampoo, conditioner, spray cologne, ribbon or bandana First Step: Use cotton balls dampened with ear cleaner to clean the inside of the ears. Second Step: Use your clippers to cut the nails. Cut the tip of the nails and be careful not to cut the quick. If you cut the quick, use your gel or powder blood stopper to stop the bleeding. Third Step: Use your rubber brush and brush entire coat thoroughly. 72
105 Fourth Step: Bath Time Use your favorite shampoo. Wet the dog first and then apply the shampoo. Shampoo the dog creating a nice lather on entire body, head, legs, and feet. Clean wrinkles on body. Wash any folds on face. (Be careful not to get any water inside the ears.) Rinse the dog until lather is completely gone. Condition (if desired) after rinsing, making sure you rinse the conditioner out before drying. As part of the dog s bath make sure you: Brush teeth to remove food debris. Option: De-shed Treatment Fifth Step: After bathing, use a towel to remove any excess water. Then use your blow dryer to blow dry the dog thoroughly or cage dry. Sixth Step: Use your shears and clean up the whiskers. Seventh Step: Hand rub conditioner onto coat to create sheen. You may also want to lightly spray coat with cologne. Final Step: Step away from the dog and take a final look at your work to make sure you are satisfied. After completing any finishing touches, place a bandana around the neck if a boy, or a ribbon if a girl. Make sure you compliment the dog on what a good dog they have been, and how handsome or beautiful he or she looks. Call the owner to have him/her picked up. You re done! 73
 or Curved Shears Clipper, #7F,#10 blade, #15 or #40 blade Additional Items: Ear cleaner, shampoo, conditioner, spray cologne, ribbon or")
106 BOUVIER DES FLANDRES Tools Needed Slicker Brush, Comb, Dematting Comb or Rake Nail Clipper, Straight Shears Thinning Shears (for a more natural look) or Curved Shears Clipper, #7F,#10 blade, #15 or #40 blade Additional Items: Ear cleaner, shampoo, conditioner, spray cologne, ribbon or bandana 74
107 First Step: Use cotton balls dampened with ear cleaner to clean the inside of the ears. Second Step: Use your nail clippers to cut the nails. Cut the tip of the nails being careful not to cut the quick. If you cut the quick, use your gel or powder blood stopper to stop the bleeding. Third Step: Use your #15 blade (Yvonne prefers #40 blade), on your clipper to remove the hair from between the pads. Fourth Step: For the sanitary trim, use your #10 blade on your clipper and clip the hair from the rectal area ½ inch on all sides of the rectum. Be careful not to touch the rectum area! Fifth Step: Use your #10 blade to trim the hair from the groin to the navel. Sixth Step: Use your slicker brush and brush entire coat thoroughly. If you encounter any matted areas, use your dematting comb or rake and remove all mats before bathing. Seventh Step: Bath Time Use your favorite shampoo. Wet the dog first and then apply the shampoo. Shampoo the dog creating a nice lather on entire body, head, legs, and feet. (Be careful not to get any water inside the ears.) Rinse the dog until lather is completely gone. Condition (if desired) after rinsing, making sure you rinse the conditioner out before drying. As part of the dog s bath make sure you: Brush teeth to remove food debris. Eighth Step: After bathing, use a towel to remove any excess water. Then use your blow dryer to dry the dog thoroughly or cage dry. Ninth Step: Comb and fluff. 75
108 Tenth Step: BODY/FEET 1) Use your thinning shears to remove any extra fullness on the neck, chest and legs. 2) Use your #7F blade to lightly skim over the entire body to even out coat, creating a smooth flowing appearance between areas. 3) Use your shears to round off the outside edges of the feet. Eleventh Step: HEAD/EARS 1) Use your #10 blade to clip the hair on the outside and inside of the ears at the base. 2) Use your shears to trim the outside edges of the ears. 3) With thinning shears, trim the top of the head and the sides of the face. Twelfth Step: FACE/BEARD 1) Use your thinning shears to thin the sides of the face. 2) Use your shears to even out the beard by combing it forward and trimming. 3) Comb the hair above the eyes forward and trim any uneven hair with your shears. Thirteenth Step: Spray coat with conditioner. Comb through. You may also want to lightly spray coat with cologne. Final Step: Step away from the dog and take a final look at your work to make sure you are satisfied. After completing any finishing touches, place a bandana around the neck if a boy, or a ribbon if a girl. Make sure you compliment the dog on what a good dog they have been, and how handsome or beautiful he or she looks. Call the owner to have him/her picked up. You re done! 76
109 Notes 77

110 BOXER Tools Needed Rubber Brush Nail Clipper, Straight Shears Additional Items: bandana Ear cleaner, shampoo, conditioner, spray cologne, ribbon or First Step: Use cotton balls dampened with ear cleaner to clean the inside of the ears. 78
111 Second Step: Use your nail clippers to cut the nails. Cut the tip of the nails and be careful not to cut the quick. If you cut the quick, use your gel or powder blood stopper to stop the bleeding. Third Step: Use your rubber brush and brush coat thoroughly. Fourth Step: Bath Time Use your favorite shampoo. Wet the dog first and then apply the shampoo. Shampoo the dog creating a nice lather on entire body, head, legs, and feet. Clean wrinkles on body. Wash any folds on face. (Be careful not to get any water inside the ears.) Rinse the dog until lather is completely gone. Condition (if desired) after rinsing, making sure you rinse the conditioner out before drying. As part of the dog s bath make sure you: Brush teeth to remove food debris. Option: De-shed Treatment Fifth Step: After bathing, use a towel to remove any excess water. Then use your blow dryer to dry the dog thoroughly or cage dry. Sixth Step: Use your shears and clean up the whiskers and any long hair on the face, over the eyes and on the muzzle. Seventh Step: Hand rub conditioner onto coat for a natural gloss. You may also want to lightly spray coat with cologne. Final Step: Step away from the dog and take a final look at your work to make sure you are satisfied. After completing any finishing touches, place a bandana around the neck if a boy, or a ribbon if a girl. Make sure you compliment the dog on what a good dog they have been, and how handsome or beautiful he or she looks. Call the owner to have him/her picked up. You re done! 79

112 BOYKIN SPANIEL Tools Needed Rubber Brush Nail Clipper, Straight Shears Additional Items: Ear cleaner, shampoo, conditioner, spray cologne, ribbon or bandana 80
113 First Step: Use cotton balls dampened with ear cleaner to clean the inside of the ears. Second Step: Use your nail clippers to cut the nails. Cut the tip of the nails being careful not to cut the quick. If you cut the quick, use your gel or powder blood stopper to stop the bleeding. Third Step: Use your rubber brush and brush entire coat thoroughly. Fourth Step: Bath Time Use your favorite shampoo. Wet the dog first and then apply the shampoo. Shampoo the dog creating a nice lather on entire body, head, legs, and feet. (Be careful not to get any water inside the ears.) Rinse the dog until lather is completely gone. Condition (if desired) after rinsing, making sure you rinse the conditioner out before drying. As part of the dog s bath make sure you: Brush teeth to remove food debris. Fifth Step: After bathing, use a towel to remove any excess water. Then use your blow dryer to dry the dog thoroughly or cage dry. Sixth Step: Use your shears to clean up the whiskers and any long hair on the face, over the eyes and on the muzzle. Seventh Step: Hand rub conditioner onto coat. Massage into coat to create sheen. You may also want to lightly spray coat with cologne. Final Step: Step away from the dog and take a final look at your work to make sure you are satisfied. After completing any finishing touches, place a bandana around the neck if a boy, or a ribbon if a girl. Make sure you compliment the dog on what a good dog they have been, and how handsome or beautiful he or she looks. Call the owner to have him/her picked up. You re done! 81

114 BRIARD Tools Needed Slicker Brush, Comb, Dematting Comb or Rake Nail Clipper, Straight Shears Thinning Shears (for a more natural look) or Curved Shears Clipper, #10 blade, #15 or #40 blade Additional Items: Ear cleaner, medicated ear powder, shampoo, conditioner, spray cologne, ribbon or bandana 82
115 First Step: Use medicated powder lightly to dry ears. Gently pull out any dead hair. Use cotton balls dampened with ear cleaner to clean the inside of the ears. Second Step: Use your nail clippers to cut the nails. Cut the tip of the nails being careful not to cut the quick. If you cut the quick, use your gel or powder blood stopper to stop the bleeding. Third Step: Use your #15 blade (Yvonne prefers #40 blade), on your clipper to remove the hair from between the pads. Fourth Step: For the sanitary trim, use your #10 blade on your clipper and clip the hair from the rectal area ½ inch on all sides of the rectum. Be careful not to touch the rectum area! Fifth Step: Use your #10 blade to trim the hair from the groin to the navel. Sixth Step: Use your slicker brush and brush entire coat thoroughly. If you encounter any matted areas, use your dematting comb or rake and remove all mats before bathing. Seventh Step: Bath Time Use your favorite shampoo. Wet the dog first and then apply the shampoo. Shampoo the dog creating a nice lather on entire body, head, legs, and feet. (Be careful not to get any water inside the ears.) Rinse the dog until lather is completely gone. Condition (if desired) after rinsing, making sure you rinse the conditioner out before drying. As part of the dog s bath make sure you: Brush teeth to remove food debris. Eighth Step: After bathing, use a towel to remove any excess water. Then use your blow dryer to dry the dog thoroughly or cage dry. Ninth Step: Comb and fluff. 83
116 Tenth Step: Use your thinning shears to clean up straggly hair on the back. Eleventh Step: Use your shears to create a square line above the eyes and to evenly square off the beard. Twelfth Step: Use your shears to round off the feet. Thirteenth Step: Spray coat with conditioner. Comb through. You may also want to lightly spray coat with cologne. Final Step: Step away from the dog and take a final look at your work to make sure you are satisfied. After completing any finishing touches, place a bandana around the neck if a boy, or a ribbon if a girl. Make sure you compliment the dog on what a good dog they have been, and how handsome or beautiful he or she looks. Call the owner to have him/her picked up. You re done! *Make sure to register at and watch streaming videos on selected dog breeds! Become a Certified Pet Groomer Hands On Wag My Tail Pet Grooming School Wag-MyTail Online Order DVDs 84
117 Notes 85

118 BRITTANY SPANIEL Tools Needed Slicker Brush, Comb Nail Clipper, Straight Shears Thinning Shears (for a more natural look) or Curved Shears Clipper, #7F, #10 blade, #15 or #40 blade Additional Items: Ear cleaner, shampoo, conditioner, spray cologne, ribbon or bandana 86
119 First Step: Use cotton balls dampened with ear cleaner to clean the inside of the ears. Second Step: Use your nail clippers to cut the nails. Cut the tip of the nails being careful not to cut the quick. If you cut the quick, use your gel or powder blood stopper to stop the bleeding. Third Step: Use your #15 blade (Yvonne prefers #40 blade), on your clipper to remove the hair from between the pads. Fourth Step: For the sanitary trim, use your #10 blade on your clipper and clip the hair from the rectal area ½ inch on all sides of the rectum. Be careful not to touch the rectum area! Fifth Step: Use your slicker brush and brush entire coat thoroughly. Sixth Step: Bath Time Use your favorite shampoo. Wet the dog first and then apply the shampoo. Shampoo the dog creating a nice lather on entire body, head, legs, and feet. (Be careful not to get any water inside the ears.) Rinse the dog until lather is completely gone. Condition (if desired) after rinsing, making sure you rinse the conditioner out before drying. As part of the dog s bath make sure you: Brush teeth to remove food debris. Seventh Step: After bathing, use a towel to remove any excess water. Then use your blow dryer to dry the dog thoroughly or cage dry. Eighth Step: Comb and fluff. Ninth Step: BODY/NECK/FEET 1) Use your thinning shears to even out hair on the back and remove any unruly hair. 2) Use your thinning shears to remove straggly hair from the hocks to the bottom of the feet. 3) Use your #7F blade to trim the front of the neck so it looks smooth. 87
120 4) Use your thinning shears to blend the long hair on the back of the neck with the short hair underneath the neck. 5) Use your shears to even out the leg featherings. 6) Use your thinning shears to trim the hair between the toes. Tenth Step: EARS/FACE 1) Use your thinning shears to remove unruly hair on both sides of the ears. 2) Use your shears and clean up the whiskers and any long hair on the face, over the eyes and on the muzzle. Eleventh Step: Spray coat with conditioner. Comb through. You may also want to lightly spray coat with cologne. Final Step: Step away from the dog and take a final look at your work to make sure you are satisfied. After completing any finishing touches, place a bandana around the neck if a boy, or a ribbon if a girl. Make sure you compliment the dog on what a good dog they have been, and how handsome or beautiful he or she looks. Call the owner to have him/her picked up. You re done! *Make sure to register at and watch streaming videos on selected dog breeds! Become a Certified Pet Groomer Hands On Wag My Tail Pet Grooming School Wag-MyTail Online Order DVDs 88
121 Notes 89

122 BRUSSELS GRIFFON Tools Needed Slicker Brush, Comb Nail Clipper, Straight Shears Thinning Blade (for a more natural look) or Curved Shears Clipper, #5F, #7F or 8 ½, #10 blade, #15 or #40 blade Additional Items: Ear cleaner, medicated ear powder, shampoo, conditioner, spray cologne, ribbon or bandana 90
123 First Step: Use medicated powder lightly to dry ears. Gently pull out any dead hair. Use cotton balls dampened with ear cleaner to clean the inside of the ears. Second Step: Use your nail clippers to cut the nails. Cut the tip of the nails being careful not to cut the quick. If you cut the quick, use your gel or powder blood stopper to stop the bleeding. Third Step: Use your #15 blade (Yvonne prefers #40 blade), on your clipper to remove the hair from between the pads. Fourth Step: For the sanitary trim, use your #10 blade on your clipper and clip the hair from the rectal area ½ inch on all sides of the rectum. Be careful not to touch the rectum area! Fifth Step: Use your #10 blade to trim the hair from the groin to the navel. Sixth Step: Use your slicker brush and brush entire coat thoroughly. Seventh Step: Bath Time Use your favorite shampoo. Wet the dog first and then apply the shampoo. Shampoo the dog creating a nice lather on entire body, head, legs, and feet. (Be careful not to get any water inside the ears.) Rinse the dog until lather is completely gone. Condition (if desired) after rinsing, making sure you rinse the conditioner out before drying. As part of the dog s bath make sure you: Brush teeth to remove food debris. Eighth Step: After bathing, use a towel to remove any excess water. Then use your blow dryer to dry the dog thoroughly or cage dry. Ninth Step: Comb and fluff. 91
124 Tenth Step: BODY 1) Use your #5F, #7F or #8 ½ blade and clip the back starting from the base of the skull and down to the base of the tail. 2) Use your #5F, #7F or #8 ½ blade and clip the sides of the neck to the shoulders and on to the elbows. 3) Use your #5F, #7F, or #8 ½ blade and using the elbow as a guide, clip the sides of the body all the way to the rear flank. 4) Use your #5F, #7F, or # 81/2 blade to clip the back half of the leg to a neat point and stop just above the hock. Leave the front legs long, but use your shears to neaten up if necessary. 5) Use your #5F, #7F or #8 ½ blade to clip the neck, going from the throat to the breastbone on the forechest and then blending down to the elbows. 6) Use your shears to round off the outside edges of the feet. Eleventh Step: HEAD/EARS/FACE 1) Use your thinning shears to trim the top of the head. 2) Use your #10 blade to clip both side of the ears, starting at the base of the ears. 3) Use your thinning shears to trim the sides of the face. Twelfth Step: EYEBROWS/BEARD 1) Use your shears to trim the eyebrows so they look like an awning. Do not separate them. Start at the outside corner and trim evenly to the center. 2) Trim the beard rounded, but leave it full. Thirteenth Step: Hand rub conditioner onto coat. You may also want to lightly spray coat with cologne. Final Step: Step away from the dog and take a final look at your work to make sure you are satisfied. After completing any finishing touches, place a bandana around the neck if a boy, or a ribbon if a girl. Make sure you compliment the dog on what a good dog they have been, and how handsome or beautiful he or she looks. Call the owner to have him/her picked up. You re done! 92
125 Notes 93

126 BULL TERRIER Tools Needed Rubber Brush Nail Clipper, Straight Shears Additional Items: Ear cleaner, shampoo, conditioner, spray cologne, ribbon or bandana 94
127 First Step: Use cotton balls dampened with ear cleaner to clean the inside of the ears. Second Step: Use your clippers to cut the nails. Cut the tip of the nails and be careful not to cut the quick. If you cut the quick, use your gel or powder blood stopper to stop the bleeding. Third Step: Use your rubber brush and brush coat thoroughly. Fourth Step: Bath Time Use your favorite shampoo. Wet the dog first and then apply the shampoo. Shampoo the dog creating a nice lather on entire body, head, legs, and feet. (Be careful not to get any water inside the ears.) Rinse the dog until lather is completely gone. Condition (if desired) after rinsing, making sure you rinse the conditioner out before drying. As part of the dog s bath make sure you: Brush teeth to remove food debris. Option: De-shed Treatment Fifth Step: After bathing, use a towel to remove any excess water. Then use your blow dryer to dry the dog thoroughly or cage dry. Sixth Step: Use your shears and clean up the whiskers on the muzzle. Seventh Step: Hand rub conditioner onto coat Massage to create a sheen. You may also want to lightly spray coat with cologne. Final Step: Step away from the dog and take a final look at your work to make sure you are satisfied. After completing any finishing touches, place a bandana around the neck if a boy, or a ribbon if a girl. Make sure you compliment the dog on what a good dog they have been, and how handsome or beautiful he or she looks. Call the owner to have him/her picked up. You re done! 95

128 BULLDOG Tools Needed Rubber Brush Nail Clipper, Straight Shears Additional Items: Ear cleaner, shampoo, baby powder conditioner, spray cologne, ribbon or bandana First Step: Use cotton balls dampened with ear cleaner to clean the inside of the ears. 96
129 Second Step: Use your nail clippers to cut the nails. Cut the tip of the nails and be careful not to cut the quick. If you cut the quick, use your gel or powder blood stopper to stop the bleeding. Third Step: Use your rubber brush and brush coat thoroughly. Option: De-shed Treatment Fourth Step: Bath Time Use your favorite shampoo. Wet the dog first and then apply the shampoo. Shampoo the dog creating a nice lather on entire body, head, legs, and feet. Wash any folds on face. Clean wrinkles on body. (Be careful not to get any water inside the ears.) Rinse the dog until lather is completely gone. Condition (if desired) after rinsing, making sure you rinse the conditioner out before drying. As part of the dog s bath make sure you: Brush teeth to remove food debris. Option: De-shed Treatment Fifth Step: After bathing, use a towel to remove any excess water. Then use your blow dryer to dry the dog thoroughly or cage dry. Sixth Step: Use your shears and clean up the whiskers. Seventh Step: Hand rub conditioner onto coat. Massage to create sheen. You may also want to spray coat with cologne. Final Step: Step away from the dog and take a final look at your work to make sure you are satisfied. After completing any finishing touches, place a bandana around the neck if a boy, or a ribbon if a girl. Make sure you compliment the dog on what a good dog they have been, and how handsome or beautiful he or she looks. Call the owner to have him/her picked up. You re done! 97

130 BULLMASTIFF Tools Needed Bristle Brush (Stiff) Nail Clipper, Straight Shears Additional Items: Ear cleaner, baby powder, shampoo, conditioner, spray cologne, ribbon or bandana First Step: Use cotton balls dampened with ear cleaner to clean the inside of the ears. Second Step: Use your nail clippers to cut the nails. Cut the tip of the nails and be careful not to cut the quick. If you cut the quick, use your gel or powder blood stopper to stop the bleeding. 98
131 Third Step: Use your brush and brush coat thoroughly. Fourth Step: Bath Time Use your favorite shampoo. Wet the dog first and then apply the shampoo. Shampoo the dog creating a nice lather on entire body, head, legs, and feet. Wash any folds on face. Clean wrinkles on body. (Be careful not to get any water inside the ears.) Rinse the dog until lather is completely gone. Condition (if desired) after rinsing, making sure you rinse the conditioner out before drying. As part of the dog s bath make sure you: Brush teeth to remove food debris. Option: De-shed Treatment Fifth Step: After bathing, use a towel to remove any excess water. Then use your blow dryer to dry the dog thoroughly or cage dry. Sixth Step: Use your shears and clean up the whiskers. Seventh Step: Hand rub conditioner onto coat to create sheen. You may also want to spray coat with cologne. Final Step: Step away from the dog and take a final look at your work to make sure you are satisfied. After completing any finishing touches, place a bandana around the neck if a boy, or a ribbon if a girl. Make sure you compliment the dog on what a good dog they have been, and how handsome or beautiful he or she looks. Call the owner to have him/her picked up. You re done! 99

132 CAIRN TERRIER Tools Needed Slicker Brush, Comb Nail Clipper, Straight Shears Thinning Blade (for a more natural look) or Curved Shears Clipper, #5F, #7F or 8 ½, #10 blade, #15 or #40 blade Additional Items: Ear cleaner, medicated ear powder, shampoo, conditioner, spray cologne, ribbon or bandana 100
133 First Step: Use medicated powder lightly to dry ears. Gently pull out any dead hair. Use cotton balls dampened with ear cleaner to clean the inside of the ears. Second Step: Use your nail clippers to cut the nails. Cut the tip of the nails being careful not to cut the quick. If you cut the quick, use your gel or powder blood stopper to stop the bleeding. Third Step: Use your #15 blade (Yvonne prefers #40 blade), on your clipper to remove the hair from between the pads. Fourth Step: For the sanitary trim, use your #10 blade on your clipper and clip the hair from the rectal area ½ inch on all sides of the rectum. Be careful not to touch the rectum area! Fifth Step: Use your #10 blade to trim the hair from the groin to the navel. Sixth Step: Use your slicker brush and brush entire coat thoroughly. Seventh Step: Bath Time Use your favorite shampoo. Wet the dog first and then apply the shampoo. Shampoo the dog creating a nice lather on entire body, head, legs, and feet. (Be careful not to get any water inside the ears.) Rinse the dog until lather is completely gone. Condition (if desired) after rinsing, making sure you rinse the conditioner out before drying. As part of the dog s bath make sure you: Brush teeth to remove food debris. Eighth Step: After bathing, use a towel to remove any excess water. Then use your blow dryer to dry the dog thoroughly or cage dry. Ninth Step: Comb and fluff! 101
134 Tenth Step: BODY 1) Use your #5F, #7F or #8 ½ blade and clip the back starting from the base of the skull and down to the base of the tail. 2) Use your #5F, #7F or #8 ½ blade and clip the sides of the neck to the shoulders and on to the elbows. 3) Use your #5F, #7F, or #8 ½ blade and using the elbow as a guide, clip the sides of the body all the way to the rear flank. 4) Use your #5F, #7F, or # 81/2 blade to clip the back half of the leg to a neat point and stop just above the hock. Leave the front legs long, but use your shears to neaten up if necessary. 5) Use your #5F, #7F or #8 ½ blade to clip the neck, going from the throat to the breastbone on the forechest and then blending down to the elbows. 6) Use your shears to round off the outside edges of the feet. 7) Clip the tail from the base to the tip, only on the top of the tail, and using the Same blade length you used for the body. Do not clip the hair underneath the tail. Eleventh Step: HEAD/EARS/FACE 1) Use your thinning shears to trim the top of the head. 2) Use your #10 blade to clip both side of the ears, starting at the base of the ears. 3) Use your thinning shears to trim the sides of the face. Twelfth Step: EYEBROWS/BEARD 3) Use your shears to trim the eyebrows so they look like an awning. Do not separate them. Start at the outside corner and trim evenly to the center. 4) Trim the beard rounded, but leave it full. Thirteenth Step: Hand rub conditioner onto coat. You may also want to lightly spray coat with cologne. Final Step: Step away from the dog and take a final look at your work to make sure you are satisfied. After completing any finishing touches, place a bandana around the neck if a boy, or a ribbon if a girl. Make sure you compliment the dog on what a good dog they have been, and how handsome or beautiful he or she looks. Call the owner to have him/her picked up. You re done! *Make sure to register at and watch streaming videos on selected dog breeds! And watch the Cairn Terrier streaming video. 102
135 Notes 103

136 CANAAN Tools Needed Slicker Brush, Comb, Shedding Blade Nail Clipper Additional Items: Ear cleaner, shampoo, conditioner, spray cologne, ribbon or bandana First Step: Use cotton balls dampened with ear cleaner to clean the inside of the ears. Second Step: Use your nail clippers to cut the nails. Cut the tip of the nails being careful not to cut the quick. If you cut the quick, use your gel or powder blood stopper to stop the bleeding. 104
137 Third Step: Use your slicker brush and brush entire coat thoroughly. Remove any dead hair with your shedding blade. Fourth Step: Bath Time Use your favorite shampoo. Wet the dog first and then apply the shampoo. Shampoo the dog creating a nice lather on entire body, head, legs, and feet. (Be careful not to get any water inside the ears.) Rinse the dog until lather is completely gone. Condition (if desired) after rinsing, making sure you rinse the conditioner out before drying. As part of the dog s bath make sure you: Brush teeth to remove food debris. Option: De-shed Treatment Option: De-shed Treatment Fifth Step: After bathing, use a towel to remove any excess water. Then use your blow dryer to dry the dog thoroughly or cage dry. Final Step: Step away from the dog and take a final look at your work to make sure you are satisfied. After completing any finishing touches, place a bandana around the neck if a boy, or a ribbon if a girl. Make sure you compliment the dog on what a good dog they have been, and how handsome or beautiful he or she looks. Call the owner to have him/her picked up. You re done! *Make sure to register at and watch streaming videos on selected dog breeds! Become a Certified Pet Groomer Hands On Wag My Tail Pet Grooming School Wag-MyTail Online Order DVDs 105

138 CARDIGAN WELSH CORGI Tools Needed Slicker Brush, Comb Nail Clipper, Straight Shears Additional Items: Ear cleaner, shampoo, conditioner, spray cologne, ribbon or bandana First Step: Use cotton balls dampened with ear cleaner to clean the inside of the ears. Second Step: Use your nail clippers to cut the nails. Cut the tip of the nails being careful not to cut the quick. If you cut the quick, use your gel or powder blood stopper to stop the bleeding. Third Step: Use your slicker brush and brush entire coat thoroughly. 106
139 Fourth Step: Bath Time Use your favorite shampoo. Wet the dog first and then apply the shampoo. Shampoo the dog creating a nice lather on entire body, head, legs, and feet. (Be careful not to get any water inside the ears.) Rinse the dog until lather is completely gone. Condition (if desired) after rinsing, making sure you rinse the conditioner out before drying. As part of the dog s bath make sure you: Brush teeth to remove food debris. Fifth Step: After bathing, use a towel to remove any excess water. Then use your blow dryer to dry the dog thoroughly or cage dry. Sixth Step: Use your shears and clean up the whiskers and any long hair on the face, over the eyes and on the muzzle. Seventh Step: Spray coat with conditioner. Comb through. You may also want to lightly spray coat with cologne. Final Step: Step away from the dog and take a final look at your work to make sure you are satisfied. After completing any finishing touches, place a bandana around the neck if a boy, or a ribbon if a girl. Make sure you compliment the dog on what a good dog they have been, and how handsome or beautiful he or she looks. Call the owner to have him/her picked up. You re done! 107

140 CAVALIER KING CHARLES SPANIEL Tools Needed Slicker Brush, Comb Nail Clipper, Straight Shears Clipper, #10 Blade, #15 or #40 Blade Additional Items: Ear cleaner, shampoo, conditioner, spray cologne, ribbon or bandana 108
141 First Step: Use cotton balls dampened with ear cleaner to clean the inside of the ears. Second Step: Use your nail clippers to cut the nails. Cut the tip of the nails being careful not to cut the quick. If you cut the quick, use your gel or powder blood stopper to stop the bleeding. Third Step: Use your #15 blade (Yvonne prefers #40 blade) on your clipper to remove the hair from between the pads. Use thinning shears to remove any straggly hair between and around paws. Fourth Step: For your sanitary trim, use your #10 blade on your clipper and clip the hair from the rectal area ½ inch on all sides of the rectum. Be careful not to touch the rectum area!. Fifth Step: Use your #10 blade to clip hair from groin to naval. Sixth Step: Use your slicker brush and brush entire coat thoroughly. If you encounter any matted areas, use your dematting comb and remove all mats before bathing. Seventh Step: Bath Time Use your favorite shampoo. Wet the dog first and then apply the shampoo. Shampoo the dog creating a nice lather on entire body, head, legs, and feet. (Be careful not to get any water inside the ears.) Rinse the dog until lather is completely gone. Condition (if desired) after rinsing, making sure you rinse the conditioner out before drying. As part of the dog s bath make sure you: Brush teeth to remove food debris. Eighth Step: After bathing, use a towel to remove any excess water. Then use your blow dryer to dry the dog thoroughly. Ninth Step: Use your shears and clean up the whiskers and any long hair on the face, over the eyes and on the muzzle. 109
142 Tenth Step: Spray coat with conditioner. Comb and fluff body, feather tail and legs. You may also want to lightly spray coat with cologne. Final Step: Step away from the dog and take a final look at your work to make sure you are satisfied. After completing any finishing touches, place a bandana around the neck if a boy, or a ribbon if a girl. Make sure you compliment the dog on what a good dog they have been, and how handsome or beautiful he or she looks. Call the owner to have him/her picked up. You re done! *Make sure to register at and watch streaming videos on selected dog breeds! Become a Certified Pet Groomer Hands On Wag My Tail Pet Grooming School Wag-MyTail Online Order DVDs 110
143 Notes 111

144 CHESAPEAKE BAY RETRIEVER Tools Needed Rubber Brush, Nail Clipper Additional Items: Ear cleaner, shampoo, conditioner, spray cologne, ribbon or bandana 112
145 First Step: Use cotton balls dampened with ear cleaner to clean the inside of the ears. Second Step: Use your nail clippers to cut the nails. Cut the tip of the nails being careful not to cut the quick. If you cut the quick, use your gel or powder blood stopper to stop the bleeding. Third Step: Use your rubber brush and brush entire coat thoroughly. Fourth Step: Bath Time Use your favorite shampoo. Wet the dog first and then apply the shampoo. Shampoo the dog creating a nice lather on entire body, head, legs, and feet. (Be careful not to get any water inside the ears.) Rinse the dog until lather is completely gone. Condition (if desired) after rinsing, making sure you rinse the conditioner out before drying. As part of the dog s bath make sure you: Brush teeth to remove food debris. Option: De-shed Treatment Fifth Step: After bathing, use a towel to remove any excess water. Then use your blow dryer to dry the dog thoroughly or cage dry. Sixth Step: Hand rub conditioner onto coat. lightly spray coat with cologne. Massage to create sheen. You may also want to Final Step: Step away from the dog and take a final look at your work to make sure you are satisfied. After completing any finishing touches, place a bandana around the neck if a boy, or a ribbon if a girl. Make sure you compliment the dog on what a good dog they have been, and how handsome or beautiful he or she looks. Call the owner to have him/her picked up. You re done! 113

146 CHIHUAHUA (LONG COAT) Tools Needed Slicker Brush, Comb Nail Clipper, Straight Shears Thinning Shears (for a more natural look) or Curved Shears Clipper, #15 or #40 blade Additional Items: Ear cleaner, shampoo, conditioner, spray cologne, ribbon or bandana 114
147 First Step: Use cotton balls dampened with ear cleaner to clean the inside of the ears. Second Step: Use your nail clippers to cut the nails. Cut the tip of the nails being careful not to cut the quick. If you cut the quick, use your gel or powder blood stopper to stop the bleeding. Third Step: Use your #15 blade (Yvonne prefers #40 blade) on your clipper to remove the hair from between the pads. Use thinning shears to remove any straggly hair between and around paws. Fourth Step: Use your slicker brush and brush entire coat thoroughly. Fifth Step: Bath Time Use your favorite shampoo. Wet the dog first and then apply the shampoo. Shampoo the dog creating a nice lather on entire body, head, legs, and feet. (Be careful not to get any water inside the ears.) Rinse the dog until lather is completely gone. Condition (if desired) after rinsing, making sure you rinse the conditioner out before drying. As part of the dog s bath make sure you: Brush teeth to remove food debris. Option: De-shed Treatment Sixth Step: After bathing, use a towel to remove any excess water. Then use your blow dryer to dry the dog thoroughly or cage dry. Seventh Step: Comb and fluff. Eighth Step: Use your shears and clean up the whiskers and any long hair on the face, over the eyes and on the muzzle. Clean up outside edges of feet so they are rounded. Ninth Step: Spray coat with conditioner. Comb through. You may also want to lightly spray coat with cologne. Final Step: Step away from the dog and take a final look at your work to make sure you are satisfied. Call mom or dad and him/her picked up. 115

148 CHIHUAHUA (SMOOTH COAT) Tools Needed Rubber Brush Nail Clipper Additional Items: Ear cleaner, shampoo, conditioner, spray cologne, ribbon or bandana First Step: Use cotton balls dampened with ear cleaner to clean the inside of the ears. Second Step: Use your nail clippers to cut the nails. Cut the tip of the nails being careful not to cut the quick. If you cut the quick, use your gel or powder blood stopper to stop the bleeding. 116
149 Third Step: Use your rubber brush and brush entire coat thoroughly. Fourth Step: Bath Time Use your favorite shampoo. Wet the dog first and then apply the shampoo. Shampoo the dog creating a nice lather on entire body, head, legs, and feet. (Be careful not to get any water inside the ears.) Rinse the dog until lather is completely gone. Condition (if desired) after rinsing, making sure you rinse the conditioner out before drying. As part of the dog s bath make sure you: Brush teeth to remove food debris. Option: De-shed Treatment Fifth Step: After bathing, use a towel to remove any excess water. Then use your blow dryer to dry the dog thoroughly or cage dry. Sixth Step: Hand rub conditioner onto coat. lightly spray coat with cologne. Massage to create sheen. You may also want to Final Step: Step away from the dog and take a final look at your work to make sure you are satisfied. After completing any finishing touches, place a bandana around the neck if a boy, or a ribbon if a girl. Make sure you compliment the dog on what a good dog they have been, and how handsome or beautiful he or she looks. Call the owner to have him/her picked up. You re done! *Make sure to register at and watch streaming videos on selected dog breeds! Become a Certified Pet Groomer Hands On Wag My Tail Pet Grooming School Wag-MyTail Online Order DVDs 117

150 CHINESE CRESTED (HAIRLESS) *CHINESE CRESTED POWDERPUFF Slicker Brush, Comb Nail Clipper Tools Needed Additional Items: Ear cleaner, medicated ear powder, shampoo, lanolin conditioner, spray cologne, ribbon or bandana 118
151 First Step: Use medicated powder lightly to dry ears. Gently pull out any dead hair. Use cotton balls dampened with ear cleaner to clean the inside of the ears. Second Step: Use your nail clippers to cut the nails. Cut the tip of the nails being careful not to cut the quick. If you cut the quick, use your gel or powder blood stopper to stop the bleeding. Third Step: Use your slicker brush and brush head and paws thoroughly. Fourth Step: Bath Time Use your favorite shampoo. Wet the dog first and then apply the shampoo. Shampoo the dog creating a nice lather on entire body, head, legs, and feet. (Be careful not to get any water inside the ears.) Rinse the dog until lather is completely gone. Condition (if desired) after rinsing, making sure you rinse the conditioner out before drying. As part of the dog s bath make sure you: Brush teeth to remove food debris. Fifth Step: After bathing, use a towel to remove any excess water. For the Powderpuff use your blow dryer to dry the dog thoroughly or cage dry. Sixth Step: Comb and fluff. Pay special attention to the head, mane, legs and tail. Seventh Step: Use your lanolin conditioner and massage into skin. For the Powerpuff comb through. You may also want to lightly spray coat with cologne. Final Step: Step away from the dog and take a final look at your work to make sure you are satisfied. After completing any finishing touches, place a bandana around the neck if a boy, or a ribbon if a girl. Make sure you compliment the dog on what a good dog they have been, and how handsome or beautiful he or she looks. Call the owner to have him/her picked up. You re done! *Note: Style the CHINESE CRESTED POWDER PUFF like the Maltese. The Powder puff variety has a long silky coat. It can be any color or combination of colors. 119

152 CHINESE SHAR-PEI Tools Needed Rubber Brush Nail Clipper, Straight Shears Additional Items: Ear cleaner, baby powder, shampoo, conditioner, spray cologne, ribbon or bandana First Step: Use cotton balls dampened with ear cleaner to clean the inside of the ears. Second Step: Use your nail clippers to cut the nails. Cut the tip of the nails being careful not to cut the quick. If you cut the quick, use your gel or powder blood stopper to stop the bleeding. Third Step: Use rubber brush to brush entire body to remove debris. Fourth Step: Bath Time Use your favorite shampoo. 120
153 Wet the dog first and then apply the shampoo. Shampoo the dog creating a nice lather on entire body, head, legs, and feet. Wash any folds on face. Clean wrinkles on body. (Be careful not to get any water inside the ears.) Rinse the dog until lather is completely gone. Condition (if desired) after rinsing, making sure you rinse the conditioner out before drying. As part of the dog s bath make sure you: Brush teeth to remove food debris. Fifth Step: After bathing, use a towel to remove any excess water. Then use your blow dryer to dry the dog thoroughly or cage dry. Use baby powder to keep wrinkles dry. Sixth Step: Use your shears and clean up the whiskers. Seventh Step: Hand rub conditioner onto body. cologne. You may also want to lightly spray coat with Final Step: Step away from the dog and take a final look at your work to make sure you are satisfied. After completing any finishing touches, place a bandana around the neck if a boy, or a ribbon if a girl. Make sure you compliment the dog on what a good dog they have been, and how handsome or beautiful he or she looks. Call the owner to have him/her picked up. You re done! *Make sure to register at and watch streaming videos on selected dog breeds! 121

154 CHOW CHOW Tools Needed Slicker Brush, Comb, Dematting Comb or Rake Nail Clipper, Straight Shears Thinning Shears (for a more natural look) or Curved Shears Clipper, #10 blade, #15 or #40 blade Additional Items: Ear cleaner, shampoo, conditioner, spray cologne, ribbon or bandana 122
155 First Step: Use cotton balls dampened with ear cleaner to clean the inside of the ears. Second Step: Use your nail clippers to cut the nails. Cut the tip of the nails being careful not to cut the quick. If you cut the quick, use your gel or powder blood stopper to stop the bleeding. Third Step: Use your #15 blade (Yvonne prefers #40 blade) on your clipper to remove the hair from between the pads. Use thinning shears to remove any straggly hair between and around paws. Fourth Step: For the sanitary trim, use your #10 blade on your clipper and clip the hair from the rectal area ½ inch on all sides of the rectum. Be careful not to touch the rectum area! Fifth Step: Use your #10 blade and clip the hair from the groin to the navel. Sixth Step: Use your slicker brush and brush entire coat thoroughly. If you encounter any matted areas, use your dematting comb or rake and remove all mats before bathing. Seventh Step: Bath Time Use your favorite shampoo. Wet the dog first and then apply the shampoo. Shampoo the dog creating a nice lather on entire body, head, legs, and feet. (Be careful not to get any water inside the ears.) Rinse the dog until lather is completely gone. Condition (if desired) after rinsing, making sure you rinse the conditioner out before drying. As part of the dog s bath make sure you: Brush teeth to remove food debris. Eighth Step: After bathing, use a towel to remove any excess water. Then use your blow dryer to dry the dog thoroughly or cage dry. Ninth Step: Comb and fluff. 123
156 Tenth Step: Use your shears and clean up the whiskers and any long hair on the face. Eleventh Step: Spray coat with conditioner. Comb and fluff again, this time going upwards, paying attention to the mane, ruff and chest. You may also want to lightly spray coat with cologne. Final Step: Step away from the dog and take a final look at your work to make sure you are satisfied. After completing any finishing touches, place a bandana around the neck if a boy, or a ribbon if a girl. Make sure you compliment the dog on what a good dog they have been, and how handsome or beautiful he or she looks. Call the owner to have him/her picked up. You re done! *Make sure to register at and watch streaming videos on selected dog breeds! Also, watch the Chow Chow streaming video for free. Become a Certified Pet Groomer Hands On Wag My Tail Pet Grooming School Wag-MyTail Online Order DVDs 124
157 Notes 125

158 CLUMBER SPANIEL Tools Needed Slicker Brush, Comb Nail Clipper, Straight Shears Thinning Shears (for a more natural look) or Curved Shears Clipper, #10 blade, #15 or #40 blade Additional Items: Ear cleaner, shampoo, conditioner, spray cologne, ribbon or bandana 126
159 First Step: Use cotton balls dampened with ear cleaner to clean the inside of the ears. Second Step: Use your nail clippers to cut the nails. Cut the tip of the nails being careful not to cut the quick. If you cut the quick, use your gel or powder blood stopper to stop the bleeding. Third Step: Use your #15 blade (Yvonne prefers #40 blade), on your clipper to remove the hair from between the pads. Fourth Step: For the sanitary trim, use your #10 blade on your clipper and clip the hair from the rectal area ½ inch on all sides of the rectum. Be careful not to touch the rectum area! Fifth Step: Use your #10 blade to trim the hair from the groin to the navel. Sixth Step: Use your slicker brush and brush entire coat thoroughly. Seventh Step: Bath Time Use your favorite shampoo. Wet the dog first and then apply the shampoo. Shampoo the dog creating a nice lather on entire body, head, legs, and feet. (Be careful not to get any water inside the ears.) Rinse the dog until lather is completely gone. Condition (if desired) after rinsing, making sure you rinse the conditioner out before drying. As part of the dog s bath make sure you: Brush teeth to remove food debris. Eighth Step: After bathing, use a towel to remove any excess water. Then use your blow dryer to dry the dog thoroughly or cage dry. Ninth Step: Comb and fluff! 127
160 Tenth Step: BODY/LEGS/FEET 1) Use your thinning shears to trim any unruly hair from the body so the coat lies flat. 2) Use your shears to even out featherings on legs, under the tail and beneath the chest. 3) Use your thinning shears to trim straggly hair from the end of the tail. 4) Use your thinning shears to remove hair from between the toes. 5) Use your shears to trim the outside edges of the feet. Eleventh Step: EARS/FACE 1) Use your thinning shears to trim straggly hair from the ears and cheeks. 2) Use your thinning shears to clean up the face. Leave it longer than a Cocker Spaniel. 3) Use your shears and clean up the whiskers and any long hair on the face. Twelfth Step: Spray coat with conditioner. Comb through. You may also want to lightly spray coat with cologne. Final Step: Step away from the dog and take a final look at your work to make sure you are satisfied. After completing any finishing touches, place a bandana around the neck if a boy, or a ribbon if a girl. Make sure you compliment the dog on what a good dog they have been, and how handsome or beautiful he or she looks. Call the owner to have him/her picked up. You re done! *Make sure to register at and watch streaming videos on selected dog breeds! Become a Certified Pet Groomer Hands On Wag My Tail Pet Grooming School Wag-MyTail Online Order DVDs 128
161 Notes 129

162 COCKER SPANIEL (AMERICAN) Tools Needed Slicker Brush, Comb Nail Clipper, Straight Shears Thinning Shears (for a more natural look) or Curved Shears Clipper, #7F or #8 ½ blade, #10 blade, #15 or #40 blade Additional Items: Ear cleaner, shampoo, conditioner, spray cologne, ribbon or bandana 130
163 First Step: Use cotton balls dampened with ear cleaner to clean the inside of the ears. Second Step: Use your nail clippers to cut the nails. Cut the tip of the nails being careful not to cut the quick. If you cut the quick, use your gel or powder blood stopper to stop the bleeding. Third Step: Use your #15 blade (Yvonne prefers #40 blade), on your clipper to remove the hair from between the pads. Fourth Step: For the sanitary trim, use your #10 blade on your clipper and clip the hair from the rectal area ½ inch on all sides of the rectum. Be careful not to touch the rectum area! Fifth Step: Use your #10 blade to trim the hair from the groin to the navel. Sixth Step: Use your slicker brush and brush entire coat thoroughly. If you encounter any matted areas, use your dematting comb and remove all mats before bathing. Seventh Step: Bath Time Use your favorite shampoo. Wet the dog first and then apply the shampoo. Shampoo the dog creating a nice lather on entire body, head, legs, and feet. (Be careful not to get any water inside the ears.) Rinse the dog until lather is completely gone. Condition (if desired) after rinsing, making sure you rinse the conditioner out before drying. As part of the dog s bath make sure you: Brush teeth to remove food debris. Eighth Step: After bathing, use a towel to remove any excess water. Then use your blow dryer to dry the dog thoroughly or cage dry. Ninth Step: Comb and fluff! 131
164 Tenth Step: BODY/LEGS/CHEST 1) Use your #7F, #8 ½ or #10 blade to clip the top of the body from the base of the skull to the end of the tail. Clip the entire tail to make it look even all around. 2) Use your #7F, #8 ½ or #10 blade to clip and blend the rest of the body, including under the chest and sides, referring to the top of the shoulders as a baseline measurement. Follow the natural contours of the body. 3) Use your thinning shears to smooth out shoulder hair evenly into leg featherings. 4) Use your thinning shears to smooth out hindquarter hair evenly into rear leg featherings. 5) Use your straight shears to trim the front and back legs into a tubular shape. 6) Use your shears to round off feet. Eleventh Step: FACE/EARS/THROAT 1) Use your #10 blade and going with the grain, trim the top of the head to the base of the skull, and around to the lower base of the ears. Trim the cheeks down and out to the corners of the ears. Starting at the nose, trim the snout up with the grain. Trim the muzzle downward. 2) Use your #10 blade to trim the top 1/3 of the ears on both sides. Thoroughly comb out the bottom 2/3 of the ears on both sides. 3) Use your #10 blade to trim under the jaw and the throat, creating a U shape going from the ears and down the sternum. Trim around the lips. 132
165 Twelfth Step: Spray coat with conditioner. Comb through. You may also want to lightly spray coat with cologne. Final Step: Step away from the dog and take a final look at your work to make sure you are satisfied. After completing any finishing touches, place a bandana around the neck if a boy, or a ribbon if a girl. Make sure you compliment the dog on what a good dog they have been, and how handsome or beautiful he or she looks. Call the owner to have him/her picked up. You re done! *Make sure to register at and watch streaming videos on selected dog breeds! Also, watch the Cocker Spaniel streaming video. 133
 or Curved Shears Clipper, #15 or #40 blade Additional Items: Ear cleaner, shampoo, conditioner, spray cologne, ribbon or")
166 COLLIE (ROUGH) Tools Needed Slicker Brush, Comb, Dematting Comb or Rake, Pin Brush (large) Nail Clipper Straight Shears Thinning Shears (for a more natural look) or Curved Shears Clipper, #15 or #40 blade Additional Items: Ear cleaner, shampoo, conditioner, spray cologne, ribbon or bandana 134
167 First Step: Use cotton balls dampened with ear cleaner to clean the inside of the ears. Second Step: Use your nail clippers to cut the nails. Cut the tip of the nails being careful not to cut the quick. If you cut the quick, use your gel or powder blood stopper to stop the bleeding. Third Step: Use your #15 blade (Yvonne prefers #40 blade), on your clipper to remove the hair from between the pads. Fourth Step: Use your slicker brush and brush entire coat thoroughly. If you encounter any matted areas, use your dematting comb or rake and remove all mats before bathing. Fifth Step: Bath Time Use your favorite shampoo. Wet the dog first and then apply the shampoo. Shampoo the dog creating a nice lather on entire body, head, legs, and feet. (Be careful not to get any water inside the ears.) Rinse the dog until lather is completely gone. Condition (if desired) after rinsing, making sure you rinse the conditioner out before drying. As part of the dog s bath make sure you: Brush teeth to remove food debris. Option: De-shed Treatment Sixth Step: After bathing, use a towel to remove any excess water. Then use your blow dryer to dry the dog thoroughly or cage dry. Seventh Step: Use your shears and clean up the whiskers and any long hair on the face, over the eyes and on the muzzle. Use shears to clean up outside edges of ears. Eighth Step: Use thinning shears to reduce volume of hair near ears and on tail. Ninth Step: Comb and then fluff with pin brush. Tenth Step: Spray coat with conditioner and brush again to fluff coat. lightly spray coat with cologne. You may also want to 135
168 Final Step: Step away from the dog and take a final look at your work to make sure you are satisfied. After completing any finishing touches, place a bandana around the neck if a boy, or a ribbon if a girl. Make sure you compliment the dog on what a good dog they have been, and how handsome or beautiful he or she looks. Call the owner to have him/her picked up. You re done! *Make sure to register at and watch streaming videos on selected dog breeds! Become a Certified Pet Groomer Hands On Wag My Tail Pet Grooming School Wag-MyTail Online Order DVDs 136
169 Notes 137

170 COLLIE (SMOOTH) Tools Needed Slicker Brush, Comb, Shedding Blade Nail Clipper, Straight Shears Additional Items: Ear cleaner, shampoo, conditioner, spray cologne, ribbon or bandana First Step: Use cotton balls dampened with ear cleaner to clean the inside of the ears. Second Step: Use your nail clippers to cut the nails. Cut the tip of the nails being careful not to cut the quick. If you cut the quick, use your gel or powder blood stopper to stop the bleeding. 138
171 Third Step: Use your slicker brush and brush entire coat thoroughly. Remove any dead hair with your shedding blade. Fourth Step: Bath Time Use your favorite shampoo. Wet the dog first and then apply the shampoo. Shampoo the dog creating a nice lather on entire body, head, legs, and feet. (Be careful not to get any water inside the ears.) Rinse the dog until lather is completely gone. Condition (if desired) after rinsing, making sure you rinse the conditioner out before drying. As part of the dog s bath make sure you: Brush teeth to remove food debris. Option: De-shed Treatment Fifth Step: After bathing, use a towel to remove any excess water. Then use your blow dryer to dry the dog thoroughly or cage dry. Sixth Step: Use your shears and clean up the whiskers and any long hair on the face, over the eyes and on the muzzle. Seventh Step: Spray coat with conditioner. Comb through. You may also want to lightly spray coat with cologne. Final Step: Step away from the dog and take a final look at your work to make sure you are satisfied. After completing any finishing touches, place a bandana around the neck if a boy, or a ribbon if a girl. Make sure you compliment the dog on what a good dog they have been, and how handsome or beautiful he or she looks. Call the owner to have him/her picked up. You re done! 139

172 COONHOUND (Black & Tan) Tools Needed Rubber Brush Nail Clipper, Straight Shears Additional Items: Ear cleaner, shampoo, conditioner, spray cologne, ribbon or bandana First Step: Use cotton balls dampened with ear cleaner to clean the inside of the ears. 140
173 Second Step: Use your nail clippers to cut the nails. Cut the tip of the nails being careful not to cut the quick. If you cut the quick, use your gel or powder blood stopper to stop the bleeding. Third Step: Use your rubber brush and brush entire coat thoroughly. Fourth Step: Bath Time Use your favorite shampoo. Wet the dog first and then apply the shampoo. Shampoo the dog creating a nice lather on entire body, head, legs, and feet. (Be careful not to get any water inside the ears.) Rinse the dog until lather is completely gone. Condition (if desired) after rinsing, making sure you rinse the conditioner out before drying. As part of the dog s bath make sure you: Brush teeth to remove food debris. Option: De-shed Treatment Fifth Step: After bathing, use a towel to remove any excess water. Then use your blow dryer to dry the dog thoroughly or cage dry. Sixth Step: Use your shears to clean up the whiskers and any long hair on the face, over the eyes and on the muzzle. Seventh Step: Hand rub conditioner onto coat. Massage into coat to create sheen. You may also want to lightly spray coat with cologne. Final Step: Step away from the dog and take a final look at your work to make sure you are satisfied. After completing any finishing touches, place a bandana around the neck if a boy, or a ribbon if a girl. Make sure you compliment the dog on what a good dog they have been, and how handsome or beautiful he or she looks. Call the owner to have him/her picked up. You re done! 141

174 CURLY- COATED RETRIEVER Tools Needed Bristle Brush (stiff), Comb Nail Clipper, Straight Shears Additional Items: Ear cleaner, medicated ear powder, shampoo, conditioner, spray cologne, ribbon or bandana First Step: Use medicated powder to lightly dry ears. Gently pull out any dead hair. Use cotton balls dampened with ear cleaner to clean the inside of the ears. Second Step: Use your nail clippers to cut the nails. Cut the tip of the nails being careful not to cut the quick. If you cut the quick, use your gel or powder blood stopper to stop the bleeding. 142
175 Third Step: Use your bristle brush and brush entire coat thoroughly. Fourth Step: Bath Time Use your favorite shampoo. Wet the dog first and then apply the shampoo. Shampoo the dog creating a nice lather on entire body, head, legs, and feet. (Be careful not to get any water inside the ears.) Rinse the dog until lather is completely gone. Condition (if desired) after rinsing, making sure you rinse the conditioner out before drying. As part of the dog s bath make sure you: Brush teeth to remove food debris. Fifth Step: After bathing, use a towel to remove any excess water. Then use your blow dryer to dry the dog thoroughly or cage dry. Sixth Step: Use your shears and clean up the whiskers and any long hair on the face, over the eyes and on the muzzle. Seventh Step: Use shears to even out any curls on the entire body, including the head and ears, that aren t lying flat. Curls taper to a point at the end of the tail. Eighth Step: Spray coat with conditioner. As you do your final brush, use circular motion to evenly distribute conditioner throughout coat. You may also want to lightly spray coat with cologne. Final Step: Step away from the dog and take a final look at your work to make sure you are satisfied. After completing any finishing touches, place a bandana around the neck if a boy, or a ribbon if a girl. Make sure you compliment the dog on what a good dog they have been, and how handsome or beautiful he or she looks. Call the owner to have him/her picked up. You re done! 143

176 DACHSHUND (Longhaired) *Wire Haired or Smooth Tools Needed Slicker Brush, Comb Nail Clipper, Straight Shears Thinning Shears (for a more natural look) or Curved Shears Clipper, #15 or #40 blade Additional Items: Ear cleaner, shampoo, conditioner, spray cologne, ribbon or bandana * On the Wire Haired Dachshund use your shears to even out hair around outside edges of the feet, and the featherings on the coat. Use thinning shears to trim fringe off of the tail and hock. For the Smooth Dachshund, eliminate step seven. 144
177 First Step: Use cotton balls dampened with ear cleaner to clean the inside of the ears. Second Step: Use your nail clippers to cut the nails. Cut the tip of the nails being careful not to cut the quick. If you cut the quick, use your gel or powder blood stopper to stop the bleeding. Third Step: Use your #15 blade (Yvonne prefers #40 blade) on your clipper to remove the hair from between the pads. Use thinning shears to remove any straggly hair between and around paws. Fourth Step: Use your slicker brush and brush entire coat thoroughly. Fifth Step: Bath Time Use your favorite shampoo. Wet the dog first and then apply the shampoo. Shampoo the dog creating a nice lather on entire body, head, legs, and feet. (Be careful not to get any water inside the ears.) Rinse the dog until lather is completely gone. Condition (if desired) after rinsing, making sure you rinse the conditioner out before drying. As part of the dog s bath make sure you: Brush teeth to remove food debris. Sixth Step: After bathing, use a towel to remove any excess water. Then use your blow dryer to dry the dog thoroughly or cage dry. Seventh Step: Comb and fluff out hair paying extra attention to the ears, legs and tail. Eighth Step: Use your shears and clean up the whiskers and any long hair on the face, over the eyes and on the muzzle. Ninth Step: Spray coat with conditioner. Comb through. You may also want to lightly spray coat with cologne. Final Step: Step away from the dog and take a final look at your work to make sure you are satisfied. Call the owner to have him/her picked up. You re done! 145

178 DALMATIAN Tools Needed Rubber Brush Nail Clipper, Straight Shears Additional Items: Ear cleaner, shampoo, conditioner, spray cologne, ribbon or bandana First Step: Use cotton balls dampened with ear cleaner to clean the inside of the ears. 146
179 Second Step: Use your nail clippers to cut the nails. Cut the tip of the nails being careful not to cut the quick. If you cut the quick, use your gel or powder blood stopper to stop the bleeding. Third Step: Use your rubber brush and brush entire coat thoroughly. Fourth Step: Bath Time Use your favorite shampoo. Wet the dog first and then apply the shampoo. Shampoo the dog creating a nice lather on entire body, head, legs, and feet. (Be careful not to get any water inside the ears.) Rinse the dog until lather is completely gone. Condition (if desired) after rinsing, making sure you rinse the conditioner out before drying. As part of the dog s bath make sure you: Brush teeth to remove food debris. Option: De-shed Treatment Fifth Step: After bathing, use a towel to remove any excess water. Then use your blow dryer to dry the dog thoroughly or cage dry. Sixth Step: Use your shears and clean up the whiskers and any long hair on the face, over the eyes and on the muzzle. Seventh Step: Hand rub conditioner onto coat. You may also want to lightly spray coat with cologne. Final Step: Step away from the dog and take a final look at your work to make sure you are satisfied. After completing any finishing touches, place a bandana around the neck if a boy, or a ribbon if a girl. Make sure you compliment the dog on what a good dog they have been, and how handsome or beautiful he or she looks. Call the owner to have him/her picked up. You re done! 147

180 DANDI DINMONT TERRIER Tools Needed Slicker Brush, Comb Nail Clipper, Straight Shears Thinning Shears (for a more natural look) or Curved Shears Clipper,#5F or #7F blade, #10 blade, #15 or #40 blade Additional Items: Ear cleaner, medicated ear powder, shampoo, conditioner, spray cologne, ribbon or bandana First Step: Use medicated powder lightly to dry ears. Gently pull out any dead hair. Use cotton balls dampened with ear cleaner to clean the inside of the ears. 148
181 Second Step: Use your nail clippers to cut the nails. Cut the tip of the nails being careful not to cut the quick. If you cut the quick, use your gel or powder blood stopper to stop the bleeding. Third Step: Use your #15 blade (Yvonne prefers #40 blade), on your clipper to remove the hair from between the pads. Fourth Step: For the sanitary trim, use your #10 blade on your clipper and clip the hair from the rectal area ½ inch on all sides of the rectum. Be careful not to touch the rectum area! Fifth Step: Use your #10 blade to trim the hair from the groin to the navel. Sixth Step: Use your slicker brush and brush entire coat thoroughly. If you encounter any matted areas, use your dematting comb or rake and remove all mats before bathing. Seventh Step: Bath Time Use your favorite shampoo. Wet the dog first and then apply the shampoo. Shampoo the dog creating a nice lather on entire body, head, legs, and feet. (Be careful not to get any water inside the ears.) Rinse the dog until lather is completely gone. Condition (if desired) after rinsing, making sure you rinse the conditioner out before drying. As part of the dog s bath make sure you: Brush teeth to remove food debris. Eighth Step: After bathing, use a towel to remove any excess water. Then use your blow dryer to dry the dog thoroughly or cage dry. Ninth Step: Comb and fluff! Tenth Step: BODY/LEGS 1) Use your #5F or #7F blade. Start at the base of the skull and trim all the way down the back to the base of the tail. 2) Use your #5F of #7F blade, and using the shoulders as a marker, trim the sides of the neck from the top of the shoulder, trimming the sides down to the flank and over the rump. 149
 Use your thinning shears to smooth out the line between the legs and the body. 5) Use your shears to round off the feet.")
182 3) Use your shears to trim the forechest leaving the fullness. 4) Use your shears on the underchest. As you even out the hair, create a slight incline from elbow to flank. 5) Use your thinning shears to smooth out the line between the legs and the body. 5) Use your shears to round off the feet. Eleventh Step: HEAD/FACE/EARS 1) Use your #10 blade to clip the top of the muzzle, starting just below the eyes at the stop and clipping toward the nose. 2) Use your #10 blade to trim the ears on both sides; starting at the base and making sure you leave a tassel on the end of each ear. (See Bedlington Terrier for direction on tassels.) 3) Use your shears to clean up the edges of the ears, but leave the tassel untrimmed. 4) Use your comb and fluff the hair on the head. Use your shears to neaten it up, but leave it rounded and high. 150

183 Twelfth Step: Spray coat with conditioner. Comb through. You may also want to lightly spray coat with cologne. Final Step: Step away from the dog and take a final look at your work to make sure you are satisfied. After completing any finishing touches, place a bandana around the neck if a boy, or a ribbon if a girl. Make sure you compliment the dog on what a good dog they have been, and how handsome or beautiful he or she looks. Call the owner to have him/her picked up. You re done! 151

184 DOBERMAN PINSCHER Tools Needed Rubber Brush, Bristle Brush (stiff) Nail Clipper, Straight Shears Additional Items: Ear cleaner, shampoo, conditioner, spray cologne, ribbon or bandana 152
185 First Step: Use cotton balls dampened with ear cleaner to clean the inside of the ears. Second Step: Use your nail clippers to cut the nails. Cut the tip of the nails being careful not to cut the quick. If you cut the quick, use your gel or powder blood stopper to stop the bleeding. Third Step: Use your rubber brush and brush entire coat thoroughly. Fourth Step: Bath Time Use your favorite shampoo. Wet the dog first and then apply the shampoo. Shampoo the dog creating a nice lather on entire body, head, legs, and feet. (Be careful not to get any water inside the ears.) Rinse the dog until lather is completely gone. Condition (if desired) after rinsing, making sure you rinse the conditioner out before drying. As part of the dog s bath make sure you: Brush teeth to remove food debris. Option: De-shed Treatment Fifth Step: After bathing, use a towel to remove any excess water. Then use your blow dryer to dry the dog thoroughly or cage dry. Sixth Step: Use your shears and clean up the whiskers and any long hair on the face, over the eyes and on the muzzle. Seventh Step: Hand rub conditioner onto coat. You may also want to lightly spray coat with cologne. Final Step: Step away from the dog and take a final look at your work to make sure you are satisfied. After completing any finishing touches, place a bandana around the neck if a boy, or a ribbon if a girl. Make sure you compliment the dog on what a good dog they have been, and how handsome or beautiful he or she looks. Call the owner to have him/her picked up. You re done! 153

186 ENGLISH COCKER SPANIEL Tools Needed Slicker Brush, Comb Nail Clipper, Straight Shears Thinning Shears (for a more natural look) or Curved Shears Clipper, #7F, #10 blade, #15 or #40 blade Additional Items: Ear cleaner, shampoo, conditioner, spray cologne, ribbon or bandana 154
187 First Step: Use cotton balls dampened with ear cleaner to clean the inside of the ears. Second Step: Use your nail clippers to cut the nails. Cut the tip of the nails being careful not to cut the quick. If you cut the quick, use your gel or powder blood stopper to stop the bleeding. Third Step: Use your #15 blade (Yvonne prefers #40 blade), on your clipper to remove the hair from between the pads. Fourth Step: For the sanitary trim, use your #10 blade on your clipper and clip the hair from the rectal area ½ inch on all sides of the rectum. Be careful not to touch the rectum area! Fifth Step: Use your #10 blade to trim the hair from the groin to the navel. Sixth Step: Use your slicker brush and brush entire coat thoroughly. If you encounter any matted areas, use your dematting comb or rake and remove all mats before bathing. Seventh Step: Bath Time Use your favorite shampoo. Wet the dog first and then apply the shampoo. Shampoo the dog creating a nice lather on entire body, head, legs, and feet. (Be careful not to get any water inside the ears.) Rinse the dog until lather is completely gone. Condition (if desired) after rinsing, making sure you rinse the conditioner out before drying. As part of the dog s bath make sure you: Brush teeth to remove food debris. Eighth Step: After bathing, use a towel to remove any excess water. Then use your blow dryer to dry the dog thoroughly or cage dry. Ninth Step: Comb and fluff! Tenth Step: BODY/LEGS/CHEST 1) Use your #7F blade to trim the top of the body from the base of the skull to the end of the tail. 155
188 2) Use your #7F blade to trim and blend the rest of the body, including under the chest and the sides, referring to the top of the shoulders as a baseline measurement. Follow the natural contours of the body. Trim the tail to make it look even all around. 3) Use your thinning shears to smooth out shoulder hair evenly into leg featherings. 4) Use your thinning shears to smooth out hindquarter hair evenly into rear leg featherings. 5) Use your straight shears to trim the front legs into a cylinder shape. 6) Use your shears to round off feet. Eleventh Step: FACE/EARS/THROAT 1) Use your #10 blade and going with the grain, trim the top of the head, to the base of the skull, and around to the lower base of the ears. Trim the cheeks down and out to the corners of the ears. Starting at the nose, trim the snout up with the grain, & trim the muzzle downward. 2) Use your #10 blade to trim the top 1/3 of the ears on both sides. Thoroughly comb out the bottom 2/3 of the ears on both sides. 3) Use your #10 blade to trim the under the jaw and the throat, creating a U shape going from the ears and down the sternum. Trim around the lips by stretching lower lip back and going against the grain. Twelfth Step: Spray coat with conditioner. Comb through. You may also want to lightly spray coat with cologne. Final Step: Step away from the dog and take a final look at your work to make sure you are satisfied. After completing any finishing touches, place a bandana around the neck if a boy, or a ribbon if a girl. Make sure you compliment the dog on what a good dog they have been, and how handsome or beautiful he or she looks. Call the owner to have him/her picked up. You re done! 156
189 Notes 157

190 ENGLISH SETTER Tools Needed Slicker Brush, Comb Nail Clipper, Straight Shears Thinning Shears (for a more natural look) or Curved Shears Clipper, #7F blade, #10 blade, #15 or #40 blade Additional Items: Ear cleaner, shampoo, conditioner, spray cologne, ribbon or bandana First Step: Use cotton balls dampened with ear cleaner to clean the inside of the ears. 158
191 Second Step: Use your nail clippers to cut the nails. Cut the tip of the nails being careful not to cut the quick. If you cut the quick, use your gel or powder blood stopper to stop the bleeding. Third Step: Use your #15 blade (Yvonne prefers #40 blade), on your clipper to remove the hair from between the pads. Fourth Step: For the sanitary trim, use your #10 blade on your clipper and clip the hair from the rectal area ½ inch on all sides of the rectum. Be careful not to touch the rectum area! Fifth Step: Use your #10 blade to trim the hair from the groin to the navel. Sixth Step: Use your slicker brush and brush entire coat thoroughly. If you encounter any matted areas, use your dematting comb and remove all mats before bathing. Seventh Step: Bath Time Use your favorite shampoo. Wet the dog first and then apply the shampoo. Shampoo the dog creating a nice lather on entire body, head, legs, and feet. (Be careful not to get any water inside the ears.) Rinse the dog until lather is completely gone. Condition (if desired) after rinsing, making sure you rinse the conditioner out before drying. As part of the dog s bath make sure you: Brush teeth to remove food debris. Eighth Step: After bathing, use a towel to remove any excess water. Then use your blow dryer to dry the dog thoroughly or cage dry. Ninth Step: Comb and fluff dry featherings. Tenth Step: BODY/LEGS/TAIL 1) Use your #7 blade, and clip the coat lightly along the grain and following the contours of the body. 2) Using the same blade technique trim the sides of the neck to a point at the elbow at the front. Blend the sides to the bottom part of the rear hip. 3) Use your thinning shears to blend the sides and the legs. 159
192 4) Use your thinning shears to trim the hock down to the bottom of the foot. 5) Use your thinning shears to trim the hair between the toes. 6) Use your shears to clean up the outside edges of the feet. 7) The tail is tapered from the base to the tip. It shouldn t fall below the hock. 8) Use your thinning shears to trim any extra fullness from the top of the tail. Eleventh Step: HEAD/FACE 1) Measure your baseline from the shoulders. Use your #10 blade to trim under the jaw creating a U shape that goes from the throat and outward to the ear. Clean around the lips by stretching the lower lip back towards the ears. 2) Use your shears to round off feet. Twelfth Step: Spray coat with conditioner. Comb through. You may also want to lightly spray coat with cologne. Final Step: Step away from the dog and take a final look at your work to make sure you are satisfied. After completing any finishing touches, place a bandana around the neck if a boy, or a ribbon if a girl. Make sure you compliment the dog on what a good dog they have been, and how handsome or beautiful he or she looks. Call the owner to have him/her picked up. You re done! *Make sure to register at and watch streaming videos on selected dog breeds! Become a Certified Pet Groomer Hands On Wag My Tail Pet Grooming School Wag-MyTail Online Order DVDs 160
193 Notes 161

194 ENGLISH SPRINGER SPANIEL Tools Needed Slicker Brush, Comb Nail Clipper, Straight Shears Thinning Shears (for a more natural look) or Curved Shears Clipper, #7F, #10 blade, #15 or #40 blade Additional Items: Ear cleaner, shampoo, conditioner, spray cologne, ribbon or bandana 162
195 First Step: Use cotton balls dampened with ear cleaner to clean the inside of the ears. Second Step: Use your nail clippers to cut the nails. Cut the tip of the nails being careful not to cut the quick. If you cut the quick, use your gel or powder blood stopper to stop the bleeding. Third Step: Use your #15 blade (Yvonne prefers #40 blade), on your clipper to remove the hair from between the pads. Fourth Step: For the sanitary trim, use your #10 blade on your clipper and clip the hair from the rectal area ½ inch on all sides of the rectum. Be careful not to touch the rectum area! Fifth Step: Use your #10 blade to trim the hair from the groin to the navel. Sixth Step: Use your slicker brush and brush entire coat thoroughly. If you encounter any matted areas, use your dematting comb and remove all mats before bathing. Seventh Step: Bath Time Use your favorite shampoo. Wet the dog first and then apply the shampoo. Shampoo the dog creating a nice lather on entire body, head, legs, and feet. (Be careful not to get any water inside the ears.) Rinse the dog until lather is completely gone. Condition (if desired) after rinsing, making sure you rinse the conditioner out before drying. As part of the dog s bath make sure you: Brush teeth to remove food debris. Eighth Step: After bathing, use a towel to remove any excess water. Then use your blow dryer to dry the dog thoroughly or cage dry. Ninth Step: Comb and fluff! 163
 Use your #7F blade at a right angle & trim the sides of the neck, ending in a point at the elbow in front.")
 Use your thinning shears to trim straggly hair from the hock to the bottom of the foot.")
196 Body Face Tenth Step: BODY/LEGS/TAIL 1) Use your #7F blade to trim the body along the grain, holding clipper at a right angle. 2) Use your #7F blade at a right angle & trim the sides of the neck, ending in a point at the elbow in front. Blend sides back to the rear and under the hips. 3) Use your #7F blade to trim the tail and blend in with the body. 4) Use your thinning shears to trim straggly hair from the hock to the bottom of the foot. 5) Use your thinning shears to trim the hair between the toes. 164
197 6) Use your shears to trim any unruly hair on the top and sides of feet. Neaten up the outside edges of the feet. Eleventh Step: HEAD/FACE/EARS 1) Use your #10 blade to trim from the top of the head to the base of the skull and trim around the ears to the base of the ear. 2) Use your #10 blade to trim the cheeks and face making sure you go with the grain and ending at the corners of the ears. 3) Use your #10 blade to trim from the stop along the foreface against the grain. Trim down the sides of the muzzle. 4) Use your #10 blade to trim the under the jaw to the throat, creating a U shape going from ear to ear. 5) Use your #10 blade and trim the flews of the lips by stretching the lower lip back and going against the grain along the edge of the lips. 6) Use your #10 blade to trim the top third of the ears on both sides. Twelfth Step: Spray coat with conditioner. Comb through. You may also want to lightly spray coat with cologne. Final Step: Step away from the dog and take a final look at your work to make sure you are satisfied. After completing any finishing touches, place a bandana around the neck if a boy, or a ribbon if a girl. Make sure you compliment the dog on what a good dog they have been, and how handsome or beautiful he or she looks. Call the owner to have him/her picked up. You re done! *Make sure to register at and watch streaming videos on selected dog breeds! Become a Certified Pet Groomer Hands On Wag My Tail Pet Grooming School Wag-MyTail Online Order DVDs 165

198 ENGLISH TOY SPANIEL Tools Needed Slicker Brush, Dematting Comb or Rake, Comb Nail Clipper, Straight Shears Clipper, #10 blade, #15 or #40 blade Additional Items: Ear cleaner, shampoo, conditioner, spray cologne, ribbon or bandana. 166
199 First Step: Use cotton balls dampened with ear cleaner to clean the inside of the ears. Second Step: Use your nail clippers to cut the nails. Cut the tip of the nails being careful not to cut the quick. If you cut the quick, use your gel or powder blood stopper to stop the bleeding. Third Step: Use your #15 blade (Yvonne prefers #40 blade) on your clipper to remove the hair from between the pads. Use thinning shears to remove any straggly hair between and around paws. Fourth Step: For the sanitary trim, use your #10 blade on your clipper and clip the hair from the rectal area ½ inch on all sides of the rectum. Be careful not to touch the rectum area! Fifth Step: Use your #10 blade to trim hair from the groin to the naval. Sixth Step: Use your slicker brush and brush entire coat thoroughly. If you encounter any matted areas such as the legs, use your dematting comb or rake to remove all mats before bathing. Seventh Step: Bath Time Use your favorite shampoo. Wet the dog first and then apply the shampoo. Shampoo the dog creating a nice lather on entire body, head, legs, and feet. Wash any folds on face. (Be careful not to get any water inside the ears.) Rinse the dog until lather is completely gone. Condition (if desired) after rinsing, making sure you rinse the conditioner out before drying. As part of the dog s bath make sure you: Brush teeth to remove food debris Eighth Step: After bathing, use a towel to remove any excess water. Then use your blow dryer to dry the dog thoroughly or cage dry. Ninth Step: Comb and fluff! 167
200 Tenth Step: Use your shears and clean up the whiskers and any long hair on the face, over the eyes and on the muzzle. Eleventh Step: Spray coat with conditioner. Comb through. You may also want to lightly spray coat with cologne. Final Step: Step away from the dog and take a final look at your work to make sure you are satisfied. After completing any finishing touches, place a bandana around the neck if a boy, or a ribbon if a girl. Make sure you compliment the dog on what a good dog they have been, and how handsome or beautiful he or she looks. Call the owner to have him/her picked up. You re done! *Make sure to register at and watch streaming videos on selected dog breeds! Become a Certified Pet Groomer Hands On Wag My Tail Pet Grooming School Wag-MyTail Online Order DVDs 168
201 Notes 169

202 FIELD SPANIEL Tools Needed Slicker Brush, Comb Nail Clipper, Straight Shears Thinning Shears (for a more natural look) or Curved Shears Clipper, #10 blade, #15 or #40 blade Additional Items: Ear cleaner, shampoo, conditioner, spray cologne, ribbon or bandana. 170
203 First Step: Use cotton balls dampened with ear cleaner to clean the inside of the ears. Second Step: Use your nail clippers to cut the nails. Cut the tip of the nails being careful not to cut the quick. If you cut the quick, use your gel or powder blood stopper to stop the bleeding. Third Step: Use your #15 blade (Yvonne prefers #40 blade) on your clipper to remove the hair from between the pads. Use thinning shears to remove any straggly hair between and around paws. Fourth Step: For the sanitary trim, use your #10 blade on your clipper and clip the hair from the rectal area ½ inch on all sides of the rectum. Be careful not to touch the rectum area! Fifth Step: Use your #10 blade to trim hair from groin to naval. Sixth Step: Use your slicker brush and brush entire coat thoroughly. Seventh Step: Bath Time Use your favorite shampoo. Wet the dog first and then apply the shampoo. Shampoo the dog creating a nice lather on entire body, head, legs, and feet. (Be careful not to get any water inside the ears.) Rinse the dog until lather is completely gone. Condition (if desired) after rinsing, making sure you rinse the conditioner out before drying. As part of the dog s bath make sure you: Brush teeth to remove food debris Eighth Step: After bathing, use a towel to remove any excess water. Then use your blow dryer to dry the dog thoroughly or cage dry. Ninth Step: Comb and Fluff! 171
204 Tenth Step: Use your thinning shears to clean up hair on face, and any curly hair on body, ears and tail. Eleventh Step: Use your shears and clean up the whiskers and any long hair on the face, over the eyes and on the muzzle. Twelfth Step: Spray coat with conditioner. Comb through. You may also want to lightly spray coat with cologne. Final Step: Step away from the dog and take a final look at your work to make sure you are satisfied. After completing any finishing touches, place a bandana around the neck if a boy, or a ribbon if a girl. Make sure you compliment the dog on what a good dog they have been, and how handsome or beautiful he or she looks. Call the owner to have him/her picked up. You re done! *Make sure to register at and watch streaming videos on selected dog breeds! Become a Certified Pet Groomer Hands On Wag My Tail Pet Grooming School Wag-MyTail Online Order DVDs 172
205 Notes 173

206 FINNISH SPITZ Tools Needed Slicker Brush, Comb, Dematting Comb or Rake Nail Clipper, Straight Shears Thinning shears (for a more natural look) or Curved Shears Additional Items: Ear cleaner, shampoo, conditioner, spray cologne, ribbon or bandana. First Step: Use cotton balls dampened with ear cleaner to clean the inside of the ears. 174
207 Second Step: Use your nail clippers to cut the nails. Cut the tip of the nails being careful not to cut the quick. If you cut the quick, use your gel or powder blood stopper to stop the bleeding. Third Step: Use your slicker brush and brush entire coat thoroughly. If you encounter any matted areas, use your comb or rake and remove all mats before bathing. Fourth Step: Bath Time Use your favorite shampoo. Wet the dog first and then apply the shampoo. Shampoo the dog creating a nice lather on entire body, head, legs, and feet. (Be careful not to get any water inside the ears.) Rinse the dog until lather is completely gone. Condition (if desired) after rinsing, making sure you rinse the conditioner out before drying. As part of the dog s bath make sure you: Brush teeth to remove food debris Option: De-shed Treatment Fifth Step: After bathing, use a towel to remove any excess water. Then use your blow dryer to dry the dog thoroughly or cage dry. Sixth Step: Comb and fluff! Seventh Step: Use your shears and clean up the whiskers and any long hair on the face, over the eyes and on the muzzle. Eighth Step: Use your thinning shears on the hind legs from the hock to the feet. Ninth Step: Use thinning shears to remove any straggly hair between and around paws. Tenth Step: Spray coat with conditioner. Comb through. You may also want to lightly spray coat with cologne. Final Step: Step away from the dog and take a final look at your work to make sure you are satisfied. After completing any finishing touches, place a bandana around the neck if a boy, or a ribbon if a girl. Make sure you compliment the dog on what a good dog they have been, and how handsome or beautiful he or she looks. You re done! 175

208 FLAT-COATED RETRIEVER Tools Needed Slicker Brush, Comb, Shedding Blade Nail Clipper, Straight Shears Additional Items: Ear cleaner, shampoo, conditioner, spray cologne, ribbon or bandana. 176
209 First Step: Use cotton balls dampened with ear cleaner to clean the inside of the ears. Second Step: Use your nail clippers to cut the nails. Cut the tip of the nails being careful not to cut the quick. If you cut the quick, use your gel or powder blood stopper to stop the bleeding. Third Step: Use your slicker brush and brush entire coat thoroughly. Remove all dead hair with your shedding blade. Fourth Step: Bath Time Use your favorite shampoo. Wet the dog first and then apply the shampoo. Shampoo the dog creating a nice lather on entire body, head, legs, and feet. (Be careful not to get any water inside the ears.) Rinse the dog until lather is completely gone. Condition (if desired) after rinsing, making sure you rinse the conditioner out before drying. As part of the dog s bath make sure you: Brush teeth to remove food debris. Option: De-shed Treatment Fifth Step: After bathing, use a towel to remove any excess water. Then use your blow dryer to dry the dog thoroughly or cage dry. Sixth Step: Use your shears and clean up the whiskers and any long hair on the face, over the eyes and on the muzzle. Seventh Step: Spray coat with conditioner. You may also want to lightly spray coat with cologne. Final Step: Step away from the dog and take a final look at your work to make sure you are satisfied. After completing any finishing touches, place a bandana around the neck if a boy, or a ribbon if a girl. Make sure you compliment the dog on what a good dog they have been, and how handsome or beautiful he or she looks. Call the owner to have him/her picked up. You re done! 177

210 FOX TERRIER (Smooth) Rubber Brush Nail Clipper, Straight Shears Tools Needed Additional Items: Ear cleaner, shampoo, conditioner, spray cologne, ribbon or bandana. 178
211 First Step: Use cotton balls dampened with ear cleaner to clean the inside of the ears. Second Step: Use your nail clippers to cut the nails. Cut the tip of the nails being careful not to cut the quick. If you cut the quick, use your gel or powder blood stopper to stop the bleeding. Third Step: Use your rubber brush and brush entire coat thoroughly. Fourth Step: Bath Time Use your favorite shampoo. Wet the dog first and then apply the shampoo. Shampoo the dog creating a nice lather on entire body, head, legs, and feet. (Be careful not to get any water inside the ears.) Rinse the dog until lather is completely gone. Condition (if desired) after rinsing, making sure you rinse the conditioner out before drying. As part of the dog s bath make sure you: Brush teeth to remove food debris Option: De-shed Treatment Fifth Step: After bathing, use a towel to remove any excess water. Then use your blow dryer to dry the dog thoroughly or cage dry. Sixth Step: Use your shears and clean up the whiskers and any long hair on the face, over the eyes and on the muzzle. Remember to trim any stray hair on the edges of the ears. Seventh Step: Hand rub conditioner onto coat. Massage into coat to create sheen. You may also want to lightly spray coat with cologne. Final Step: Step away from the dog and take a final look at your work to make sure you are satisfied. After completing any finishing touches, place a bandana around the neck if a boy, or a ribbon if a girl. Make sure you compliment the dog on what a good dog they have been, and how handsome or beautiful he or she looks. Call the owner to have him/her picked up. You re done! 179

212 FOXHOUND (American) Tools Needed Rubber Brush Nail Clipper, Straight Shears Additional Items: Ear cleaner, shampoo, conditioner, spray cologne, ribbon or bandana. First Step: Use cotton balls dampened with ear cleaner to clean the inside of the ears. 180
213 Second Step: Use your nail clippers to cut the nails. Cut the tip of the nails being careful not to cut the quick. If you cut the quick, use your gel or powder blood stopper to stop the bleeding. Third Step: Use your rubber brush and brush entire coat thoroughly. Fourth Step: Bath Time Use your favorite shampoo. Wet the dog first and then apply the shampoo. Shampoo the dog creating a nice lather on entire body, head, legs, and feet. (Be careful not to get any water inside the ears.) Rinse the dog until lather is completely gone. Condition (if desired) after rinsing, making sure you rinse the conditioner out before drying. As part of the dog s bath make sure you: Brush teeth to remove food debris Option: De-shed Treatment Fifth Step: After bathing, use a towel to remove any excess water. Then use your blow dryer to dry the dog thoroughly or cage dry. Sixth Step: Use your shears and clean up the whiskers and any long hair on the face, over the eyes and on the muzzle. Seventh Step: Hand rub conditioner onto coat. Massage into coat for sheen. You may also want to lightly spray coat with cologne. Final Step: Step away from the dog and take a final look at your work to make sure you are satisfied. After completing any finishing touches, place a bandana around the neck if a boy, or a ribbon if a girl. Make sure you compliment the dog on what a good dog they have been, and how handsome or beautiful he or she looks. Call the owner to have him/her picked up. You re done! 181

214 FOXHOUND (English) Tools Needed Rubber Brush Nail Clipper, Straight Shears Additional Items: Ear cleaner, shampoo, conditioner, spray cologne, ribbon or bandana. 182
215 First Step: Use cotton balls dampened with ear cleaner to clean the inside of the ears. Second Step: Use your nail clippers to cut the nails. Cut the tip of the nails being careful not to cut the quick. If you cut the quick, use your gel or powder blood stopper to stop the bleeding. Third Step: Use your rubber brush and brush entire coat thoroughly. Fourth Step: Bath Time Use your favorite shampoo. Wet the dog first and then apply the shampoo. Shampoo the dog creating a nice lather on entire body, head, legs, and feet. (Be careful not to get any water inside the ears.) Rinse the dog until lather is completely gone. Condition (if desired) after rinsing, making sure you rinse the conditioner out before drying. As part of the dog s bath make sure you: Brush teeth to remove food debris Option: De-shed Treatment Fifth Step: After bathing, use a towel to remove any excess water. Then use your blow dryer to dry the dog thoroughly or cage dry. Sixth Step: Use your shears and clean up the whiskers and any long hair on the face, over the eyes and on the muzzle. Seventh Step: Hand rub conditioner onto coat. Massage quickly for sheen. You may also want to lightly spray coat with cologne. Final Step: Step away from the dog and take a final look at your work to make sure you are satisfied. After completing any finishing touches, place a bandana around the neck if a boy, or a ribbon if a girl. Make sure you compliment the dog on what a good dog they have been, and how handsome or beautiful he or she looks. Call the owner to have him/her picked up. You re done! 183

216 FRENCH BULLDOG Tools Needed Rubber Brush Nail Clipper, Straight Shears Additional Items: Ear cleaner, shampoo, conditioner, spray cologne, ribbon or bandana. 184
217 First Step: Use cotton balls dampened with ear cleaner to clean the inside of the ears. Second Step: Use your nail clippers to cut the nails. Cut the tip of the nails being careful not to cut the quick. If you cut the quick, use your gel or powder blood stopper to stop the bleeding. Third Step: Use your rubber brush and brush entire coat thoroughly. Fourth Step: Bath Time Use your favorite shampoo. Wet the dog first and then apply the shampoo. Shampoo the dog creating a nice lather on entire body, head, legs, and feet. Wash any folds on face. Clean wrinkles on body. (Be careful not to get any water inside the ears.) Rinse the dog until lather is completely gone. Condition (if desired) after rinsing, making sure you rinse the conditioner out before drying. As part of the dog s bath make sure you: Brush teeth to remove food debris Option: De-shed Treatment Fifth Step: After bathing, use a towel to remove any excess water. Then use your blow dryer to dry the dog thoroughly or cage dry. Sixth Step: Use your shears and clean up the whiskers and any long hair on the face, over the eyes and on the muzzle. Seventh Step: Hand rub conditioner onto coat. Massage into coat to create sheen. You may also want to lightly spray coat with cologne. Final Step: Step away from the dog and take a final look at your work to make sure you are satisfied. After completing any finishing touches, place a bandana around the neck if a boy, or a ribbon if a girl. Make sure you compliment the dog on what a good dog they have been, and how handsome or beautiful he or she looks. Call the owner to have him/her picked up. You re done! 185

218 GERMAN PINSCHER Tools Needed Rubber Brush Nail Clipper, Straight Shears Additional Items: Ear cleaner, shampoo, conditioner, spray cologne, ribbon or bandana. 186
219 First Step: Use cotton balls dampened with ear cleaner to clean the inside of the ears. Second Step: Use your nail clippers to cut the nails. Cut the tip of the nails being careful not to cut the quick. If you cut the quick, use your gel or powder blood stopper to stop the bleeding. Third Step: Use your rubber brush and brush entire coat thoroughly. Fourth Step: Bath Time Use your favorite shampoo. Wet the dog first and then apply the shampoo. Shampoo the dog creating a nice lather on entire body, head, legs, and feet. (Be careful not to get any water inside the ears.) Rinse the dog until lather is completely gone. Condition (if desired) after rinsing, making sure you rinse the conditioner out before drying. As part of the dog s bath make sure you: Brush teeth to remove food debris Option: De-shed Treatment Fifth Step: After bathing, use a towel to remove any excess water. Then use your blow dryer to dry the dog thoroughly or cage dry. Sixth Step: Use your shears and clean up the whiskers and any long hair on the face, over the eyes and on the muzzle. Seventh Step: Hand rub conditioner onto coat. Massage it into coat to create a sheen. You may also want to lightly spray coat with cologne. Final Step: Step away from the dog and take a final look at your work to make sure you are satisfied. After completing any finishing touches, place a bandana around the neck if a boy, or a ribbon if a girl. Make sure you compliment the dog on what a good dog they have been, and how handsome or beautiful he or she looks. Call the owner to have him/her picked up. You re done! 187

220 GERMAN SHEPHERD Tools Needed Slicker Brush, Comb, Shedding Blade Nail Clipper Additional Items: Ear cleaner, shampoo, conditioner, spray cologne, ribbon or bandana. 188
221 First Step: Use cotton balls dampened with ear cleaner to clean the inside of the ears. Second Step: Use your nail clippers to cut the nails. Cut the tip of the nails being careful not to cut the quick. If you cut the quick, use your gel or powder blood stopper to stop the bleeding. Third Step: Use your slicker brush and brush entire coat thoroughly. Remove all dead hair with your shedding blade. Fourth Step: Bath Time Use your favorite shampoo. Wet the dog first and then apply the shampoo. Shampoo the dog creating a nice lather on entire body, head, legs, and feet. (Be careful not to get any water inside the ears.) Rinse the dog until lather is completely gone. Condition (if desired) after rinsing, making sure you rinse the conditioner out before drying. As part of the dog s bath make sure you: Brush teeth to remove food debris Option: De-shed Treatment Fifth Step: After bathing, use a towel to remove any excess water. Then use your blow dryer to dry the dog thoroughly or cage dry. Sixth Step: Use your shears and clean up the whiskers and any long hair on the face, over the eyes and on the muzzle. Seventh Step: Spray coat with conditioner. Comb through. You may also want to spray coat with cologne. Final Step: Step away from the dog and take a final look at your work to make sure you are satisfied. After completing any finishing touches, place a bandana around the neck if a boy, or a ribbon if a girl. Make sure you compliment the dog on what a good dog they have been, and how handsome or beautiful he or she looks. Call the owner to have him/her picked up. You re done! 189

222 GERMAN SHORTHAIRED POINTER Tools Needed Rubber Brush, Shedding Blade Nail Clipper, Straight Shears Additional Items: Ear cleaner, shampoo, conditioner, spray cologne, ribbon or bandana. First Step: Use cotton balls dampened with ear cleaner to clean the inside of the ears. Second Step: Use your nail clippers to cut the nails. Cut the tip of the nails being careful not to cut the quick. If you cut the quick, use your gel or powder blood stopper to stop the bleeding. 190
223 Third Step: Use your rubber brush and brush entire coat thoroughly. Fourth Step: Bath Time Use your favorite shampoo. Wet the dog first and then apply the shampoo. Shampoo the dog creating a nice lather on entire body, head, legs, and feet. (Be careful not to get any water inside the ears.) Rinse the dog until lather is completely gone. Condition (if desired) after rinsing, making sure you rinse the conditioner out before drying. As part of the dog s bath make sure you: Brush teeth to remove food debris Option: De-shed Treatment Fifth Step: After bathing, use a towel to remove any excess water. Then use your blow dryer to dry the dog thoroughly or cage dry. Sixth Step: Use your shears and clean up the whiskers and any long hair on the face, over the eyes and on the muzzle. Seventh Step: Hand rub conditioner onto coat. Massage into coat to create sheen. You may also want to spray coat with cologne. Final Step: Step away from the dog and take a final look at your work to make sure you are satisfied. After completing any finishing touches, place a bandana around the neck if a boy, or a ribbon if a girl. Make sure you compliment the dog on what a good dog they have been, and how handsome or beautiful he or she looks. Call the owner to have him/her picked up. You re done! 191

224 GERMAN WIREHAIRED POINTER Tools Needed Slicker Brush Nail Clipper, Straight Shears Thinning Shears (for a more natural look) or Curved Shears, Additional Items: Ear cleaner, shampoo, conditioner, spray cologne, ribbon or bandana. First Step: Use cotton balls dampened with ear cleaner to clean the inside of the ears. Second Step: Use your nail clippers to cut the nails. Cut the tip of the nails being careful not to cut the quick. If you cut the quick, use your gel or powder blood stopper to stop the bleeding. 192
225 Third Step: Use your slicker brush and brush entire coat thoroughly. Fourth Step: Bath Time Use your favorite shampoo. Wet the dog first and then apply the shampoo. Shampoo the dog creating a nice lather on entire body, head, legs, and feet. Wash any folds on face. Clean wrinkles on body. (Be careful not to get any water inside the ears.) Rinse the dog until lather is completely gone. Condition (if desired) after rinsing, making sure you rinse the conditioner out before drying. As part of the dog s bath make sure you: Brush teeth to remove food debris Fifth Step: After bathing, use a towel to remove any excess water. Then use your blow dryer to dry the dog thoroughly or cage dry. Sixth Step: Use your thinning shears or stripping knife to clean up straggly hair from body, top of head and ears. Seventh Step: Use your shears and clean up the whiskers and any long hair on the face, over the eyes and on the muzzle. Eighth Step: Use your shears or thinning shears to evenly trim eyebrows. Ninth Step: Spray coat with conditioner. cologne. Brush coat. You may also want to spray coat with Final Step: Step away from the dog and take a final look at your work to make sure you are satisfied. After completing any finishing touches, place a bandana around the neck if a boy, or a ribbon if a girl. Make sure you compliment the dog on what a good dog they have been, and how handsome or beautiful he or she looks. Call the owner to have him/her picked up. You re done! 193

226 GLEN OF IMAAL TERRIER Tools Needed Slicker Brush, Comb Nail Clipper, Straight Shears Thinning shears (for a more natural look) or Curved Shears Clipper, #10 blade, #15 or #40 blade Additional Items: Ear cleaner, medicated ear powder, shampoo, conditioner, spray cologne, ribbon or bandana. 194
227 First Step: Use medicated powder lightly to dry ears. Gently pull out any dead hair. Use cotton balls dampened with ear cleaner to clean the inside of the ears. Second Step: Use your nail clippers to cut the nails. Cut the tip of the nails being careful not to cut the quick. If you cut the quick, use your gel or powder blood stopper to stop the bleeding. Third Step: Use your #15 blade (Yvonne prefers #40 blade) on your clipper to remove the hair from between the pads. Use thinning shears to remove any straggly hair between and around paws to give them a nice rounded shape. Fourth Step: For the sanitation trim, use your #10 blade on your clipper and clip the hair from the rectal area ½ inch on all sides of the rectum. Be careful not to touch the rectum area! Fifth Step: Use your slicker brush and brush entire coat thoroughly. Sixth Step: Bath Time Use your favorite shampoo. Wet the dog first and then apply the shampoo. Shampoo the dog creating a nice lather on entire body, head, legs, and feet. Wash any folds on face. Clean wrinkles on body. (Be careful not to get any water inside the ears.) Rinse the dog until lather is completely gone. Condition (if desired) after rinsing, making sure you rinse the conditioner out before drying. As part of the dog s bath make sure you: Brush teeth to remove food debris Seventh Step: After bathing, use a towel to remove any excess water. Then use your blow dryer to dry the dog thoroughly or cage dry. Eighth Step: Use your thinning shears to make sure the hair on the body, forechest and legs is smooth and even. Ninth Step: Use your thinning shears to clean up any hair on the face, muzzle and under the chin. Trim the outside edges of the ears. 195
228 Tenth Step: Spray coat with conditioner. cologne. Comb through. You may also want to spray coat with Final Step: Step away from the dog and take a final look at your work to make sure you are satisfied. After completing any finishing touches, place a bandana around the neck if a boy, or a ribbon if a girl. Make sure you compliment the dog on what a good dog they have been, and how handsome or beautiful he or she looks. Call the owner to have him/her picked up. You re done! *Make sure to register at and watch streaming videos on selected dog breeds! Become a Certified Pet Groomer Hands On Wag My Tail Pet Grooming School Wag-MyTail Online Order DVDs 196
229 Notes 197

230 GOLDEN RETRIEVER Tools Needed Slicker Brush, Comb, Dematting Comb or Rake Nail Clipper, Straight Shears Thinning Shears (for a more natural look) or Curved Shears Additional Items: Ear cleaner, shampoo, conditioner, spray cologne, ribbon or bandana. First Step: Use cotton balls dampened with ear cleaner to clean the inside of the ears. 198
231 Second Step: Use your nail clippers to cut the nails. Cut the tip of the nails being careful not to cut the quick. If you cut the quick, use your gel or powder blood stopper to stop the bleeding. Third Step: Use your slicker brush and brush entire coat thoroughly. If you encounter any matted areas, use your dematting comb or rake and remove all mats before bathing. Fourth Step: Bath Time Use your favorite shampoo. Wet the dog first and then apply the shampoo. Shampoo the dog creating a nice lather on entire body, head, legs, and feet. (Be careful not to get any water inside the ears.) Rinse the dog until lather is completely gone. Condition (if desired) after rinsing, making sure you rinse the conditioner out before drying. As part of the dog s bath make sure you: Brush teeth to remove food debris Option: De-shed Treatment Fifth Step: After bathing, use a towel to remove any excess water. Then use your blow dryer to dry the dog thoroughly or cage dry. Sixth Step: Use your thinning shears to trim behind the ears. This breed tends to matt behind the ears. If you find mats behind the ears, go ahead and shave them out with a #10 blade or 7 skipped. Seventh Step: Use your shears and trim the leg fringe, and taper the tail to a point at the tip. Clean up the whiskers and any long hair on the face, over the eyes and on the muzzle. Eighth Step: Spray coat with conditioner. Comb through. You may also want to spray coat with cologne. Final Step: Step away from the dog and take a final look at your work to make sure you are satisfied. After completing any finishing touches, place a bandana around the neck if a boy, or a ribbon if a girl. Make sure you compliment the dog on what a good dog they have been, and how handsome or beautiful he or she looks. Call the owner to have him/her picked up. You re done! 199

232 GORDON SETTER Tools Needed Slicker Brush, Comb Nail Clipper, Straight Shears Thinning Shears (for a more natural look) or Curved Shears Clipper, #7F blade, #10 blade, #15 or #40 blade Additional Items: Ear cleaner, shampoo, conditioner, spray cologne, ribbon or bandana 200
233 First Step: Use cotton balls dampened with ear cleaner to clean the inside of the ears. Second Step: Use your nail clippers to cut the nails. Cut the tip of the nails being careful not to cut the quick. If you cut the quick, use your gel or powder blood stopper to stop the bleeding. Third Step: Use your #15 blade (Yvonne prefers #40 blade), on your clipper to remove the hair from between the pads. Fourth Step: For the sanitary trim, use your #10 blade on your clipper and clip the hair from the rectal area ½ inch on all sides of the rectum. Be careful not to touch the rectum area! Fifth Step: Use your slicker brush and brush entire coat thoroughly. Sixth Step: Bath Time Use your favorite shampoo. Wet the dog first and then apply the shampoo. Shampoo the dog creating a nice lather on entire body, head, legs, and feet. (Be careful not to get any water inside the ears.) Rinse the dog until lather is completely gone. Condition (if desired) after rinsing, making sure you rinse the conditioner out before drying. As part of the dog s bath make sure you: Brush teeth to remove food debris. Seventh Step: After bathing, use a towel to remove any excess water. Then use your blow dryer to dry the dog thoroughly or cage dry. Eighth Step: Comb and fluff up the featherings. Ninth Step: BODY/LEGS/TAIL 1) Use your #7F blade, hold at a right angle to the dog s body, and going with the grain, trim following the contours of the body. Use the shoulder as your baseline. 2) Using the same blade and technique, trim the sides of the neck to a point at the front elbow. 201
234 3) Use your #7F blade to blend the sides of the body to the lower part of the hip at the rear. 4) Use your thinning shears to blend in the hair on the body and legs so it flows evenly. 5) Use your thinning shears to trim the hock to the bottom of the foot. 6) Use your comb to lift up the hair between the toes and use your thinning shears to make it level with the top of the foot. 7) Use your shears to trim the outside edges of the feet. 8) Use you thinning shears to trim the underside of the tail about 1/3 inch. Comb the featherings down. The tail tapers from wider at the base to a point at the tip. The tip should be above the hock. 9) Use your thinning shears to thin any extra fullness from the topside of the tail. Tenth Step: FACE/EARS 1) Use your #10 blade to trim the cheeks back to the corner of the ear. 2) Use your #10 blade to trim the foreface from the stop by the eyes, going against the grain. Trim down the sides of the muzzle. 3) Use your #10 blade to trim the underjaw down to the throat creating a U shape at the throat from ear to ear. Clean the straggly hair around the lips. 4) Use your #10 blade to trim the top 1/3 of the ears on both sides. Eleventh Step: Spray coat with conditioner. Comb through. You may also want to lightly spray coat with cologne. Final Step: Step away from the dog and take a final look at your work to make sure you are satisfied. After completing any finishing touches, place a bandana around the neck if a boy, or a ribbon if a girl. Make sure you compliment the dog on what a good dog they have been, and how handsome or beautiful he or she looks. Call the owner to have him/her picked up. You re done! 202
235 Notes 203

236 GREAT DANE Tools Needed Rubber Brush Nail Clipper, Straight Shears Additional Items: Ear cleaner, shampoo, conditioner, pad moisturizer, spray cologne, ribbon or bandana. First Step: Use cotton balls dampened with ear cleaner to clean the inside of the ears. 204
237 Second Step: Use your nail clippers to cut the nails. Cut the tip of the nails being careful not to cut the quick. If you cut the quick, use your gel or powder blood stopper to stop the bleeding. Third Step: Use your rubber brush and brush entire coat thoroughly. Fourth Step: Bath Time Use your favorite shampoo. Wet the dog first and then apply the shampoo. Shampoo the dog creating a nice lather on entire body, head, legs, and feet. Clean wrinkles on body. Wash any folds on face. (Be careful not to get any water inside the ears.) Rinse the dog until lather is completely gone. Condition (if desired) after rinsing, making sure you rinse the conditioner out before drying. As part of the dog s bath make sure you: Brush teeth to remove food debris Option: De-shed Treatment Fifth Step: After bathing, use a towel to remove any excess water. Then use your blow dryer to dry the dog thoroughly or cage dry. Sixth Step: Use your shears and clean up the whiskers and any long hair on the face, over the eyes and on the muzzle. Seventh Step: Use pad moisturizer on joints and pasterns to keep them supple. Eighth Step: Spray coat with conditioner. Brush through. You may also want to lightly spray coat with cologne. Final Step: Step away from the dog and take a final look at your work to make sure you are satisfied. After completing any finishing touches, place a bandana around the neck if a boy, or a ribbon if a girl. Make sure you compliment the dog on what a good dog they have been, and how handsome or beautiful he or she looks. Call the owner to have him/her picked up. You re done! 205
 or Curved Shears Additional Items: Ear cleaner, shampoo, conditioner, spray cologne, ribbon or bandana.")
238 GREAT PYRENEES Tools Needed Slicker Brush (large), Comb, Dematting Comb or Rake Nail Clipper, Straight Shears Thinning Shears (for a more natural look) or Curved Shears Additional Items: Ear cleaner, shampoo, conditioner, spray cologne, ribbon or bandana. 206
239 First Step: Use cotton balls dampened with ear cleaner to clean the inside of the ears. Second Step: Use your nail clippers to cut the nails. Cut the tip of the nails being careful not to cut the quick. If you cut the quick, use your gel or powder blood stopper to stop the bleeding. Third Step: Use your slicker brush and brush entire coat thoroughly. If you encounter any matted areas, use your dematting comb or rake and remove all mats before bathing. Fourth Step: Bath Time Use your favorite shampoo. Wet the dog first and then apply the shampoo. Shampoo the dog creating a nice lather on entire body, head, legs, and feet. (Be careful not to get any water inside the ears.) Rinse the dog until lather is completely gone. Condition (if desired) after rinsing, making sure you rinse the conditioner out before drying. As part of the dog s bath make sure you: Brush teeth to remove food debris.option: De-shed Treatment Fifth Step: After bathing, use a towel to remove any excess water. Then use your blow dryer to dry the dog thoroughly or cage dry. Sixth Step: Comb and fluff! Seventh Step: Use your shears and clean up the whiskers and any long hair on the face, over the eyes and on the muzzle. Eighth Step: Use thinning shears to remove straggly hair around paws. Ninth Step: Spray coat with conditioner. Comb through. You may also want to lightly spray coat with cologne. Final Step: Step away from the dog and take a final look at your work to make sure you are satisfied. After completing any finishing touches, place a bandana around the neck if a boy, or a ribbon if a girl. Make sure you compliment the dog on what a good dog they have been, and how handsome or beautiful he or she looks. You re Done! 207

240 GREATER SWISS MOUNTAIN DOG Tools Needed Rubber Brush Nail Clipper, Straight Shears Additional Items: Ear cleaner, shampoo, conditioner, spray cologne, ribbon or bandana. 208
241 First Step: Use cotton balls dampened with ear cleaner to clean the inside of the ears. Second Step: Use your nail clippers to cut the nails. Cut the tip of the nails being careful not to cut the quick. If you cut the quick, use your gel or powder blood stopper to stop the bleeding. Third Step: Use your rubber brush and brush entire coat thoroughly. Fourth Step: Bath Time Use your favorite shampoo. Wet the dog first and then apply the shampoo. Shampoo the dog creating a nice lather on entire body, head, legs, and feet. (Be careful not to get any water inside the ears.) Rinse the dog until lather is completely gone. Condition (if desired) after rinsing, making sure you rinse the conditioner out before drying. As part of the dog s bath make sure you: Brush teeth to remove food debris Option: De-shed Treatment Fifth Step: After bathing, use a towel to remove any excess water. Then use your blow dryer to dry the dog thoroughly or cage dry. Sixth Step: Use your scissors and clean up the whiskers and any long hair on the face, over the eyes and on the muzzle. Trim straggly hair around ears. Seventh Step: Lightly spray coat with conditioner. spray coat with cologne. Brush through. You may also want to lightly Final Step: Step away from the dog and take a final look at your work to make sure you are satisfied. After completing any finishing touches, place a bandana around the neck if a boy, or a ribbon if a girl. Make sure you compliment the dog on what a good dog they have been, and how handsome or beautiful he or she looks. Call the owner to have him/her picked up. You re done! 209

242 GREYHOUND Tools Needed Rubber Brush Nail Clipper, Straight Shears Additional Items: Ear cleaner, shampoo, conditioner, spray cologne, ribbon or bandana. 210
243 First Step: Use cotton balls dampened with ear cleaner to clean the inside of the ears. Second Step: Use your nail clippers to cut the nails. Cut the tip of the nails being careful not to cut the quick. If you cut the quick, use your gel or powder blood stopper to stop the bleeding. Third Step: Use your rubber brush and brush entire coat thoroughly. Fourth Step: Bath Time Use your favorite shampoo. Wet the dog first and then apply the shampoo. Shampoo the dog creating a nice lather on entire body, head, legs, and feet. (Be careful not to get any water inside the ears.) Rinse the dog until lather is completely gone. Condition (if desired) after rinsing, making sure you rinse the conditioner out before drying. As part of the dog s bath make sure you: Brush teeth to remove food debris. Option: De-shed Treatment Fifth Step: After bathing, use a towel to remove any excess water. Then use your blow dryer to dry the dog thoroughly or cage dry. Sixth Step: Use your shears and clean up the whiskers and any long hair on the face, over the eyes and on the muzzle. Seventh Step: Spray coat with conditioner. Brush through. You may also want to lightly spray coat with cologne. Final Step: Step away from the dog and take a final look at your work to make sure you are satisfied. After completing any finishing touches, place a bandana around the neck if a boy, or a ribbon if a girl. Make sure you compliment the dog on what a good dog they have been, and how handsome or beautiful he or she looks. Call the owner to have him/her picked up. You re done! 211

244 HARRIER Rubber Brush Nail Clipper, Straight Shears Tools Needed Additional Items: Ear cleaner, shampoo, conditioner, spray cologne, ribbon or bandana. First Step: Use cotton balls dampened with ear cleaner to clean the inside of the ears. 212
245 Second Step: Use your nail clippers to cut the nails. Cut the tip of the nails being careful not to cut the quick. If you cut the quick, use your gel or powder blood stopper to stop the bleeding. Third Step: Use your rubber brush and brush entire coat thoroughly. Fourth Step: Bath Time Use your favorite shampoo. Wet the dog first and then apply the shampoo. Shampoo the dog creating a nice lather on entire body, head, legs, and feet. (Be careful not to get any water inside the ears.) Rinse the dog until lather is completely gone. Condition (if desired) after rinsing, making sure you rinse the conditioner out before drying. As part of the dog s bath make sure you: Brush teeth to remove food debris Option: De-shed Treatment Fifth Step: After bathing, use a towel to remove any excess water. Then use your blow dryer to dry the dog thoroughly or cage dry. Sixth Step: Use your shears and clean up the whiskers and any long hair on the face, over the eyes and on the muzzle. Seventh Step: Spray coat with conditioner. Brush through. You may also want to spray coat with cologne. Final Step: Step away from the dog and take a final look at your work to make sure you are satisfied. After completing any finishing touches, place a bandana around the neck if a boy, or a ribbon if a girl. Make sure you compliment the dog on what a good dog they have been, and how handsome or beautiful he or she looks. Call the owner to have him/her picked up. You re done! 213

246 HAVANESE Tools Needed Slicker Brush, Comb, Dematting Comb or Rake Nail Clipper, Straight Shears Clipper, #10 blade, #15 or #40 blade Additional Items: Ear cleaner, medicated ear powder, shampoo, conditioner, spray cologne, ribbon or bandana First Step: Use medicated powder lightly to dry ears. Gently pull out any dead hair. Use cotton balls dampened with ear cleaner to clean the inside of the ears. Second Step: Use your nail clippers to cut the nails. Cut the tip of the nails being careful not to cut the quick. If you cut the quick, use your gel or powder blood stopper to stop the bleeding. 214
247 Third Step: Use your #15 blade (Yvonne prefers #40 blade), on your clipper to remove the hair from between the pads. Fourth Step: For the sanitary trim, use your #10 blade on your clipper and clip the hair from the rectal area ½ inch on all sides of the rectum. Be careful not to touch the rectum area! Fifth Step: Use your #10 blade to trim the hair from the groin to the navel. Sixth Step: Use your slicker brush and brush entire coat thoroughly. If you encounter any matted areas, use your dematting comb or rake and remove all mats before bathing. Seventh Step: Bath Time Use your favorite shampoo. Wet the dog first and then apply the shampoo. Shampoo the dog creating a nice lather on entire body, head, legs, and feet. (Be careful not to get any water inside the ears.) Rinse the dog until lather is completely gone. Condition (if desired) after rinsing, making sure you rinse the conditioner out before drying. As part of the dog s bath make sure you: Brush teeth to remove food debris. Eighth Step: After bathing, use a towel to remove any excess water. Then use your blow dryer to dry the dog thoroughly or cage dry. Ninth Step: Comb and fluff! Tenth Step: Part the hair on top of the head ending at the tip of the nose. Over each eye braid a small amount of hair. (optional) Eleventh Step: Use your shears to round off feet. Spray coat with conditioner. Comb through going upwards to create fullness. You may also want to lightly spray coat with cologne. Final Step: Step away from the dog and take a final look at your work to make sure you are satisfied. You re done! 215

248 IBIZAN HOUND Tools Needed Rubber Brush Nail Clipper, Straight Shears Additional Items: Ear cleaner, shampoo, conditioner, spray cologne, ribbon or bandana. First Step: Use cotton balls dampened with ear cleaner to clean the inside of the ears. 216
249 Second Step: Use your nail clippers to cut the nails. Cut the tip of the nails being careful not to cut the quick. If you cut the quick, use your gel or powder blood stopper to stop the bleeding. Third Step: Use your slicker brush and brush entire coat thoroughly. Fourth Step: Bath Time Use your favorite shampoo. Wet the dog first and then apply the shampoo. Shampoo the dog creating a nice lather on entire body, head, legs, and feet. (Be careful not to get any water inside the ears.) Rinse the dog until lather is completely gone. Condition (if desired) after rinsing, making sure you rinse the conditioner out before drying. As part of the dog s bath make sure you: Brush teeth to remove food debris Option: De-shed Treatment Fifth Step: After bathing, use a towel to remove any excess water. Then use your blow dryer to dry the dog thoroughly or cage dry. Sixth Step: Use your shears and clean up the whiskers and any long hair on the face, over the eyes and on the muzzle. Seventh Step: Spray coat with conditioner. Brush through. You may also want to lightly spray coat with cologne. Final Step: Step away from the dog and take a final look at your work to make sure you are satisfied. After completing any finishing touches, place a bandana around the neck if a boy, or a ribbon if a girl. Make sure you compliment the dog on what a good dog they have been, and how handsome or beautiful he or she looks. Call the owner to have him/her picked up. You re done! 217

250 IRISH RED & WHITE SETTER Tools Needed Slicker Brush, Comb, Dematting Comb or Rake Nail Clipper, Straight Shears Thinning Shears (for a more natural look) or Curved Shears Clipper, #7F blade, #10 blade, #15 or #40 blade Additional Items: Ear cleaner, shampoo, conditioner, spray cologne, ribbon or bandana First Step: Use medicated powder lightly to dry ears. Gently pull out any dead hair. Use cotton balls dampened with ear cleaner to clean the inside of the ears. Second Step: Use your nail clippers to cut the nails. Cut the tip of the nails being careful not to cut the quick. If you cut the quick, use your gel or powder blood stopper to stop the bleeding. 218
251 Third Step: Use your #15 blade (Yvonne prefers #40 blade), on your clipper to remove the hair from between the pads. Fourth Step: For the sanitary trim, use your #10 blade on your clipper and clip the hair from the rectal area ½ inch on all sides of the rectum. Be careful not to touch the rectum area! Fifth Step: Use your slicker brush and brush entire coat thoroughly. If you encounter any matted areas, use your dematting comb or rake and remove all mats before bathing. Sixth Step: Bath Time Use your favorite shampoo. Wet the dog first and then apply the shampoo. Shampoo the dog creating a nice lather on entire body, head, legs, and feet. (Be careful not to get any water inside the ears.) Rinse the dog until lather is completely gone. Condition (if desired) after rinsing, making sure you rinse the conditioner out before drying. As part of the dog s bath make sure you: Brush teeth to remove food debris. Seventh Step: After bathing, use a towel to remove any excess water. Then use your blow dryer to dry the dog thoroughly or cage dry. Eighth Step: Comb and fluff! Ninth Step: BODY/LEGS/CHEST 1) Use your #7F blade to trim the top of the body from the base of the skull to the lower part of the hip. 2) Use your #7F blade to trim and blend the rest of the body, including under the chest and sides, referring to the top of the shoulders as a baseline measurement. Follow the natural contours of the body. 3) Use your thinning shears to smooth out shoulder hair evenly into leg featherings. 4) Use your thinning shears to trim hair from the hock to the bottom of the foot. 5) Use your thinning shears to trim the hair between the toes level with the top of the foot. 6) Use your shears to round off feet. 7) Use your thinning shears to trim 1-3 inches off the underside of the tail. Taper to a point at the tip leaving the base of the tail wider then the tip. Trim the tail so it doesn t fall below the hock. Trim extra hair from the top of the tail. 219

252 Tenth Step: FACE/EARS/THROAT 1) Use your #10 blade and going with the grain, trim the top of the head to the base of the skull, and around to the lower base of the ears. Trim the face. Trim the cheeks down and out to the corners of the ears. Starting at the stop, trim up the snout against the grain. Trim the muzzle downward. 2) Use your #10 blade to trim the under the jaw and the throat, creating a U shape going from the ears and down the sternum. Trim around the lips. 3) Use your #10 blade to trim the top 1/3 of the ears on both sides. Thoroughly comb out the bottom 2/3 of the ears on both sides. Eleventh Step: Spray coat with conditioner. Comb through. You may also want to lightly spray coat with cologne. Final Step: Step away from the dog and take a final look at your work to make sure you are satisfied. After completing any finishing touches, place a bandana around the neck if a boy, or a ribbon if a girl. Make sure you compliment the dog on what a good dog they have been, and how handsome or beautiful he or she looks. You re done! 220
253 Notes 221

254 IRISH SETTER Tools Needed Slicker Brush, Comb, Dematting Comb or Rake Nail Clipper, Straight Shears Thinning Shears (for a more natural look) or Curved Shears Clipper, #7F blade, #10 blade, #15 or #40 blade Additional Items: Ear cleaner, shampoo, conditioner, spray cologne, ribbon or bandana 222
255 First Step: Use cotton balls dampened with ear cleaner to clean the inside of the ears. Second Step: Use your nail clippers to cut the nails. Cut the tip of the nails being careful not to cut the quick. If you cut the quick, use your gel or powder blood stopper to stop the bleeding. Third Step: Use your #15 blade (Yvonne prefers #40 blade), on your clipper to remove the hair from between the pads. Fourth Step: For the sanitary trim, use your #10 blade on your clipper and clip the hair from the rectal area ½ inch on all sides of the rectum. Be careful not to touch the rectum area! Fifth Step: Use your slicker brush and brush entire coat thoroughly. If you encounter any matted areas, use your dematting comb or rake and remove all mats before bathing. Sixth Step: Bath Time Use your favorite shampoo. Wet the dog first and then apply the shampoo. Shampoo the dog creating a nice lather on entire body, head, legs, and feet. (Be careful not to get any water inside the ears.) Rinse the dog until lather is completely gone. Condition (if desired) after rinsing, making sure you rinse the conditioner out before drying. As part of the dog s bath make sure you: Brush teeth to remove food debris. Seventh Step: After bathing, use a towel to remove any excess water. Then use your blow dryer to dry the dog thoroughly or cage dry. Eighth Step: Comb and fluff! 223
 Use your #7F blade to trim and blend the rest of the body, including under the chest and sides, referring to the top of the shoulders as a baseline measurement.")
256 Ninth Step: BODY/LEGS/CHEST 1) Use your #7F blade to trim the top of the body from the base of the skull to the lower part of the hip. 2) Use your #7F blade to trim and blend the rest of the body, including under the chest and sides, referring to the top of the shoulders as a baseline measurement. Follow the natural contours of the body. 3) Use your thinning shears to smooth out shoulder hair evenly into leg featherings. 4) Use your thinning shears to trim hair from the hock to the bottom of the foot. 224
257 5) Use your thinning shears to trim the hair between the toes level with the top of the foot. 6) Use your shears to round off feet. 7) Use your thinning shears to trim 1-3 inches off the underside of the tail. Taper to a point at the tip leaving the base of the tail wider then the tip. Trim the tail so it doesn t fall below the hock. Trim extra hair from the top of the tail. Tenth Step: FACE/EARS/THROAT 1) Use your #10 blade and going with the grain, trim the top of the head to the base of the skull, and around to the lower base of the ears. Trim the face. Trim the cheeks down and out to the corners of the ears. Starting at the stop, trim up the snout against the grain. Trim the muzzle downward. 2) Use your #10 blade to trim the under the jaw and the throat, creating a U shape going from the ears and down the sternum. Trim around the lips. 3) Use your #10 blade to trim the top 1/3 of the ears on both sides. Thoroughly comb out the bottom 2/3 of the ears on both sides. Eleventh Step: Spray coat with conditioner. Comb through. You may also want to lightly spray coat with cologne. Final Step: Step away from the dog and take a final look at your work to make sure you are satisfied. After completing any finishing touches, place a bandana around the neck if a boy, or a ribbon if a girl. Make sure you compliment the dog on what a good dog they have been, and how handsome or beautiful he or she looks. You re done! *Make sure to register at and watch streaming videos on selected dog breeds! Become a Certified Pet Groomer Hands On Wag My Tail Pet Grooming School Wag-MyTail Online Order DVDs 225

258 IRISH TERRIER Tools Needed Slicker Brush, Comb, Brush (soft) Nail Clipper, Straight Shears Thinning Shears (for a more natural look) or Curved Shears Clipper #5F blade, #7F or 8 ½ blade, #10 blade, #15 or #40 blade Additional Items: Ear cleaner, medicated ear powder, shampoo, conditioner, spray cologne, ribbon or bandana First Step: Use medicated powder lightly to dry ears. Gently pull out any dead hair. Use cotton balls dampened with ear cleaner to clean the inside of the ears. 226
259 Second Step: Use your nail clippers to cut the nails. Cut the tip of the nails being careful not to cut the quick. If you cut the quick, use your gel or powder blood stopper to stop the bleeding. Third Step: Use your #15 blade (Yvonne prefers #40 blade), on your clipper to remove the hair from between the pads. Fourth Step: For the sanitary trim, use your #10 blade on your clipper and clip the hair from the rectal area ½ inch on all sides of the rectum. Be careful not to touch the rectum area! Fifth Step: Use your #10 blade to trim the hair from the groin to the navel. Sixth Step: Use your slicker brush and brush entire coat thoroughly. If you encounter any matted areas, use your comb and remove all mats before bathing. Seventh Step: Bath Time Use your favorite shampoo. Wet the dog first and then apply the shampoo. Shampoo the dog creating a nice lather on entire body, head, legs, and feet. (Be careful not to get any water inside the ears.) Rinse the dog until lather is completely gone. Condition (if desired) after rinsing, making sure you rinse the conditioner out before drying. As part of the dog s bath make sure you: Brush teeth to remove food debris. Eighth Step: After bathing, use a towel to remove any excess water. Then use your blow dryer to dry the dog thoroughly or cage dry. Ninth Step: Comb and fluff! Tenth Step: BODY Use either your #5F, #7F or #8 ½ blade and follow the natural direction of the hair growth. Using the breastbone as your guide, clip in this order: 1) Base of skull down to back of the base of the tail. 2) Clip the entire tail. 3) Down the sides of the neck to the shoulder and ending at the elbow in front. 227

 Down the chest and shoulders to the")
260 4) Down the sides of the body past the flank at rear and ending at the hip on the hind legs. 5) Down the chest and shoulders to the front arm and the elbow at the side. 228
261 Eleventh Step: FACE Use your #10 blade. 1) Comb hair forward around eyes. Clip from the upper part of the eye socket to the base of the skull. 2) Clip from the outside part of the eye to the base of the ear. 3) Clip cheek starting at outside corner of the eye. Twelfth Step: EARS Use your #10 blade. 1) Clip both sides of the ears starting at base of ears. 2) Use shears to even out edges of ears. Thirteenth Step: EYEBROWS Use your thinning shears/comb. 1) Comb eyebrows forward and create a V shape with thinning shears by removing extra hair. 2) Diagonally trim eyebrows from the outside to the center. A triangular shape is desired. Fourteenth Step: MUZZLE/BEARD Use your thinning shears. 1) Trim extra hair from top of muzzle. 2) Comb beard forward and thin from corner of mouth to corner of eyebrow. Line should appear straight. 3) Shape beard into a barrel shape. Thin if necessary. Fifteenth Step: UNDERCHEST/FORECHEST/LEGS Use your shears/thinning shears. 1) With shears trim underchest hair from elbow pointing toward flank and following body lines. 2) Use your shears to shape the front legs. They should be straight with the legs full and rounded. 3) Use thinning shears to shape rear legs. The hip and leg should be smoothly blended. 4) Use your thinning shears to smooth out forechest. 5) Use your shears to round off feet. Sixteenth Step: Hand rub conditioner into coat. You may also want to spray coat with cologne. Final Step: Step away from the dog and take a final look at your work to make sure you are satisfied. After completing any finishing touches, place a bandana around the neck if a boy, or a ribbon if a girl. Make sure you compliment the dog on what a good dog they have been, and how handsome or beautiful he or she looks. You re done! 229

262 IRISH WATER SPANIEL Tools Needed Slicker Brush, Comb, Dematting Comb or Rake Nail Clipper, Straight Shears Clipper, #15 or #40 blade Additional Items: Ear cleaner, medicated ear powder, shampoo, conditioner, spray cologne, ribbon or bandana 230
263 First Step: Use medicated powder lightly to dry ears. Gently pull out any dead hair. Use cotton balls dampened with ear cleaner to clean the inside of the ears. Second Step: Use your nail clippers to cut the nails. Cut the tip of the nails being careful not to cut the quick. If you cut the quick, use your gel or powder blood stopper to stop the bleeding. Third Step: Use your #15 blade (Yvonne prefers #40 blade), on your clipper to remove the hair from between the pads. Fourth Step: Use your slicker brush and brush entire coat thoroughly. If you encounter any matted areas, use your dematting comb or rake and remove all mats before bathing. Fifth Step: Bath Time Use your favorite shampoo. Wet the dog first and then apply the shampoo. Shampoo the dog creating a nice lather on entire body, head, legs, and feet. (Be careful not to get any water inside the ears.) Rinse the dog until lather is completely gone. Condition (if desired) after rinsing, making sure you rinse the conditioner out before drying. As part of the dog s bath make sure you: Brush teeth to remove food debris. Sixth Step: After bathing, use a towel to remove any excess water. Then use your blow dryer to dry the dog thoroughly or cage dry. Seventh Step: Comb and fluff! Eighth Step: Use your shears to even out any unruly hair on the coat. Ninth Step: Use your #15 or #40 blade to trim the area from the ear to the corner of the eye and down the cheeks on the face. Trim the underjaw and muzzle, the throat and under the chin. Tenth Step: Use your shears to trim the tail closely and evenly. It should be short. 231
264 Eleventh Step: Use your shears to trim the topknot from ear to ear in front. Twelfth Step: Use your shears to round off feet. Thirteenth Step: Spray coat with conditioner. Comb through. You may also want to lightly spray coat with cologne. Final Step: Step away from the dog and take a final look at your work to make sure you are satisfied. After completing any finishing touches, place a bandana around the neck if a boy, or a ribbon if a girl. Make sure you compliment the dog on what a good dog they have been, and how handsome or beautiful he or she looks. Call the owner to have him/her picked up. You re done! *Make sure to register at and watch streaming videos on selected dog breeds! Become a Certified Pet Groomer Hands On Wag My Tail Pet Grooming School Wag-MyTail Online Order DVDs 232
265 Notes 233

266 IRISH WOLFHOUND Tools Needed Slicker Brush, Comb Nail Clipper, Straight Shears Thinning Shears (for a more natural look) or Curved Shears Clipper, #15 or #40 blade Additional Items: Ear cleaner, shampoo, conditioner, spray cologne, ribbon or bandana First Step: Use cotton balls dampened with ear cleaner to clean the inside of the ears. Second Step: Use your nail clippers to cut the nails. Cut the tip of the nails being careful not to cut the quick. If you cut the quick, use your gel or powder blood stopper to stop the bleeding. 234
267 Third Step: Use your #15 blade (Yvonne prefers #40 blade), on your clipper to remove the hair from between the pads. Fourth Step: Use your slicker brush and brush entire coat thoroughly. Fifth Step: Bath Time Use your favorite shampoo. Wet the dog first and then apply the shampoo. Shampoo the dog creating a nice lather on entire body, head, legs, and feet. (Be careful not to get any water inside the ears.) Rinse the dog until lather is completely gone. Condition (if desired) after rinsing, making sure you rinse the conditioner out before drying. As part of the dog s bath make sure you: Brush teeth to remove food debris. Sixth Step: After bathing, use a towel to remove any excess water. Then use your blow dryer to dry the dog thoroughly or cage dry. Seventh Step: Comb and fluff! Eighth Step: BODY/NECK/LEGS/TAIL/FEET 1) Use your thinning shears to trim any straggly hair from the body, neck and throat areas. 2) Use your shears to even out leg featherings. 3) Use your shears to round off feet. 4) Use your shears to even out tail featherings. Ninth Step: HEAD/FACE/BEARD 1) Use your thinning shears to trim any straggly hair from the top of the head. 2) Use your thinning shears to thin the hair on the cheeks. 3) Use your thinning shears to trim any straggly hair around ears. 4) Use your shears to square off the beard and whiskers, leaving them full. Tenth Step: Spray coat with conditioner. Comb through. You may also want to lightly spray coat with cologne. You re done! 235

268 ITALIAN GREYHOUND Tools Needed Rubber Brush Nail Clipper, Straight Shears Additional Items: Ear cleaner, shampoo, conditioner, spray cologne, ribbon or bandana. 236
269 First Step: Use cotton balls dampened with ear cleaner to clean the inside of the ears. Second Step: Use your nail clippers to cut the nails. Cut the tip of the nails being careful not to cut the quick. If you cut the quick, use your gel or powder blood stopper to stop the bleeding. Third Step: Use your slicker brush and brush entire coat thoroughly. Fourth Step: Bath Time Use your favorite shampoo. Wet the dog first and then apply the shampoo. Shampoo the dog creating a nice lather on entire body, head, legs, and feet. (Be careful not to get any water inside the ears.) Rinse the dog until lather is completely gone. Condition (if desired) after rinsing, making sure you rinse the conditioner out before drying. As part of the dog s bath make sure you: Brush teeth to remove food debris Fifth Step: After bathing, use a towel to remove any excess water. Then use your blow dryer to dry the dog thoroughly or cage dry. Sixth Step: Use your shears and clean up the whiskers and any long hair on the face, over the eyes and on the muzzle. Seventh Step: Spray coat with conditioner. Brush through. You may also want to lightly spray coat with cologne. Final Step: Step away from the dog and take a final look at your work to make sure you are satisfied. After completing any finishing touches, place a bandana around the neck if a boy, or a ribbon if a girl. Make sure you compliment the dog on what a good dog they have been, and how handsome or beautiful he or she looks. Call the owner to have him/her picked up. You re done! 237
 or Curved Shears Additional Items: Ear cleaner, shampoo, conditioner, spray cologne, ribbon or bandana. 238")
270 JACK RUSSELL (Smooth) Tools Needed Rubber Brush Nail Clipper, Straight Shears Thinning Shears (for a more natural look) or Curved Shears Additional Items: Ear cleaner, shampoo, conditioner, spray cologne, ribbon or bandana. 238
271 First Step: Use cotton balls dampened with ear cleaner to clean the inside of the ears. Second Step: Use your nail clippers to cut the nails. Cut the tip of the nails being careful not to cut the quick. If you cut the quick, use your gel or powder blood stopper to stop the bleeding. Third Step: Use your rubber brush and brush entire coat thoroughly. Fourth Step: Bath Time Use your favorite shampoo. Wet the dog first and then apply the shampoo. Shampoo the dog creating a nice lather on entire body, head, legs, and feet. (Be careful not to get any water inside the ears.) Rinse the dog until lather is completely gone. Condition (if desired) after rinsing, making sure you rinse the conditioner out before drying. As part of the dog s bath make sure you: Brush teeth to remove food debris Option: De-shed Treatment Fifth Step: After bathing, use a towel to remove any excess water. Then use your blow dryer to dry the dog thoroughly or cage dry. Sixth Step: Use your thinning shears to trim rough hair so it looks smooth on the body. Seventh Step: Use your shears and clean up the whiskers and any long hair on the face, over the eyes and on the muzzle. Eighth Step: Spray coat with conditioner. You may also want to lightly spray coat with cologne. Final Step: Step away from the dog and take a final look at your work to make sure you are satisfied. After completing any finishing touches, place a bandana around the neck if a boy, or a ribbon if a girl. Make sure you compliment the dog on what a good dog they have been, and how handsome or beautiful he or she looks. Call the owner to have him/her picked up. You re done! 239
 or Curved Shears Clipper, #10 Blade, #15 or #40 Blade Additional Items: Ear cleaner, shampoo, conditioner, spray cologne, ribbon or bandana.")
272 JACK RUSSELL (Wire Hair) Tools Needed Slicker Brush, Dematting Comb or Rake Nail Clipper, Straight Shears Thinning Shears (for a more natural look) or Curved Shears Clipper, #10 Blade, #15 or #40 Blade Additional Items: Ear cleaner, shampoo, conditioner, spray cologne, ribbon or bandana. 240
273 First Step: Use cotton balls dampened with ear cleaner to clean the inside of the ears. Second Step: Use your nail clippers to cut the nails. Cut the tip of the nails being careful not to cut the quick. If you cut the quick, use your gel or powder blood stopper to stop the bleeding. Third Step: Use your #15 blade (Yvonne prefers #40 blade) on your clipper to remove the hair from between the pads. Use thinning shears to remove any straggly hair between and around paws. Fourth Step: For the sanitary trim, use your #10 blade on your clipper and clip the hair from the rectal area ½ inch on all sides of the rectum. Be careful not to touch the rectum area! Fifth Step: Use your slicker brush and brush entire coat thoroughly. If you encounter any matted areas, use your dematting comb or rake and remove all mats before bathing. Sixth Step: Bath Time Use your favorite shampoo. Wet the dog first and then apply the shampoo. Shampoo the dog creating a nice lather on entire body, head, legs, and feet. (Be careful not to get any water inside the ears.) Rinse the dog until lather is completely gone. Condition (if desired) after rinsing, making sure you rinse the conditioner out before drying. As part of the dog s bath make sure you: Brush teeth to remove food debris Seventh Step: After bathing, use a towel to remove any excess water. Then use your blow dryer to dry the dog thoroughly or cage dry. Eighth Step: Use your thinning shears to trim the forechest and to smooth any rough hair on the legs and the rest of the body. Trim any extra hair from the face, under the chin and on top of the muzzle. 241
274 Ninth Step: Use your shears and clean up the whiskers and any long hair on the face, over the eyes and on the muzzle. Trim outside edges of the ears to neaten them. Round off feet. Tenth Step: Spray coat with conditioner. Comb conditioner through coat. You may also want to lightly spray coat with cologne. Final Step: Step away from the dog and take a final look at your work to make sure you are satisfied. After completing any finishing touches, place a bandana around the neck if a boy, or a ribbon if a girl. Make sure you compliment the dog on what a good dog they have been, and how handsome or beautiful he or she looks. Call the owner to have him/her picked up. You re done! *Make sure to register at and watch streaming videos on selected dog breeds! Become a Certified Pet Groomer Hands On Wag My Tail Pet Grooming School Wag-MyTail Online Order DVDs 242
275 Notes 243

276 JAPANESE CHIN Tools Needed Slicker Brush, Dematting Comb or Rake Nail Clipper Clipper, #10 blade, #15 or #40 blade Additional Items: Ear cleaner, shampoo, conditioner, spray cologne, ribbon or bandana First Step: Use cotton balls dampened with ear cleaner to clean the inside of the ears. 244
277 Second Step: Use your nail clippers to cut the nails. Cut the tip of the nails being careful not to cut the quick. If you cut the quick, use your gel or powder blood stopper to stop the bleeding. Third Step: Use your #15 blade (Yvonne prefers #40 blade) on your clipper to remove the hair from between the pads. Fourth Step: For the sanitary trim, use your #10 blade on your clipper and clip the hair from the rectal area ½ inch on all sides of the rectum. Be careful not to touch the rectum area! Fifth Step: Use your slicker brush and brush entire coat thoroughly. If you encounter any matted areas, use your dematting comb or rake and remove all mats before bathing. Sixth Step: Bath Time Use your favorite shampoo. Wet the dog first and then apply the shampoo. Shampoo the dog creating a nice lather on entire body, head, legs, and feet. Wash any folds on face. (Be careful not to get any water inside the ears.) Rinse the dog until lather is completely gone. Condition (if desired) after rinsing, making sure you rinse the conditioner out before drying. As part of the dog s bath make sure you: Brush teeth to remove food debris Seventh Step: After bathing, use a towel to remove any excess water. Then use your blow dryer to dry the dog thoroughly or cage dry. Eighth Step: Comb and fluff! Ninth Step: Use your thinning shears and clean up any straggly hair on the legs and feet. Tenth Step: Spray coat with conditioner. Comb through. You may also want to lightly spray coat with cologne. Step away from the dog and take a final look at your work to make sure you are satisfied. You re done! 245

278 KEESHOND Tools Needed Slicker Brush, Dematting Comb or Rake, Comb Nail Clipper, Straight Shears Clipper, #10 Blade and #15 or #40 Blade Additional Items: Ear cleaner, shampoo, conditioner, spray cologne, ribbon or bandana. First Step: Use cotton balls dampened with ear cleaner to clean the inside of the ears. 246
279 Second Step: Use your nail clippers to cut the nails. Cut the tip of the nails being careful not to cut the quick. If you cut the quick, use your gel or powder blood stopper to stop the bleeding. Third Step: Use your #15 blade (Yvonne prefers #40 blade) on your clipper to remove the hair from between the pads. Use thinning shears to remove any straggly hair between and around paws. Fourth Step: For the sanitary trim, use your #10 blade on your clipper and clip the hair from the rectal area ½ inch on all sides of the rectum. Be careful not to touch the rectum area! Fifth Step: Use your slicker brush and brush entire coat thoroughly. If you encounter any matted areas, use your dematting comb or rake and remove all mats before bathing. Sixth Step: Bath Time Use your favorite shampoo. Wet the dog first and then apply the shampoo. Shampoo the dog creating a nice lather on entire body, head, legs, and feet. (Be careful not to get any water inside the ears.) Rinse the dog until lather is completely gone. Condition (if desired) after rinsing, making sure you rinse the conditioner out before drying. As part of the dog s bath make sure you: Brush teeth to remove food debris Option: De-shed Treatment. Seventh Step: After bathing, use a towel to remove any excess water. Then use your blow dryer to dry the dog thoroughly or cage dry. Eighth Step: Comb and fluff! Ninth Step: Use your shears and clean up the whiskers and any long hair on the face, over the eyes and on the muzzle. Clean up outside edges of ears and feet. Tenth Step: Spray coat with conditioner. Brush and/or comb to fluff hair out from body. You may also want to lightly spray coat with cologne. You re done! 247

280 KERRY BLUE TERRIER Tools Needed Slicker Brush, Comb, Dematting Comb or Rake Nail Clipper, Straight Shears Clipper, #5F or #7blade, #10 blade, #15 or #40 blade Additional Items: Ear cleaner, medicated ear powder, shampoo, conditioner, spray cologne, ribbon or bandana First Step: Use medicated powder lightly to dry ears. Gently pull out any dead hair. Use cotton balls dampened with ear cleaner to clean the inside of the ears. 248
281 Second Step: Use your nail clippers to cut the nails. Cut the tip of the nails being careful not to cut the quick. If you cut the quick, use your gel or powder blood stopper to stop the bleeding. Third Step: Use your #15 blade (Yvonne prefers #40 blade), on your clipper to remove the hair from between the pads. Fourth Step: For the sanitary trim, use your #10 blade on your clipper and clip the hair from the rectal area ½ inch on all sides of the rectum. Be careful not to touch the rectum area! Fifth Step: Use your #10 blade to trim the hair from the groin to the navel. Sixth Step: Use your slicker brush and brush entire coat thoroughly. If you encounter any matted areas, use your dematting comb or rake and remove all mats before bathing. Seventh Step: Bath Time Use your favorite shampoo. Wet the dog first and then apply the shampoo. Shampoo the dog creating a nice lather on entire body, head, legs, and feet. (Be careful not to get any water inside the ears.) Rinse the dog until lather is completely gone. Condition (if desired) after rinsing, making sure you rinse the conditioner out before drying. As part of the dog s bath make sure you: Brush teeth to remove food debris. Eighth Step: After bathing, use a towel to remove any excess water. Then use your blow dryer to dry the dog thoroughly or cage dry. Ninth Step: Comb and fluff! Tenth Step: BODY/LEGS/TAIL Use your #5F or #7F blade. 1) Trim the body starting at the base of the skull and go down the back ending at the base of the tail. 2) Trim the tail to a blunt tip with a wider base. 3) Trim the sides of the neck to halfway between the top of the shoulder and elbow. 249
 Use your #10 blade to create a V shape on the neck, starting about 2 in. below the throat and going diagonally into your V.")
282 4) Trim the sides of the back to the flank at the rear and to the hips at the rear legs. 5) Create a shallow incline line from the elbow to the hip. 6) Use your #10 blade to create a V shape on the neck, starting about 2 in. below the throat and going diagonally into your V. 7) Use your shears to trim the chest so it blends in smoothly from the neck, by increasing the hair length as you go downward. 8) Use your shears to trim the front legs into a tubular shape. Leave the front legs fuller and more rounded than the rear legs. 9) Use your shears to trim the rear legs going with the contours of the legs and showing the bend in the stifle. 10) Use your shears to make sure the entire body, legs and tail are blended smoothly together. 11) Use your shears to round off feet. Eleventh Step: FACE/EARS 1) Use your #10 blade to trim the ears, going around the outside edges of the ears at the base. Make sure there is a clean line between the ears and the sides of the head. 2) Use your #10 blade and trim the ears cleanly on both sides. 3) Use your shears to neaten up the outside edges of the ears. 4) Use your shears to trim the eyebrows. Comb forward and then start trimming at the outside corner, going to the center. Leave the fall full and blend it into the hair on the face. 5) Use your shears to remove any extra hair from the beard, creating a long look. Beard is left full, not bushy. 250
283 Twelfth Step: Spray coat with conditioner. Comb through. You may also want to lightly spray coat with cologne. Final Step: Step away from the dog and take a final look at your work to make sure you are satisfied. After completing any finishing touches, place a bandana around the neck if a boy, or a ribbon if a girl. Make sure you compliment the dog on what a good dog they have been, and how handsome or beautiful he or she looks. Call the owner to have him/her picked up. You re done! *Make sure to register at and watch streaming videos on selected dog breeds! 251

284 KOMONDOR Tools Needed Scrubbing Brush, Dematting Comb or Rake Nail Clipper, Straight Shears Clipper, #10 blade, #15 or #40 blade Additional Items: Ear cleaner, shampoo, spray cologne, ribbon or bandana First Step: Use medicated powder lightly to dry ears. Gently pull out any dead hair. Use cotton balls dampened with ear cleaner to clean the inside of the ears. Second Step: Use your nail clippers to cut the nails. Cut the tip of the nails being careful not to cut the quick. If you cut the quick, use your gel or powder blood stopper to stop the bleeding. 252
285 Third Step: Use your #15 blade (Yvonne prefers #40 blade), on your clipper to remove the hair from between the pads. Fourth Step: For the sanitary trim, use your #10 blade on your clipper and clip the hair from the rectal area ½ inch on all sides of the rectum. Be careful not to touch the rectum area! Fifth Step: Use your #10 blade to trim the hair from the groin to the navel. Sixth Step: Bath Time Use your favorite shampoo. Wet the dog first and then apply the shampoo. Shampoo the dog creating a nice lather on entire body, head, legs, and feet. Make sure you wash cords completely, using a scrubbing brush. (Be careful not to get any water inside the ears.) Rinse the dog until lather is completely gone. Condition (if desired) after rinsing, making sure you rinse the conditioner out before drying. As part of the dog s bath make sure you: Brush teeth to remove food debris Seventh Step: Put dog in kennel on towels and dry with a forced air dryer. Do Not Brush After Drying! Eighth Step: If needed, separate cording by hand all the way down to the skin. Ninth Step: Use your shears to trim any cords that touch the ground when standing. For ease, trim all the cords to a single measurement ie. 4 or 5. Final Step: Step away from the dog and take a final look at your work to make sure you are satisfied. After completing any finishing touches, make sure you compliment the dog on what a good dog they have been, and how handsome or beautiful he or she looks. Call the owner to have him/her picked up. You re done! 253

286 KUVASZ Tools Needed Slicker Brush, Comb, Dematting Comb or Rake Nail Clipper, Straight Shears Thinning Shears (for a more natural look) or Curved Shears Additional Items: Ear cleaner, medicated ear powder, shampoo, conditioner, spray cologne, ribbon or bandana First Step: Use cotton balls dampened with ear cleaner to clean the inside of the ears. Second Step: Use your nail clippers to cut the nails. Cut the tip of the nails being careful not to cut the quick. If you cut the quick, use your gel or powder blood stopper to stop the bleeding. 254
287 Third Step: Use your slicker brush and brush entire coat thoroughly. If you encounter any matted areas, use your dematting comb or rake and remove all mats before bathing. Fourth Step: Bath Time Use your favorite shampoo. Wet the dog first and then apply the shampoo. Shampoo the dog creating a nice lather on entire body, head, legs, and feet. (Be careful not to get any water inside the ears.) Rinse the dog until lather is completely gone. Condition (if desired) after rinsing, making sure you rinse the conditioner out before drying. As part of the dog s bath make sure you: Brush teeth to remove food debris Option: De-shed Treatment Fifth Step: After bathing, use a towel to remove any excess water. Then use your blow dryer to dry the dog thoroughly or cage dry. Sixth Step: Comb and fluff! Seventh Step: Use your shears and clean up the whiskers and any long hair on the face, over the eyes and on the muzzle. Eighth Step: Spray coat with conditioner. Comb through. You may also want to lightly spray coat with cologne. Final Step: Step away from the dog and take a final look at your work to make sure you are satisfied. After completing any finishing touches, place a bandana around the neck if a boy, or a ribbon if a girl. Make sure you compliment the dog on what a good dog they have been, and how handsome or beautiful he or she looks. Call the owner to have him/her picked up. You re done! 255

288 LABRADOR RETRIEVER Tools Needed Rubber Brush, Shedding Blade, Comb Nail Clipper, Straight Shears Additional Items: Ear cleaner, shampoo, conditioner, spray cologne, ribbon or bandana First Step: Use cotton balls dampened with ear cleaner to clean the inside of the ears. Second Step: Use your nail clippers to cut the nails. Cut the tip of the nails being careful not to cut the quick. If you cut the quick, use your gel or powder blood stopper to stop the bleeding. 256
289 Third Step: Use your rubber brush and brush entire coat thoroughly. Use your shedding blade to remove dead hair. Fourth Step: Bath Time Use your favorite shampoo. Wet the dog first and then apply the shampoo. Shampoo the dog creating a nice lather on entire body, head, legs, and feet. (Be careful not to get any water inside the ears.) Rinse the dog until lather is completely gone. Condition (if desired) after rinsing, making sure you rinse the conditioner out before drying. As part of the dog s bath make sure you: Brush teeth to remove food debris Option: De-shed Treatment Fifth Step: After bathing, use a towel to remove any excess water. Then use your blow dryer to dry the dog thoroughly or cage dry. Sixth Step: Use your shears and clean up the whiskers and any long hair on the face, over the eyes and on the muzzle. Seventh Step: Spray coat with conditioner. Brush through. You may also want to lightly spray coat with cologne. Final Step: Step away from the dog and take a final look at your work to make sure you are satisfied. After completing any finishing touches, place a bandana around the neck if a boy, or a ribbon if a girl. Make sure you compliment the dog on what a good dog they have been, and how handsome or beautiful he or she looks. Call the owner to have him/her picked up. You re done! 257

290 LAKELAND TERRIER Tools Needed Slicker Brush, Comb Nail Clipper, Straight Shears Thinning Shears (for a more natural look) or Curved Shears Clipper, #5F, #7F or 8 ½ blade, #10 blade, #15 or #40 blade Additional Items: Ear cleaner, medicated ear powder, shampoo, conditioner, spray cologne, ribbon or bandana First Step: Use medicated powder lightly to dry ears. Gently pull out any dead hair. Use cotton balls dampened with ear cleaner to clean the inside of the ears. 258
291 Second Step: Use your nail clippers to cut the nails. Cut the tip of the nails being careful not to cut the quick. If you cut the quick, use your gel or powder blood stopper to stop the bleeding. Third Step: Use your #15 blade (Yvonne prefers #40 blade), on your clipper to remove the hair from between the pads. Fourth Step: For the sanitary trim, use your #10 blade on your clipper and clip the hair from the rectal area ½ inch on all sides of the rectum. Be careful not to touch the rectum area! Fifth Step: Use your #10 blade to trim the hair from the groin to the navel. Sixth Step: Use your slicker brush and brush entire coat thoroughly. If you encounter any matted areas, use your comb and remove all mats before bathing. Seventh Step: Bath Time Use your favorite shampoo. Wet the dog first and then apply the shampoo. Shampoo the dog creating a nice lather on entire body, head, legs, and feet. (Be careful not to get any water inside the ears.) Rinse the dog until lather is completely gone. Condition (if desired) after rinsing, making sure you rinse the conditioner out before drying. As part of the dog s bath make sure you: Brush teeth to remove food debris. Eighth Step: After bathing, use a towel to remove any excess water. Then use your blow dryer to dry the dog thoroughly or cage dry. Ninth Step: Comb and fluff! Tenth Step: BODY/LEGS/TAIL Use your #5F or #7F or #8 ½ blade. 1) Trim the body starting at the base of the skull and go down the back ending at the base of the tail. 2) Trim all around the tail. 3) Trim the sides of the body to the flank at the rear and to the hips at the rear legs. 259
 Use your shears to trim the front legs into a tubular shape. Leave the front legs fuller and more rounded than the rear legs.")
292 4) Trim the chest, shoulders and neck ending at the arm in front and the elbow on the sides. Use your thinning shears to smooth out and blend these areas. 5) Use your shears to trim the front legs into a tubular shape. Leave the front legs fuller and more rounded than the rear legs. 8) Use your shears to trim the rear legs going with the contours of the legs and showing the bend in the stifle. 9) Use your thinning shears to blend in the hair on the legs with the hips. 9) Use your shears to make sure the entire body, legs and tail are blended smoothly together. 10) Use your shears to round off feet. Eleventh Step: FACE/EARS 1) Use your #10 blade to trim the face by combing the hair forward and then trimming ¼ in. starting at the top of the eye (forehead) and going to the base of the skull. Continue trimming from the eye up to the ears and down the cheeks. 2) Use your #10 blade and trim the ears cleanly on both sides, going from the base outward.. 3) Use your shears to neaten up the outside edges of the ears. 4) Use your shears to trim the eyebrows. Comb forward and then start trimming at the outside corner, going to the center. Leave the fall full and blend it into the hair on the face. 5) Use your thinning shears to remove any extra hair from the beard, creating a long look. Beard is left full, but not bushy. Thin out the line going from the corner of the mouth to the eyebrow so it s straight. 260
293 Twelfth Step: Spray coat with conditioner. Comb through. You may also want to lightly spray coat with cologne. Final Step: Step away from the dog and take a final look at your work to make sure you are satisfied. After completing any finishing touches, place a bandana around the neck if a boy, or a ribbon if a girl. Make sure you compliment the dog on what a good dog they have been, and how handsome or beautiful he or she looks. Call the owner to have him/her picked up. You re done! Notes 261

294 LEONBERGER Tools Needed Slicker Brush, Comb, Dematting Comb or Rake Nail Clipper, Straight Shears Thinning Shears (for a more natural look) or Curved Shears Additional Items: Ear cleaner, shampoo, conditioner, spray cologne, ribbon or bandana First Step: Use cotton balls dampened with ear cleaner to clean the inside of the ears. 262
295 Second Step: Use your nail clippers to cut the nails. Cut the tip of the nails being careful not to cut the quick. If you cut the quick, use your gel or powder blood stopper to stop the bleeding. Third Step: Use your slicker brush and brush entire coat thoroughly. If you encounter any matted areas, use your dematting comb or rake and remove all mats before bathing. Fourth Step: Bath Time Use your favorite shampoo. Wet the dog first and then apply the shampoo. Shampoo the dog creating a nice lather on entire body, head, legs, and feet. (Be careful not to get any water inside the ears.) Rinse the dog until lather is completely gone. Condition (if desired) after rinsing, making sure you rinse the conditioner out before drying. As part of the dog s bath make sure you: Brush teeth to remove food debris Option: De-shed Treatment Fifth Step: After bathing, use a towel to remove any excess water. Then use your blow dryer to dry the dog thoroughly or cage dry. Sixth Step: Use your shears and clean up the whiskers and any long hair on the face, over the eyes and on the muzzle. Seventh Step: Use thinning shears or curved shears to remove any straggly hair between and around paws. Eighth Step: Spray coat with conditioner. Comb through. You may also want to lightly spray coat with cologne. Final Step: Step away from the dog and take a final look at your work to make sure you are satisfied. After completing any finishing touches, place a bandana around the neck if a boy, or a ribbon if a girl. Make sure you compliment the dog on what a good dog they have been, and how handsome or beautiful he or she looks. Call the owner to have him/her picked up. You re done! 263

296 LHASA APSO Tools Needed Slicker Brush, Comb, Dematting Comb or Rake Nail Clipper, Straight Shears Clipper, #10 blade, #15 or #40 blade Additional Items: Ear cleaner, medicated ear powder, shampoo, crème rinse, coat dressing, conditioner, spray cologne, ribbon or bandana First Step: Use medicated powder lightly to dry ears. Gently pull out any dead hair. Use cotton balls dampened with ear cleaner to clean the inside of the ears. 264
297 Second Step: Use your nail clippers to cut the nails. Cut the tip of the nails being careful not to cut the quick. If you cut the quick, use your gel or powder blood stopper to stop the bleeding. Third Step: Use your #15 blade (Yvonne prefers #40 blade), on your clipper to remove the hair from between the pads. Fourth Step: For the sanitary trim, use your #10 blade on your clipper and clip the hair from the rectal area ½ inch on all sides of the rectum. Be careful not to touch the rectum area! Fifth Step: Use your #10 blade to trim the hair from the groin to the naval. Sixth Step: Use your slicker brush and brush entire coat thoroughly. If you encounter any matted areas, use your dematting comb or rake and remove all mats before bathing. Seventh Step: Bath Time Use your favorite shampoo. Wet the dog first and then apply the shampoo. Shampoo the dog creating a nice lather on entire body, head, legs, and feet. (Be careful not to get any water inside the ears.) Rinse the dog until lather is completely gone. Use Crème rinse (if desired) after rinsing. Leave it on for a few minutes then rinse the crème rinse out before drying. As part of the dog s bath make sure you: Brush teeth to remove food debris Eighth Step: After bathing, use a towel to remove any excess water. Then use your blow dryer to dry the dog thoroughly or cage dry. Ninth Step: Comb and fluff the tail combing downward. Tenth Step: Part the hair down the center, starting at the top of the head and going to the base of the tail and combing straight down. Spray with coat dressing. Part the hair from the top of the head and go down to the tip of the nose. You do not need to spray this area with coat dressing. 265
298 Eleventh Step: Spray coat with conditioner. Comb through. You may also want to lightly spray coat with cologne. Final Step: Step away from the dog and take a final look at your work to make sure you are satisfied. After completing any finishing touches, place a bandana around the neck if a boy, or a ribbon if a girl. To avoid any eye irritation for the dog, you can tie the topknot up and this is a good place for a bow. Make sure you compliment the dog on what a good dog they have been, and how handsome or beautiful he or she looks. Call the owner to have him/her picked up. You re done! *Make sure to register at and watch streaming videos on selected dog breeds! Become a Certified Pet Groomer Hands On Wag My Tail Pet Grooming School Wag-MyTail Online Order DVDs 266
299 Notes 267

300 LOWCHEN Tools Needed Slicker Brush, Comb, Dematting Comb or Rake Nail Clipper, Straight Shears Thinning Shears (for a more natural look) or Curved Shears Clipper, #10 blade, #15 or #40 blade Additional Items: Ear cleaner, medicated ear powder, shampoo, conditioner, spray cologne, ribbon or bandana First Step: Use medicated powder lightly to dry ears. Gently pull out any dead hair. Use cotton balls dampened with ear cleaner to clean the inside of the ears. 268
301 Second Step: Use your nail clippers to cut the nails. Cut the tip of the nails being careful not to cut the quick. If you cut the quick, use your gel or powder blood stopper to stop the bleeding. Third Step: Use your #15 blade (Yvonne prefers #40 blade), on your clipper to remove the hair from between the pads. Fourth Step: For the sanitary trim, use your #10 blade on your clipper and clip the hair from the rectal area ½ inch on all sides of the rectum. Be careful not to touch the rectum area! Fifth Step: Use your #10 blade to trim the hair from the groin to the navel. Sixth Step: BACK AREA INCLUDING REAR LEGS Use your #15 blade to rough cut the dog s coat. Trim from the last rib to the base of the tail. Trim tail from base about half way and leave a plume at the tip. Trim the back end down to the hocks. Leave a tuft between the back legs from hocks to feet. Seventh Step: FRONT AREA INCLUDING FRONT LEGS Use your slicker brush and brush entire coat thoroughly. If you encounter any matted areas, use your dematting comb or rake and remove all mats before bathing. Eighth Step: Bath Time Use your favorite shampoo. Wet the dog first and then apply the shampoo. Shampoo the dog creating a nice lather on entire body, head, legs, and feet. (Be careful not to get any water inside the ears.) Rinse the dog until lather is completely gone. Condition (if desired) after rinsing, making sure you rinse the conditioner out before drying. As part of the dog s bath make sure you: Brush teeth to remove food debris Ninth Step: After bathing, use a towel to remove any excess water. Then use your blow dryer to dry the dog thoroughly or cage dry. 269
302 Tenth Step: Comb and fluff the body, mane and head. Make sure you fluff the tufts on the tail and legs. Use your shears to even up straggly hair anywhere on the body and fine tune your rough cut. It is important the clipped areas are smooth and the untrimmed areas are fluffy. Eleventh Step: Use your shears and clean up the whiskers and any long hair on the face, over the eyes and on the muzzle. Twelfth Step: Use your shears to round off feet. Thirteenth Step: Spray coat with conditioner on untrimmed areas. Comb through. Hand rub conditioner on trimmed areas. You may also want to lightly spray coat with cologne. Final Step: Step away from the dog and take a final look at your work to make sure you are satisfied. After completing any finishing touches, place a bandana around the neck if a boy, or a ribbon if a girl. Make sure you compliment the dog on what a good dog they have been, and how handsome or beautiful he or she looks. Call the owner to have him/her picked up. You re done! *Make sure to register at and watch streaming videos on selected dog breeds! Become a Certified Pet Groomer Hands On Wag My Tail Pet Grooming School Wag-MyTail Online Order DVDs 270
303 Notes 271

304 MALTESE Tools Needed Slicker Brush, Comb, Dematting Comb or Rake Nail Clipper, Straight Shears Clipper, #10 blade, #15 or #40 blade Additional Items: Ear cleaner, medicated ear powder, whitening shampoo, crème rinse, conditioner, small rubber bands, coat dressing spray cologne, ribbons First Step: Use medicated powder lightly to dry ears. Gently pull out any dead hair. Use cotton balls dampened with ear cleaner to clean the inside of the ears. 272
305 Second Step: Use your nail clippers to cut the nails. Cut the tip of the nails being careful not to cut the quick. If you cut the quick, use your gel or powder blood stopper to stop the bleeding. Third Step: Use your #15 blade (Yvonne prefers #40 blade), on your clipper to remove the hair from between the pads. Fourth Step: For the sanitary trim, use your #10 blade on your clipper and clip the hair from the rectal area ½ inch on all sides of the rectum. Be careful not to touch the rectum area! Fifth Step: Use your #10 blade to trim the hair from the groin to the navel. Sixth Step: Use your slicker brush and brush entire coat thoroughly. If you encounter any matted areas, use your dematting comb or rake and remove all mats before bathing. Seventh Step: Bath Time Use your favorite shampoo. Wet the dog first and then apply the shampoo. Shampoo the dog creating a nice lather on entire body, head, legs, and feet. (Be careful not to get any water inside the ears.) Rinse the dog until lather is completely gone. Condition (if desired) after rinsing, making sure you rinse the conditioner out before drying. As part of the dog s bath make sure you: Brush teeth to remove food debris Eighth Step: After bathing, use a towel to remove any excess water. Then use your blow dryer to dry the dog thoroughly or cage dry. Ninth Step: Comb and fluff. Comb chest area with the grain going downwards. Completely comb out the tail up and over the back. Tenth Step: Use your shears to round off feet. 273
306 Eleventh Step: Part the hair down the center, starting at the top of the head and going to the base of the tail and combing straight down. Spray with coat dressing. Part the hair from the top of the head and go down to the tip of the nose. You do not need to spray this area with coat dressing. Twelfth Step: Evenly divide the hair on the top of the head from the corner of the eye to the ear. The line from the ears should mirror each other. Wrap a small rubber band around each of the two topknots, fold the top portion down and secure with another wrap of the rubber band. You will be able to wrap the rubber band about four times total. Check the bands are not too tight. Attach bows on each topknot. Thirteenth Step: Spray coat with conditioner. Comb through. You may also want to lightly spray coat with cologne. Final Step: Step away from the dog and take a final look at your work to make sure you are satisfied. After completing any finishing touches, place a bandana around the neck if a boy, or a ribbon if a girl. Make sure you compliment the dog on what a good dog they have been, and how handsome or beautiful he or she looks. Call the owner to have him/her picked up. You re done! *Make sure to register at and watch streaming videos on selected dog breeds! Also, watch the Maltese streaming video. 274
307 Notes 275

308 MANCHESTER TERRIER Tools Needed Rubber Brush Nail Clipper, Straight Shears Additional Items: Ear cleaner, shampoo, conditioner, spray cologne, ribbon or bandana 276
309 First Step: Use cotton balls dampened with ear cleaner to clean the inside of the ears. Second Step: Use your nail clippers to cut the nails. Cut the tip of the nails being careful not to cut the quick. If you cut the quick, use your gel or powder blood stopper to stop the bleeding. Third Step: Use your rubber brush and brush entire coat thoroughly. Fourth Step: Bath Time Use your favorite shampoo. Wet the dog first and then apply the shampoo. Shampoo the dog creating a nice lather on entire body, head, legs, and feet. (Be careful not to get any water inside the ears.) Rinse the dog until lather is completely gone. Condition (if desired) after rinsing, making sure you rinse the conditioner out before drying. As part of the dog s bath make sure you: Brush teeth to remove food debris. Option: De-shed Treatment Fifth Step: After bathing, use a towel to remove any excess water. Then use your blow dryer to dry the dog thoroughly or cage dry. Sixth Step: Use your shears and clean up the whiskers and any long hair on the face, over the eyes and on the muzzle. Seventh Step: Hand rub conditioner onto coat. Massage quickly to create sheen. You may also want to lightly spray coat with cologne. Final Step: Step away from the dog and take a final look at your work to make sure you are satisfied. After completing any finishing touches, place a bandana around the neck if a boy, or a ribbon if a girl. Make sure you compliment the dog on what a good dog they have been, and how handsome or beautiful he or she looks. Call the owner to have him/her picked up. You re done! 277

310 MASTIFF Tools Needed Rubber Brush Nail Clipper, Straight Shears Additional Items: Ear cleaner, pad moisturizer, shampoo, conditioner, spray cologne, ribbon or bandana First Step: Use cotton balls dampened with ear cleaner to clean the inside of the ears. 278
311 Second Step: Use your nail clippers to cut the nails. Cut the tip of the nails being careful not to cut the quick. If you cut the quick, use your gel or powder blood stopper to stop the bleeding. Third Step: Use your rubber brush and brush entire coat thoroughly. Fourth Step: Bath Time Use your favorite shampoo. Wet the dog first and then apply the shampoo. Shampoo the dog creating a nice lather on entire body, head, legs, and feet. (Be careful not to get any water inside the ears.) Rinse the dog until lather is completely gone. Condition (if desired) after rinsing, making sure you rinse the conditioner out before drying. As part of the dog s bath make sure you: Brush teeth to remove food debris Option: De-shed Treatment Fifth Step: After bathing, use a towel to remove any excess water. Then use your blow dryer to dry the dog thoroughly or cage dry. Sixth Step: Use your shears and clean up the whiskers and any long hair on the face, over the eyes and on the muzzle. Seventh Step: Apply baby powder to keep wrinkles dry. Eighth Step: Use pad moisturizer on joints and pasterns to keep them supple. Ninth Step: Spray coat with conditioner. Brush through. You may also want to lightly spray coat with cologne. Final Step: Step away from the dog and take a final look at your work to make sure you are satisfied. After completing any finishing touches, place a bandana around the neck if a boy, or a ribbon if a girl. Make sure you compliment the dog on what a good dog they have been, and how handsome or beautiful he or she looks. Call the owner to have him/her picked up. You re done! 279

312 MINIATURE PINSCHER Tools Needed Rubber Brush Nail Clipper, Straight Shears Additional Items: Ear cleaner, shampoo, conditioner, spray cologne, ribbon or bandana 280
313 First Step: Use cotton balls dampened with ear cleaner to clean the inside of the ears. Second Step: Use your nail clippers to cut the nails. Cut the tip of the nails being careful not to cut the quick. If you cut the quick, use your gel or powder blood stopper to stop the bleeding. Third Step: Use your rubber brush and brush entire coat thoroughly. Fourth Step: Bath Time Use your favorite shampoo. Wet the dog first and then apply the shampoo. Shampoo the dog creating a nice lather on entire body, head, legs, and feet. (Be careful not to get any water inside the ears.) Rinse the dog until lather is completely gone. Condition (if desired) after rinsing, making sure you rinse the conditioner out before drying. As part of the dog s bath make sure you: Brush teeth to remove food debris. Option: De-shed Treatment Fifth Step: After bathing, use a towel to remove any excess water. Then use your blow dryer to dry the dog thoroughly or cage dry. Sixth Step: Use your shears and clean up the whiskers and any long hair on the face, over the eyes and on the muzzle. Seventh Step: Hand rub conditioner onto coat. Massage quickly to create sheen. You may also want to lightly spray coat with cologne. Final Step: Step away from the dog and take a final look at your work to make sure you are satisfied. After completing any finishing touches, place a bandana around the neck if a boy, or a ribbon if a girl. Make sure you compliment the dog on what a good dog they have been, and how handsome or beautiful he or she looks. Call the owner to have him/her picked up. You re done! 281

314 NEWFOUNDLAND Tools Needed Slicker Brush, Comb, Dematting Comb or Rake Nail Clipper, Straight Shears Thinning Shears (for a more natural look) or Curved Shears Additional Items: Ear cleaner, shampoo, conditioner, spray cologne, ribbon or bandana First Step: Use cotton balls dampened with ear cleaner to clean the inside of the ears. 282
315 Second Step: Use your nail clippers to cut the nails. Cut the tip of the nails being careful not to cut the quick. If you cut the quick, use your gel or powder blood stopper to stop the bleeding. Third Step: Use your slicker brush and brush entire coat thoroughly. If you encounter any matted areas, use your dematting comb or rake and remove all mats before bathing. Fourth Step: Bath Time Use your favorite shampoo. Wet the dog first and then apply the shampoo. Shampoo the dog creating a nice lather on entire body, head, legs, and feet. (Be careful not to get any water inside the ears.) Rinse the dog until lather is completely gone. Condition (if desired) after rinsing, making sure you rinse the conditioner out before drying. As part of the dog s bath make sure you: Brush teeth to remove food debris Option: De-shed Treatment Fifth Step: After bathing, use a towel to remove any excess water. Then use your blow dryer to dry the dog thoroughly or cage dry. Sixth Step: Comb and fluff! Seventh Step: Use your shears and clean up the whiskers and any long hair on the face, over the eyes and on the muzzle. Eighth Step: Use your thinning shears to trim edges of paws. Ninth Step: Spray coat with conditioner. Comb through. You may also want to lightly spray coat with cologne. Final Step: Step away from the dog and take a final look at your work to make sure you are satisfied. After completing any finishing touches, place a bandana around the neck if a boy, or a ribbon if a girl. Make sure you compliment the dog on what a good dog they have been, and how handsome or beautiful he or she looks. Call the owner to have him/her picked up. You re done! 283

316 NORFOLK TERRIER Tools Needed Slicker Brush, Comb Nail Clipper, Straight Shears, Stripping Knife Thinning Shears (for a more natural look) or Curved Shears Clipper, #10 blade, #15 or #40 blade Additional Items: Ear cleaner, medicated powder, shampoo, conditioner, spray cologne, ribbon or bandana 284
317 First Step: Use medicated powder lightly to dry ears. Gently pull out any dead hair. Use cotton balls dampened with ear cleaner to clean the inside of the ears. Second Step: Use your nail clippers to cut the nails. Cut the tip of the nails being careful not to cut the quick. If you cut the quick, use your gel or powder blood stopper to stop the bleeding. Third Step: Use your #15 blade (Yvonne prefers #40 blade), on your clipper to remove the hair from between the pads. Fourth Step: For the sanitary trim, use your #10 blade on your clipper and clip the hair from the rectal area ½ inch on all sides of the rectum. Be careful not to touch the rectum area! Fifth Step: Use your slicker brush and brush entire coat thoroughly. Sixth Step: Bath Time Use your favorite shampoo. Wet the dog first and then apply the shampoo. Shampoo the dog creating a nice lather on entire body, head, legs, and feet. (Be careful not to get any water inside the ears.) Rinse the dog until lather is completely gone. Condition (if desired) after rinsing, making sure you rinse the conditioner out before drying. As part of the dog s bath make sure you: Brush teeth to remove food debris Seventh Step: After bathing, use a towel to remove any excess water. Then use your blow dryer to dry the dog thoroughly or cage dry. Eighth Step: Use your thinning shears to even out hair on the shoulders and the rest of the body except the chest. The tail is trimmed closely at the tip, wider at the base. Ninth Step: Use your #10 blade to trim hair on both sides of the ears. Use your shears to trim the outside edges of the ears. Tenth Step: Spray coat with conditioner. You may also want to lightly spray coat with cologne. 285
318 Final Step: Step away from the dog and take a final look at your work to make sure you are satisfied. After completing any finishing touches, place a bandana around the neck if a boy, or a ribbon if a girl. Make sure you compliment the dog on what a good dog they have been, and how handsome or beautiful he or she looks. Call the owner to have him/her picked up. You re done! *Make sure to register at and watch streaming videos on selected dog breeds! Become a Certified Pet Groomer Hands On Wag My Tail Pet Grooming School Wag-MyTail Online Order DVDs 286
319 Notes 287

320 NORWEGIAN BUHUND Tools Needed Slicker Brush, Comb, Dematting Comb or Rake Nail Clipper, Straight Shears Thinning Shears (for a more natural look) or Curved Shears Additional Items: Ear cleaner, shampoo, conditioner, spray cologne, ribbon or bandana First Step: Use cotton balls dampened with ear cleaner to clean the inside of the ears. 288
321 Second Step: Use your nail clippers to cut the nails. Cut the tip of the nails being careful not to cut the quick. If you cut the quick, use your gel or powder blood stopper to stop the bleeding. Third Step: Use your slicker brush and brush entire coat thoroughly. If you encounter any matted areas, use your dematting comb or rake and remove all mats before bathing. Fourth Step: Bath Time Use your favorite shampoo. Wet the dog first and then apply the shampoo. Shampoo the dog creating a nice lather on entire body, head, legs, and feet. (Be careful not to get any water inside the ears.) Rinse the dog until lather is completely gone. Condition (if desired) after rinsing, making sure you rinse the conditioner out before drying. As part of the dog s bath make sure you: Brush teeth to remove food debris. Option: De-shed Treatment Fifth Step: After bathing, use a towel to remove any excess water. Then use your blow dryer to dry the dog thoroughly or cage dry. Sixth Step: Comb and fluff! Seventh Step: Use your shears and clean up the whiskers and any long hair on the face, over the eyes, around the edges of the ears and on the muzzle. Eighth Step: Use thinning shears or curved shears to remove any straggly hair between and around paws. Use your shears to thin the fullness on the tail. Ninth Step: Spray coat with conditioner. Comb through. You may also want to lightly spray coat with cologne. Final Step: Step away from the dog and take a final look at your work to make sure you are satisfied. After completing any finishing touches, place a bandana around the neck if a boy, or a ribbon if a girl. Make sure you compliment the dog on what a good dog they have been, and how handsome or beautiful he or she looks. Call the owner to have him/her picked up. You re done! 289
 or Curved Shears Additional Items: Ear cleaner, shampoo, conditioner, spray cologne, ribbon or bandana")
322 NORWEGIAN ELKHOUND Tools Needed Slicker Brush, Comb, Dematting Comb or Rake Nail Clipper, Straight Shears Thinning Shears (for a more natural look) or Curved Shears Additional Items: Ear cleaner, shampoo, conditioner, spray cologne, ribbon or bandana 290
323 First Step: Use cotton balls dampened with ear cleaner to clean the inside of the ears. Second Step: Use your nail clippers to cut the nails. Cut the tip of the nails being careful not to cut the quick. If you cut the quick, use your gel or powder blood stopper to stop the bleeding. Third Step: Use your slicker brush and brush entire coat thoroughly. If you encounter any matted areas, use your dematting comb or rake and remove all mats before bathing. Fourth Step: Bath Time Use your favorite shampoo. Wet the dog first and then apply the shampoo. Shampoo the dog creating a nice lather on entire body, head, legs, and feet. (Be careful not to get any water inside the ears.) Rinse the dog until lather is completely gone. Condition (if desired) after rinsing, making sure you rinse the conditioner out before drying. As part of the dog s bath make sure you: Brush teeth to remove food debris. Option: De-shed Treatment Fifth Step: After bathing, use a towel to remove any excess water. Then use your blow dryer to dry the dog thoroughly or cage dry. Sixth Step: Comb and fluff! Seventh Step: Use your shears and clean up the whiskers and any long hair on the face, over the eyes, around the edges of the ears and on the muzzle. Eighth Step: Use thinning shears or curved shears to remove any straggly hair between and around paws. Use your shears to thin the fullness on the tail. Ninth Step: Spray coat with conditioner. Comb through. You may also want to lightly spray coat with cologne. Final Step: Step away from the dog and take a final look at your work to make sure you are satisfied. You re done! 291

324 NORWICH TERRIER Tools Needed Bristle Brush (stiff), Comb Nail Clipper, Straight Shears, Stripping Knife Thinning Shears (for a more natural look) or Curved Shears Clipper, #10 blade, #15 or #40 blade Additional Items: Ear cleaner, medicated ear powder, shampoo, conditioner, spray cologne, ribbon or bandana First Step: Use medicated powder lightly to dry ears. Gently pull out any dead hair. Use cotton balls dampened with ear cleaner to clean the inside of the ears. 292
325 Second Step: Use your nail clippers to cut the nails. Cut the tip of the nails being careful not to cut the quick. If you cut the quick, use your gel or powder blood stopper to stop the bleeding. Third Step: Use your #15 blade (Yvonne prefers #40 blade), on your clipper to remove the hair from between the pads. Fourth Step: For the sanitary trim, use your #10 blade on your clipper and clip the hair from the rectal area ½ inch on all sides of the rectum. Be careful not to touch the rectum area! Fifth Step: Use your bristle brush and brush entire coat thoroughly. Sixth Step: Bath Time Use your favorite shampoo. Wet the dog first and then apply the shampoo. Shampoo the dog creating a nice lather on entire body, head, legs, and feet. (Be careful not to get any water inside the ears.) Rinse the dog until lather is completely gone. Condition (if desired) after rinsing, making sure you rinse the conditioner out before drying. As part of the dog s bath make sure you: Brush teeth to remove food debris Seventh Step: After bathing, use a towel to remove any excess water. Then use your blow dryer to dry the dog thoroughly or cage dry. Eighth Step: Use your thinning shears to even out hair on the shoulders and the rest of the body except the chest. The tail is trimmed closely at the tip, wider at the base. Ninth Step: Use your #10 blade to trim hair on both sides of the ears. Use your shears to trim the outside edges of the ears. Round off the outside edges of the feet. Tenth Step: Spray coat with conditioner. You may also want to lightly spray coat with cologne. Final Step: Step away from the dog and take a final look at your work to make sure you are satisfied. You re done! 293
 or Curved Shears Additional Items: Ear cleaner, shampoo, conditioner, spray cologne, ribbon or")
326 NOVA SCOTIA DUCK TOLLING RETRIEVER Tools Needed Slicker Brush, Comb, Dematting Comb or Rake Nail Clipper, Straight Shears Thinning Shears (for a more natural look) or Curved Shears Additional Items: Ear cleaner, shampoo, conditioner, spray cologne, ribbon or bandana 294
327 First Step: Use cotton balls dampened with ear cleaner to clean the inside of the ears. Second Step: Use your nail clippers to cut the nails. Cut the tip of the nails being careful not to cut the quick. If you cut the quick, use your gel or powder blood stopper to stop the bleeding. Third Step: Use your slicker brush and brush entire coat thoroughly. If you encounter any matted areas, use your dematting comb or rake and remove all mats before bathing. Fourth Step: Bath Time Use your favorite shampoo. Wet the dog first and then apply the shampoo. Shampoo the dog creating a nice lather on entire body, head, legs, and feet. (Be careful not to get any water inside the ears.) Rinse the dog until lather is completely gone. Condition (if desired) after rinsing, making sure you rinse the conditioner out before drying. As part of the dog s bath make sure you: Brush teeth to remove food debris. Option: De-shed Treatment Fifth Step: After bathing, use a towel to remove any excess water. Then use your blow dryer to dry the dog thoroughly or cage dry. Sixth Step: Comb and fluff! Seventh Step: Use your shears and clean up the whiskers and any long hair on the face, over the eyes and on the muzzle. Eighth Step: Use your thinning shears to trim hair behind the ears. Ninth Step: Use your shears to even out leg fringe and to taper the tail to a point at the end. Round off the outside edges of the feet. Tenth Step: Spray coat with conditioner. Comb through. You may also want to lightly spray coat with cologne. You re done! 295

328 OLD ENGLISH SHEEPDOG Tools Needed Slicker Brush, Comb, Dematting Comb or Rake Soft Brush, Pin Brush Nail Clipper, Straight Shears Clipper, #10 blade, #15 or #40 blade Additional Items: Ear cleaner, medicated ear powder, shampoo, cream rinse, conditioner, spray cologne, ribbon or bandana First Step: Use medicated powder lightly to dry ears. Gently pull out any dead hair. Use cotton balls dampened with ear cleaner to clean the inside of the ears. 296
329 Second Step: Use your nail clippers to cut the nails. Cut the tip of the nails being careful not to cut the quick. If you cut the quick, use your gel or powder blood stopper to stop the bleeding. Third Step: Use your #15 blade (Yvonne prefers #40 blade), on your clipper to remove the hair from between the pads. Fourth Step: For the sanitary trim, use your #10 blade on your clipper and clip the hair from the rectal area ½ inch on all sides of the rectum. Be careful not to touch the rectum area! Fifth Step: Use your #10 blade to trim hair from the groin to the navel. Sixth Step: Use your slicker brush and brush entire coat thoroughly. If you encounter any matted areas, use your dematting comb or rake and remove all mats before bathing. Seventh Step: Bath Time Use your favorite shampoo. Wet the dog first and then apply the shampoo. Shampoo the dog creating a nice lather on entire body, head, legs, and feet. (Be careful not to get any water inside the ears.) Rinse the dog until lather is completely gone. Condition (if desired) after rinsing, making sure you rinse the conditioner out before drying. As part of the dog s bath make sure you: Brush teeth to remove food debris Eighth Step: After bathing, use a towel to remove any excess water. Then use your blow dryer to dry the dog thoroughly or cage dry. Ninth Step: Comb and fluff! Tenth Step: Round off the outside edges of the feet. Eleventh Step: Spray coat with conditioner. Brush through with your soft brush and then use your pin brush to increase fluffiness (except on legs and sides). You may also want to lightly spray coat with cologne. 297
330 Final Step: Step away from the dog and take a final look at your work to make sure you are satisfied. After completing any finishing touches, place a bandana around the neck if a boy, or a ribbon if a girl. Make sure you compliment the dog on what a good dog they have been, and how handsome or beautiful he or she looks. Call the owner to have him/her picked up. You re done! *Make sure to register at and watch streaming videos on selected dog breeds! Become a Certified Pet Groomer Hands On Wag My Tail Pet Grooming School Wag-MyTail Online Order DVDs 298
331 Notes 299

332 OTTERHOUND Tools Needed Slicker Brush, Comb, Dematting Comb or Rake Nail Clipper, Straight Shears Thinning Shears (for a more natural look) or Curved Shears Clipper, #10 blade, #15 or #40 blade Additional Items: Ear cleaner, shampoo, conditioner, spray cologne, ribbon or bandana 300
333 First Step: Use cotton balls dampened with ear cleaner to clean the inside of the ears. Second Step: Use your nail clippers to cut the nails. Cut the tip of the nails being careful not to cut the quick. If you cut the quick, use your gel or powder blood stopper to stop the bleeding. Third Step: Use your #15 blade (Yvonne prefers #40 blade), on your clipper to remove the hair from between the pads. Fourth Step: For the sanitary trim, use your #10 blade on your clipper and clip the hair from the rectal area ½ inch on all sides of the rectum. Be careful not to touch the rectum area! Fifth Step: Use your #10 blade to trim hair from the groin to the navel. Sixth Step: Use your slicker brush and brush entire coat thoroughly. If you encounter any matted areas, use your dematting comb or rake and remove all mats before bathing. Seventh Step: Bath Time Use your favorite shampoo. Wet the dog first and then apply the shampoo. Shampoo the dog creating a nice lather on entire body, head, legs, and feet. (Be careful not to get any water inside the ears.) Rinse the dog until lather is completely gone. Condition (if desired) after rinsing, making sure you rinse the conditioner out before drying. As part of the dog s bath make sure you: Brush teeth to remove food debris Eighth Step: After bathing, use a towel to remove any excess water. Then use your blow dryer to dry the dog thoroughly or cage dry. Ninth Step: Comb and fluff. Use your shears and clean up the whiskers and any long hair on the face, over the eyes and on the muzzle. 301
334 Tenth Step: With your thinning shears trim any straggly hair from the back and from the top of the head. Eyebrows should be quite full. Eleventh Step: Use your shears to trim the beard so it looks squared off. Trim the fringe on the outside edges of the ears. Round off the feet. Twelfth Step: Spray coat with conditioner. Comb through. You may also want to lightly spray coat with cologne. Final Step: Step away from the dog and take a final look at your work to make sure you are satisfied. After completing any finishing touches, place a bandana around the neck if a boy, or a ribbon if a girl. Make sure you compliment the dog on what a good dog they have been, and how handsome or beautiful he or she looks. Call the owner to have him/her picked up. You re done! *Make sure to register at and watch streaming videos on selected dog breeds! Become a Certified Pet Groomer Hands On Wag My Tail Pet Grooming School Wag-MyTail Online Order DVDs 302
335 Notes 303

336 PAPILLON Tools Needed Slicker Brush, Comb Nail Clipper, Straight Shears Clipper, #15 or #40 blade Additional Items: Ear cleaner, shampoo, conditioner, spray cologne, ribbon or bandana First Step: Use cotton balls dampened with ear cleaner to clean the inside of the ears. 304
337 Second Step: Use your nail clippers to cut the nails. Cut the tip of the nails being careful not to cut the quick. If you cut the quick, use your gel or powder blood stopper to stop the bleeding. Third Step: Use your #15 blade (Yvonne prefers #40 blade), on your clipper to remove the hair from between the pads. Fourth Step: Use your slicker brush and brush entire coat thoroughly. Fifth Step: Bath Time Use your favorite shampoo. Wet the dog first and then apply the shampoo. Shampoo the dog creating a nice lather on entire body, head, legs, and feet. (Be careful not to get any water inside the ears.) Rinse the dog until lather is completely gone. Condition (if desired) after rinsing, making sure you rinse the conditioner out before drying. As part of the dog s bath make sure you: Brush teeth to remove food debris Sixth Step: After bathing, use a towel to remove any excess water. Then use your blow dryer to dry the dog thoroughly or cage dry. Seventh Step: Comb and fluff. Pay attention to the featherings on the tail, legs, chest, and ears. Eighth Step: Use your shears and clean up the whiskers and any long hair on the face, over the eyes and on the muzzle. Even the fringe on the ears keeping it long. Trim the fringe on the tail. Even off the outside edges of the feet. Ninth Step: Spray coat with conditioner. Comb through. You may also want to lightly spray coat with cologne. Final Step: Step away from the dog and take a final look at your work to make sure you are satisfied. After completing any finishing touches, place a bandana around the neck if a boy, or a ribbon if a girl. Make sure you compliment the dog on what a good dog they have been, and how handsome or beautiful he or she looks. You re done. 305
 or Curved Shears Additional Items: Ear cleaner, shampoo, conditioner, spray cologne, ribbon or")
338 Parson Russell Terrier Tools Needed Rubber Brush Nail Clipper, Straight Shears Thinning Shears (for a more natural look) or Curved Shears Additional Items: Ear cleaner, shampoo, conditioner, spray cologne, ribbon or bandana. 306
339 First Step: Use cotton balls dampened with ear cleaner to clean the inside of the ears. Second Step: Use your nail clippers to cut the nails. Cut the tip of the nails being careful not to cut the quick. If you cut the quick, use your gel or powder blood stopper to stop the bleeding. Third Step: Use your slicker brush and brush entire coat thoroughly. Fourth Step: Bath Time Use your favorite shampoo. Wet the dog first and then apply the shampoo. Shampoo the dog creating a nice lather on entire body, head, legs, and feet. (Be careful not to get any water inside the ears.) Rinse the dog until lather is completely gone. Condition (if desired) after rinsing, making sure you rinse the conditioner out before drying. As part of the dog s bath make sure you: Brush teeth to remove food debris Fifth Step: After bathing, use a towel to remove any excess water. Then use your blow dryer to dry the dog thoroughly or cage dry. Sixth Step: Use your thinning shears to trim rough hair so it looks smooth on the body. Seventh Step: Use your shears and clean up the whiskers and any long hair on the face, over the eyes and on the muzzle. Trim any straggly hair over the ears. Round off the outsides of the feet. Eighth Step: Spray coat with conditioner. You may also want to lightly spray coat with cologne. Final Step: Step away from the dog and take a final look at your work to make sure you are satisfied. After completing any finishing touches, place a bandana around the neck if a boy, or a ribbon if a girl. Make sure you compliment the dog on what a good dog they have been, and how handsome or beautiful he or she looks. Call the owner to have him/her picked up. You re done! 307

340 PEKINGESE Tools Needed Slicker Brush, Comb, Dematting Comb or Rake, Pin Brush Nail Clipper, Straight Shears Clipper #10 blade, #15 or #40 blade Additional Items: Ear cleaner, shampoo, coat dressing, spray cologne, ribbon or bandana First Step: Use cotton balls dampened with ear cleaner to clean the inside of the ears. Second Step: Use your nail clippers to cut the nails. Cut the tip of the nails being careful not to cut the quick. If you cut the quick, use your gel or powder blood stopper to stop the bleeding 308
341 Third Step: Use your #15 blade (Yvonne prefers #40 blade), on your clipper to remove the hair from between the pads. Fourth Step: For the sanitary trim, use your #10 blade on your clipper and clip the hair from the rectal area ½ inch on all sides of the rectum. Be careful not to touch the rectum area! Fifth Step: Use your slicker brush and brush entire coat thoroughly. If you encounter any matted areas, use your dematting comb or rake and remove all mats before bathing. Sixth Step: Bath Time Use your favorite shampoo. Wet the dog first and then apply the shampoo. Shampoo the dog creating a nice lather on entire body, head, legs, and feet. (Be careful not to get any water inside the ears.) Rinse the dog until lather is completely gone. Condition (if desired) after rinsing, making sure you rinse the conditioner out before drying. As part of the dog s bath make sure you: Brush teeth to remove food debris Clean wrinkles on body Wash any folds on face Seventh Step: After bathing, use a towel to remove any excess water. Then use your blow dryer to dry the dog thoroughly or cage dry. Use baby powder in wrinkles to keep them dry. Eighth Step: Brush and fluff. Ninth Step: Create a part in the center of the tail and let it fall on both sides of the body. Tenth Step: Use a coat dressing. Use your pin brush to fluff up. You may also want to lightly spray coat with cologne. Final Step: Step away from the dog and take a final look at your work to make sure you are satisfied. After completing any finishing touches, place a bandana around the neck if a boy, or a ribbon if a girl. Make sure you compliment the dog on what a good dog they have been, and how handsome or beautiful he or she looks. You re done! 309

342 PEMBROKE WELSH CORGI Tools Needed Bristle Brush (med stiff), Comb Nail Clipper, Straight Shears Additional Items: Ear cleaner, shampoo, conditioner, spray cologne, ribbon or bandana First Step: Use cotton balls dampened with ear cleaner to clean the inside of the ears. 310
343 Second Step: Use your nail clippers to cut the nails. Cut the tip of the nails being careful not to cut the quick. If you cut the quick, use your gel or powder blood stopper to stop the bleeding. Third Step: Use your bristle brush and brush entire coat thoroughly. Fourth Step: Bath Time Use your favorite shampoo. Wet the dog first and then apply the shampoo. Shampoo the dog creating a nice lather on entire body, head, legs, and feet. (Be careful not to get any water inside the ears.) Rinse the dog until lather is completely gone. Condition (if desired) after rinsing, making sure you rinse the conditioner out before drying. As part of the dog s bath make sure you: Brush teeth to remove food debris Option: De-shed Treatment Fifth Step: After bathing, use a towel to remove any excess water. Then use your blow dryer to dry the dog thoroughly or cage dry. Sixth Step: Use your shears and clean up the whiskers and any long hair on the face, over the eyes and on the muzzle. Seventh Step: Spray coat with conditioner. Comb through. You may also want to lightly spray coat with cologne. Final Step: Step away from the dog and take a final look at your work to make sure you are satisfied. After completing any finishing touches, place a bandana around the neck if a boy, or a ribbon if a girl. Make sure you compliment the dog on what a good dog they have been, and how handsome or beautiful he or she looks. Call the owner to have him/her picked up. You re done! 311

344 PETIT BASSET GRIFFON VENDEEN Tools Needed Slicker Brush, Comb Nail Clipper, Straight Shears Clipper, #10 blade, #15 or #40 blade Additional Items: Ear cleaner, shampoo, conditioner, spray cologne, ribbon or bandana First Step: Use cotton balls dampened with ear cleaner to clean the inside of the ears. Second Step: Use your nail clippers to cut the nails. Cut the tip of the nails being careful not to cut the quick. If you cut the quick, use your gel or powder blood stopper to stop the bleeding. 312
345 Third Step: Use your #15 blade (Yvonne prefers #40 blade), on your clipper to remove the hair from between the pads. Fourth Step: For the sanitary trim, use your #10 blade on your clipper and clip the hair from the rectal area ½ inch on all sides of the rectum. Be careful not to touch the rectum area! Fifth Step: Use your #10 blade to trim the hair from the groin to the navel. Sixth Step: Use your slicker brush and brush entire coat thoroughly. Seventh Step: Bath Time Use your favorite shampoo. Wet the dog first and then apply the shampoo. Shampoo the dog creating a nice lather on entire body, head, legs, and feet. (Be careful not to get any water inside the ears.) Rinse the dog until lather is completely gone. Condition (if desired) after rinsing, making sure you rinse the conditioner out before drying. As part of the dog s bath make sure you: Brush teeth to remove food debris Eighth Step: After bathing, use a towel to remove any excess water. Then use your blow dryer to dry the dog thoroughly or cage dry. Ninth Step: Comb and fluff! Tenth Step: Use your shears and clean up the whiskers and any long hair on the face, over the eyes and on the muzzle. Eleventh Step: Use your thinning shears to trim hair around the ears. Twelfth Step & Final: Use your shears to even out leg fringe and to taper the tail to a point at the end. Round off the outside edges of the feet. You may want to lightly spray coat with cologne. 313

346 PHARAOH HOUND Tools Needed Rubber Brush Nail Clipper, Straight Shears Additional Items: Ear cleaner, shampoo, conditioner, spray cologne, ribbon or bandana First Step: Use cotton balls dampened with ear cleaner to clean the inside of the ears. 314
347 Second Step: Use your nail clippers to cut the nails. Cut the tip of the nails being careful not to cut the quick. If you cut the quick, use your gel or powder blood stopper to stop the bleeding. Third Step: Use your rubber brush and brush entire coat thoroughly. Fourth Step: Bath Time Use your favorite shampoo. Wet the dog first and then apply the shampoo. Shampoo the dog creating a nice lather on entire body, head, legs, and feet. (Be careful not to get any water inside the ears.) Rinse the dog until lather is completely gone. Condition (if desired) after rinsing, making sure you rinse the conditioner out before drying. As part of the dog s bath make sure you: Brush teeth to remove food debris Fifth Step: After bathing, use a towel to remove any excess water. Then use your blow dryer to dry the dog thoroughly or cage dry. Sixth Step: Use your shears and clean up the whiskers and any long hair on the face, over the eyes and on the muzzle. Seventh Step: Spray coat with conditioner. Brush through. You may also want to lightly spray coat with cologne. Final Step: Step away from the dog and take a final look at your work to make sure you are satisfied. After completing any finishing touches, place a bandana around the neck if a boy, or a ribbon if a girl. Make sure you compliment the dog on what a good dog they have been, and how handsome or beautiful he or she looks. Call the owner to have him/her picked up. You re done! 315

348 PLOTTHOUND Tools Needed Rubber Brush Nail Clipper, Straight Shears Additional Items: Ear cleaner, shampoo, conditioner, spray cologne, ribbon or bandana First Step: Use cotton balls dampened with ear cleaner to clean the inside of the ears. 316
349 Second Step: Use your nail clippers to cut the nails. Cut the tip of the nails being careful not to cut the quick. If you cut the quick, use your gel or powder blood stopper to stop the bleeding. Third Step: Use your rubber brush and brush entire coat thoroughly. Fourth Step: Bath Time Use your favorite shampoo. Wet the dog first and then apply the shampoo. Shampoo the dog creating a nice lather on entire body, head, legs, and feet. (Be careful not to get any water inside the ears.) Rinse the dog until lather is completely gone. Condition (if desired) after rinsing, making sure you rinse the conditioner out before drying. As part of the dog s bath make sure you: Brush teeth to remove food debris Option: De-shed Treatment Fifth Step: After bathing, use a towel to remove any excess water. Then use your blow dryer to dry the dog thoroughly or cage dry. Sixth Step: Use your shears and clean up the whiskers and any long hair on the face, over the eyes and on the muzzle. Seventh Step: Spray coat with conditioner. Brush through. You may also want to lightly spray coat with cologne. Final Step: Step away from the dog and take a final look at your work to make sure you are satisfied. After completing any finishing touches, place a bandana around the neck if a boy, or a ribbon if a girl. Make sure you compliment the dog on what a good dog they have been, and how handsome or beautiful he or she looks. Call the owner to have him/her picked up. You re done! 317

350 POINTER Tools Needed Rubber Brush Nail Clipper, Straight Shears Additional Items: Ear cleaner, shampoo, conditioner, spray cologne, ribbon or bandana First Step: Use cotton balls dampened with ear cleaner to clean the inside of the ears. Second Step: Use your nail clippers to cut the nails. Cut the tip of the nails being careful not to cut the quick. If you cut the quick, use your gel or powder blood stopper to stop the bleeding. Third Step: Use your rubber brush and brush entire coat thoroughly. 318
351 Fourth Step: Bath Time Use your favorite shampoo. Wet the dog first and then apply the shampoo. Shampoo the dog creating a nice lather on entire body, head, legs, and feet. (Be careful not to get any water inside the ears.) Rinse the dog until lather is completely gone. Condition (if desired) after rinsing, making sure you rinse the conditioner out before drying. As part of the dog s bath make sure you: Brush teeth to remove food debris Option: De-shed Treatment Fifth Step: After bathing, use a towel to remove any excess water. Then use your blow dryer to dry the dog thoroughly or cage dry. Sixth Step: Use your shears and clean up the whiskers and any long hair on the face, over the eyes and on the muzzle. Seventh Step: Spray coat with conditioner. Brush through. You may also want to lightly spray coat with cologne. Final Step: Step away from the dog and take a final look at your work to make sure you are satisfied. After completing any finishing touches, place a bandana around the neck if a boy, or a ribbon if a girl. Make sure you compliment the dog on what a good dog they have been, and how handsome or beautiful he or she looks. Call the owner to have him/her picked up. You re done! *Make sure to register at and watch streaming videos on selected dog breeds! 319

352 POLISH LOWLAND SHEEPDOG Tools Needed Slicker Brush, Comb, Dematting Comb or Rake Soft Brush, Pin Brush Nail Clipper, Straight Shears Clipper, #10 blade, #15 or #40 blade Additional Items: Ear cleaner, shampoo, cream rinse, conditioner, spray cologne, ribbon or bandana 320
353 First Step: Use cotton balls dampened with ear cleaner to clean the inside of the ears. Second Step: Use your nail clippers to cut the nails. Cut the tip of the nails being careful not to cut the quick. If you cut the quick, use your gel or powder blood stopper to stop the bleeding. Third Step: Use your #15 blade (Yvonne prefers #40 blade), on your clipper to remove the hair from between the pads. Fourth Step: For the sanitary trim, use your #10 blade on your clipper and clip the hair from the rectal area ½ inch on all sides of the rectum. Be careful not to touch the rectum area! Fifth Step: Use your #10 blade to trim the hair from the groin to the navel. Sixth Step: Use your slicker brush and brush entire coat thoroughly. If you encounter any matted areas, use your dematting comb or rake and remove all mats before bathing. Seventh Step: Bath Time Use your favorite shampoo. Wet the dog first and then apply the shampoo. Shampoo the dog creating a nice lather on entire body, head, legs, and feet. (Be careful not to get any water inside the ears.) Rinse the dog until lather is completely gone. Condition (if desired) after rinsing, making sure you rinse the conditioner out before drying. As part of the dog s bath make sure you: Brush teeth to remove food debris Eighth Step: After bathing, use a towel to remove any excess water. Then use your blow dryer to dry the dog thoroughly or cage dry. Ninth Step: Comb and fluff! Tenth Step: Use your shears to round off feet. 321
354 Eleventh Step: Spray coat with conditioner. Use your soft brush to brush through. Use your pin brush last to fluff up coat. You may also want to lightly spray coat with cologne. Final Step: Step away from the dog and take a final look at your work to make sure you are satisfied. After completing any finishing touches, place a bandana around the neck if a boy, or a ribbon if a girl. Make sure you compliment the dog on what a good dog they have been, and how handsome or beautiful he or she looks. Call the owner to have him/her picked up. You re done! *Make sure to register at and watch streaming videos on selected dog breeds! Become a Certified Pet Groomer Hands On Wag My Tail Pet Grooming School Wag-MyTail Online Order DVDs 322
355 Notes 323

356 POMERANIAN Tools Needed Slicker Brush, Pin Brush, Comb Nail Clipper, Straight Shears Clipper, #10 blade, #15 or #40 blade Additional Items: Ear cleaner, shampoo, conditioner, spray cologne, ribbon or bandana First Step: Use cotton balls dampened with ear cleaner to clean the inside of the ears. Second Step: Use your nail clippers to cut the nails. Cut the tip of the nails being careful not to cut the quick. If you cut the quick, use your gel or powder blood stopper to stop the bleeding. 324
357 Third Step: Use your #15 blade (Yvonne prefers #40 blade), on your clipper to remove the hair from between the pads. Fourth Step: For the sanitary trim, use your #10 blade on your clipper and clip the hair from the rectal area ½ inch on all sides of the rectum. Be careful not to touch the rectum area! Fifth Step: Use your slicker brush and brush entire coat thoroughly. Sixth Step: Bath Time Use your favorite shampoo. Wet the dog first and then apply the shampoo. Shampoo the dog creating a nice lather on entire body, head, legs, and feet. (Be careful not to get any water inside the ears.) Rinse the dog until lather is completely gone. Condition (if desired) after rinsing, making sure you rinse the conditioner out before drying. As part of the dog s bath make sure you: Brush teeth to remove food debris Seventh Step: After bathing, use a towel to remove any excess water. Then use your blow dryer to dry the dog thoroughly or cage dry. Eighth Step: Comb and fluff! Ninth Step: Use your shears and clean up the whiskers and any long hair on the face, over the eyes, around the outside edges of the ears and on the muzzle. Tenth Step: Use your shears to round off feet. Eleventh Step: Trim the tail in the shape of a feather, so that it fans out nicely. Twelfth Step: Fluff the whole body against the grain with your pin brush, use your coat dressing, and fluff again. Hair should stand away from the body. You may also want to lightly spray coat lightly with cologne. You re done! 325

358 POODLE-KENNEL CLIP *see note Tools Needed Slicker Brush, Comb Nail Clipper, Straight Shears Clipper, #7F blade, #10 blade, #15 blade Additional Items: Ear cleaner, medicated ear powder, shampoo, conditioner, spray cologne, ribbon or bandana 326
359 First Step: Use medicated powder lightly to dry ears. Gently pull out any dead hair. Use cotton balls dampened with ear cleaner to clean the inside of the ears. Second Step: Use your nail clippers to cut the nails. Cut the tip of the nails being careful not to cut the quick. If you cut the quick, use your gel or powder blood stopper to stop the bleeding. Third Step: Use your #15 blade to lift the hair up from between the toes and pads. Trim up both sides of each toe. The ankle bone is your baseline marker. See section on Poodle- Summer Clip for guideline on poodle feet. Fourth Step: For the sanitary trim, use your #10 and clip the hair from the rectal area ½ on all sides of the rectum. Be careful not to touch the rectum area! Fifth Step: FACE 1) Use your #10 or #15 blade to shave the face. Shave against the grain. 2) Go from corner of eye straight across to the nub of the ear 3) From the nub of the ear go down into a V shape at the throat 4) Repeat on the other side. 5) The line across the face goes straight across the stop. Shave everything inside these lines on the face and muzzle. Sixth Step: TAIL 1) Use your #15 blade to trim the top side of the tail, going against the grain. 1) When trimming the underside of the tail, go with the grain. 3) Trim approximately ¼ the length of the tail starting from the base. Seventh Step: TO SET THE PATTERN Use the same blade (either your #5F or #7F), and pattern on each step. 1) Clip starting at the base of the head, go down the center of the back to the withers (the area in between the shoulders) in a straight line, continuing down the back to the base of the tail. 2) Now clip down the sides of the body, clipping about 1 inch to the elbow, and about 1 inch from the flank. 3) Clip from the base of the ear, and go down to just above the shoulder, and down the front of the chest. 4) Clip the underchest (Lift the front legs for easy access). 5) Clip down the hips just above the hip line. 6) Now clip the hair with the grain inside the pattern lines. 327
360 Eight Step: Bath Time Use your favorite shampoo. Wet the dog first and then apply the shampoo. Shampoo the dog creating a nice lather on entire body, head, legs, and feet. (Be careful not to get any water inside the ears.) Rinse the dog until lather is completely gone. Condition (if desired) after rinsing, making sure you rinse the conditioner out before drying. As part of the dog s bath make sure you: Brush teeth to remove food debris. Ninth Step: After bathing, use a towel to remove any excess water. While drying, keep a damp towel on any parts of the body that are not being dried at that moment. Use your blow dryer to dry the dog thoroughly and as straight as possible. There should not be any curls left in the coat. This type of coat should not be cage dried. Tenth Step: Comb and fluff! Eleventh Step: Go back with the blade you used to set the pattern, and clean up any loose hair in the clipped area so that it is left smooth. Twelfth Step: Comb the hair on the legs, teasing it out so it fluffs up. Use your shears to finish off the front and the rear legs so they look neat. Blend the long hair with the short hair by either using thinning shears or an attachment comb. The legs should appear to be in a tubular shape. Thirteenth Step: Fluff and comb out tail. Twist the tip of the hair on the tail and trim off about a ½ inch. Fluff again, and use your curved shears to shape the tail into a round ball. Please see section on tails for more details. Fourteenth Step: Use your shears to blend the chest area with the front legs and under the chest with the shoulders. Fifteenth Step: Comb the head and the ears. Please refer to Poodle Puppy clip section for instructions on finishing the head. Final Step: Step away from the dog and take a final look at your work to make sure you are satisfied. After completing any finishing touches, place a bandana around the neck if 328
361 a boy, or a ribbon if a girl. Make sure you compliment the dog on what a good dog they have been, and how handsome or beautiful he or she looks. *Note: This style is appropriate for the Standard Poodle, Miniature Poodle, and the Toy Poodle. *Make sure to register at for free and watch the Poodle streaming videos. 329

362 POODLE-PUPPY CLIP *see note Tools Needed Slicker Brush, Comb Nail Clipper, Straight Shears Clipper, #10 blade, #15 blade Additional Items: Ear cleaner, medicated ear powder, shampoo, conditioner, spray cologne, ribbon or bandana First Step: Use medicated powder lightly to dry ears. Gently pull out any dead hair. Use cotton balls dampened with ear cleaner to clean the inside of the ears. Second Step: Use your nail clippers to cut the nails. Cut the tip of the nails being careful not to cut the quick. If you cut the quick, use your gel or powder blood stopper to stop the bleeding. 330
363 Third Step: Use your #15 blade to lift the hair up from between the toes and pads. Trim up both sides of each toe. The ankle bone is your baseline marker. See section on Poodle- Summer Clip for guideline on poodle feet. Fourth Step: For the sanitary trim, use your #10 and clip the hair from the rectal area ½ on all sides of the rectum. Use your #10 blade to trim the hair from the groin to the navel. Fifth Step: FACE 1) Use your #10 or #15 blade to shave the face. Shave against the grain. 2) Go from corner of eye straight across to the nub of the ear 3) From the nub of the ear go down into a V shape at the throat 4) Repeat on the other side. 5) The line across the face goes straight across the stop. Shave everything inside these lines on the face and muzzle. 6) If you want a moustache, leave hair on the muzzle from the corners of the mouth to the nose. Sixth Step: TAIL 1) Use your #15 blade to trim the top side of the tail, going against the grain. 1) When trimming the underside of the tail, go with the grain. 3) Trim approximately ¼ the length of the tail starting from the base. Seventh Step: Bath Time Use your favorite shampoo. Wet the dog first and then apply the shampoo. Shampoo the dog creating a nice lather on entire body, head, legs, and feet. (Be careful not to get any water inside the ears.) Rinse the dog until lather is completely gone. Condition (if desired) after rinsing, making sure you rinse the conditioner out before drying. As part of the dog s bath make sure you: Brush teeth to remove food debris. Eighth Step: After bathing, use a towel to remove any excess water. While drying, keep a damp towel on any parts of the body that are not being dried at that moment. Use your blow dryer to dry the dog thoroughly and as straight as possible. There should not be any curls left in the coat. This type of coat should not be cage dried. Ninth Step: Use your comb to fluff up the hair on the entire body, releasing all the curls since this is a shears-only style. 331
364 Tenth Step: Use your shears to finish off the front and the rear legs so they look neat, but very fluffy. Use your shears to evenly trim the cuffs. Eleventh Step: Fluff and comb out tail. Twist the tip of the hair on the tail and trim off about a ½ inch. Fluff again, and use your curved shears to shape the tail into a round ball. Please see section on tails for more details. Twelfth Step: Comb the head and the ears. Please refer to section on Poodle Head for further explanation on shaping the topknot. Final Step: Step away from the dog and take a final look at your work to make sure you are satisfied. After completing any finishing touches, place a bandana around the neck if a boy, or a ribbon if a girl. Make sure you compliment the dog on what a good dog they have been, and how handsome or beautiful he or she looks. Call the owner to have him/her picked up. You re done! *Note: This style is appropriate for the Standard Poodle, Miniature Poodle, and the Toy Poodle. *Make sure to register at for free and watch the Poodle streaming videos. 332
365 Poodle Top Knot FACE 1) Use your #10 or #15 blade to shave the face. Shave against the grain. 2) Go from corner of eye straight across to the nub of the ear 3) From the nub of the ear go down into a V shape at the throat 4) Repeat on the other side. 5) The line across the face goes straight across the stop. Shave everything inside these lines on the face and muzzle. 6) If you want a moustache, leave hair on the muzzle from the corners of the mouth to the nose. Top Knot 1) Comb the hair forward from the top of the top knot. Use your straight shears and trim hair evenly to be flush with eyes. 2) Comb the top knot to one side and use your straight shears to cut hair on the side. Repeat on the other side to create a box shaped top knot. 3) Use your curved shears and start trimming the top of the top knot to reduce the height of the hair to the desired length and then shape the entire top knot to form a round dome. 333
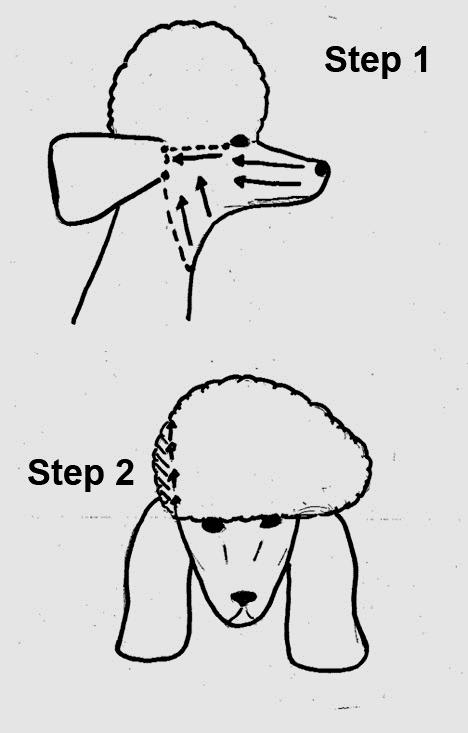
366 334

367 335

368 POODLE-SUMMER CLIP *see note Tools Needed Slicker Brush, Comb Nail Clipper, Straight Shears Clipper, #7F blade, #10 blade, #15 blade Additional Items: Ear cleaner, medicated ear powder, shampoo, conditioner, spray cologne, ribbon or bandana First Step: Use medicated powder lightly to dry ears. Gently pull out any dead hair. Use cotton balls dampened with ear cleaner to clean the inside of the ears. 336
369 Second Step: Use your nail clippers to cut the nails. Cut the tip of the nails being careful not to cut the quick. If you cut the quick, use your gel or powder blood stopper to stop the bleeding. Third Step: Use your #15 blade to lift the hair up from between the toes and pads. Trim up both sides of each toe. The ankle bone is your baseline marker. See section on for guideline on poodle feet. Fourth Step: For the sanitary trim, use your #10 and clip the hair from the rectal area ½ on all sides of the rectum. Use your #10 blade to trim the hair from the groin to the navel. Fifth Step: FACE 1) Use your #10 or #15 blade to shave the face. Shave against the grain. 2) Go from corner of eye straight across to the nub of the ear 3) From the nub of the ear go down into a V shape at the throat 4) Repeat on the other side. 5) The line across the face goes straight across the stop. Shave everything inside these lines on the face and muzzle. 6) If you want a moustache, leave hair on the muzzle from the corners of the mouth to the nose. Sixth Step: TAIL 1) Use your #15 blade to trim the top side of the tail, going against the grain. 1) When trimming the underside of the tail, go with the grain. 3) Trim approximately ¼ the length of the tail starting from the base. Seventh Step: TO SET THE PATTERN Use the same blade (either your #7F, or #10 blade) on each step. 1) Start from the base of the skull and clip to the base of the tail. 2) Clip the rear leg ¼ in above the hock joint. 3) Clip the sides of the neck to the elbow, ending at a line on the front legs that is even with the line at the hock joint on the rear legs. 4) Clip the rest of the body, going with the grain. Eighth Step: Use your slicker brush and brush the rest of the hair thoroughly. If you encounter any matted areas, use your comb and remove all mats before bathing. Ninth Step: Bath Time Use your favorite shampoo. 337
370 Wet the dog first and then apply the shampoo. Shampoo the dog creating a nice lather on entire body, head, legs, and feet. (Be careful not to get any water inside the ears.) Rinse the dog until lather is completely gone. Condition (if desired) after rinsing, making sure you rinse the conditioner out before drying. As part of the dog s bath make sure you: Brush teeth to remove food debris. Tenth Step: After bathing, use a towel to remove any excess water. Then use your blow dryer to dry the dog thoroughly or cage dry. Eleventh Step: Fluff dry the topknot, ears, tail and leg pompons. Comb after drying. Twelfth Step: Fluff and comb out tail. Twist the tip of the hair on the tail and trim off about a ½ inch. Fluff again, and use your curved shears to shape the tail into a round ball. Please see section on tails for more details. Thirteenth Step: Comb the hair on the legs (pompoms or bracelets) by teasing it out so it fluffs up. Scissor them into a ball shape. Please see section on feet for further details. Fourteenth Step: Comb the head and the ears. Tease the head to increase fluffiness. Please refer to section Puppy Clip on heads for further explanation on shaping the topknot. Final Step: Step away from the dog and take a final look at your work to make sure you are satisfied. After completing any finishing touches, place a bandana around the neck if a boy, or a ribbon if a girl. Make sure you compliment the dog on what a good dog they have been, and how handsome or beautiful he or she looks. *Note: This style is appropriate for the Standard Poodle, Miniature Poodle, and the Toy Poodle. *Make sure to register at for free and watch how to groom the Poodle streaming videos. 338
371 Notes 339

372 PORTUGUESE WATER DOG (Retriever Clip) Tools Needed Bristle Brush, Comb Nail Clipper, Straight Shears Additional Items: Ear cleaner, medicated ear powder, shampoo, conditioner, spray cologne, ribbon or bandana 340
373 First Step: Use medicated powder lightly to dry ears. Gently pull out any dead hair. Use cotton balls dampened with ear cleaner to clean the inside of the ears. Second Step: Use your nail clippers to cut the nails. Cut the tip of the nails being careful not to cut the quick. If you cut the quick, use your gel or powder blood stopper to stop the bleeding. Third Step: Use your bristle brush and brush entire coat thoroughly. If you encounter any matted areas, use your dematting comb or rake and remove all mats before bathing. Fourth Step: Bath Time Use your favorite shampoo. Wet the dog first and then apply the shampoo. Shampoo the dog creating a nice lather on entire body, head, legs, and feet. (Be careful not to get any water inside the ears.) Rinse the dog until lather is completely gone. Condition (if desired) after rinsing, making sure you rinse the conditioner out before drying. As part of the dog s bath make sure you: Brush teeth to remove food debris. Fifth Step: After bathing, use a towel to remove any excess water. Then use your blow dryer to dry the dog thoroughly or cage dry. Sixth Step: Use your shears to trim any unruly curls so that all the hair on the entire dog looks even. Only the hair at the end of the tail should be left long. Seventh Step: Use your shears to round off feet. Eighth Step: Spray coat with conditioner. Brush through. You may also want to lightly spray coat with cologne. Final Step: Step away from the dog and take a final look at your work to make sure you are satisfied. After completing any finishing touches, place a bandana around the neck if a boy, or a ribbon if a girl. Make sure you compliment the dog on what a good dog they have been, and how handsome or beautiful he or she looks. You re done. 341

374 PORTUGUESE WATER DOG (Lion Clip) Tools Needed Slicker Brush, Comb, Dematting Comb or Rake Nail Clipper, Straight Shears Clipper, #10 blade, #15 or #40 blade Additional Items: Ear cleaner, medicated ear powder, shampoo, conditioner, spray cologne, ribbon or bandana First Step: Use medicated powder lightly to dry ears. Gently pull out any dead hair. Use cotton balls dampened with ear cleaner to clean the inside of the ears. 342
375 Second Step: Use your nail clippers to cut the nails. Cut the tip of the nails being careful not to cut the quick. If you cut the quick, use your gel or powder blood stopper to stop the bleeding. Third Step: Use your #15 blade (Yvonne prefers #40 blade), on your clipper to remove the hair from between the pads. Fourth Step: For the sanitary trim, use your #10 blade on your clipper and clip the hair from the rectal area ½ inch on all sides of the rectum. Be careful not to touch the rectum area! Fifth Step: TO SET THE PATTERN Use your #10 blade to rough cut these areas before bathing. Always trim going with the grain. Start at the middle of the back to the base of the tail. Clip the whole area of the rear end of the dog. Also clip the entire back legs. FACE 1) Trim from the outer corner of eye to the front of the ear. Trim from the corner of the mouth to the bottom of the ear. 2) Trim down the muzzle starting from under the eye. 3) Trim on top of the muzzle, which starts between the eyes, down to the tip of the nose. 4) Trim any hair from around the lips. UNDERSIDE 1) Use your #10 blade to trim the hair from the groin to the navel. LEGS/ TAIL 1) Start at the middle of the back and trim down to the base of the tail. 2) Trim rear end completely. 3) Trim all hair down the rear legs to the feet. 4) Trim tail from the base, leaving the top ¼ long at the tip. Sixth Step: Use your slicker brush and brush entire coat thoroughly. If you encounter any matted areas, use your dematting comb or rake and remove all mats before bathing. Seventh Step: Bath Time Use your favorite shampoo. Wet the dog first and then apply the shampoo. 343
376 Shampoo the dog creating a nice lather on entire body, head, legs, and feet. (Be careful not to get any water inside the ears.) Rinse the dog until lather is completely gone. Condition (if desired) after rinsing, making sure you rinse the conditioner out before drying. As part of the dog s bath make sure you: Brush teeth to remove food debris. Eighth Step: After bathing, use a towel to remove any excess water. Then use your blow dryer to dry the dog thoroughly or cage dry. Ninth Step: Comb and fluff! Use shears to even up hair on body. Tenth Step: HEAD 1) Use your shears and trim hair on top of head so it blends smoothly into the ear area. 2) Trim the bottom of the ears so they line up with the jaw bone. Eleventh Step: LEGS 1) Trim front legs leaving them full and rounded but so they appear straight (tubular). 2) Use shears to round off feet. Twelfth Step: Hand rub conditioner onto the trimmed areas. On the untrimmed areas, spray coat with conditioner. Comb through. You may also want to lightly spray coat with cologne. Final Step: Step away from the dog and take a final look at your work to make sure you are satisfied. After completing any finishing touches, place a bandana around the neck if a boy, or a ribbon if a girl. Make sure you compliment the dog on what a good dog they have been, and how handsome or beautiful he or she looks. Call the owner to have him/her picked up. You re done! 344
377 Notes 345

378 PUG Tools Needed Rubber Brush, Comb Nail Clipper, Straight Shears Additional Items: Ear cleaner, shampoo, conditioner, spray cologne, ribbon or bandana First Step: Use cotton balls dampened with ear cleaner to clean the inside of the ears. 346
379 Second Step: Use your nail clippers to cut the nails. Cut the tip of the nails being careful not to cut the quick. If you cut the quick, use your gel or powder blood stopper to stop the bleeding. Third Step: Use your rubber brush and brush entire coat thoroughly. Fourth Step: Bath Time Use your favorite shampoo. Wet the dog first and then apply the shampoo. Shampoo the dog creating a nice lather on entire body, head, legs, and feet. Clean wrinkles on body. Wash any folds on face. (Be careful not to get any water inside the ears.) Rinse the dog until lather is completely gone. Condition (if desired) after rinsing, making sure you rinse the conditioner out before drying. As part of the dog s bath make sure you: Brush teeth to remove food debris. Clean and rinse all folds in the face Option: De-shed Treatment Fifth Step: After bathing, use a towel to remove any excess water. Then use your blow dryer to dry the dog thoroughly or cage dry. Sixth Step: Use your shears and clean up the whiskers and any long hair on the face, over the eyes and on the muzzle. Seventh Step: Hand rub conditioner onto coat. You may also want to lightly spray coat with cologne. Final Step: Step away from the dog and take a final look at your work to make sure you are satisfied. After completing any finishing touches, place a bandana around the neck if a boy, or a ribbon if a girl. Make sure you compliment the dog on what a good dog they have been, and how handsome or beautiful he or she looks. Call the owner to have him/her picked up. You re done! 347

380 PULI (Brushed Coat) *Note: For a corded Puli, see directions for Komondor Tools Needed Slicker Brush, Comb, Dematting Comb or Rake Nail Clipper, Straight Shears Clipper, #10 blade, #15 or #40 blade Additional Items: Ear cleaner, medicated ear powder, shampoo, conditioner, spray cologne, ribbon or bandana First Step: Use medicated powder lightly to dry ears. Gently pull out any dead hair. Use cotton balls dampened with ear cleaner to clean the inside of the ears. 348
381 Second Step: Use your nail clippers to cut the nails. Cut the tip of the nails being careful not to cut the quick. If you cut the quick, use your gel or powder blood stopper to stop the bleeding. Third Step: Use your #15 blade (Yvonne prefers #40 blade), on your clipper to remove the hair from between the pads. Fourth Step: For the sanitary trim, use your #10 blade on your clipper and clip the hair from the rectal area ½ inch on all sides of the rectum. Be careful not to touch the rectum area! Fifth Step: Use your #10 blade to trim the hair from the groin to the navel. Sixth Step: Use your slicker brush and brush entire coat thoroughly. If you encounter any matted areas, use your dematting comb or rake and remove all mats before bathing. Seventh Step: Bath Time Use your favorite shampoo. Wet the dog first and then apply the shampoo. Shampoo the dog creating a nice lather on entire body, head, legs, and feet. (Be careful not to get any water inside the ears.) Rinse the dog until lather is completely gone. Condition (if desired) after rinsing, making sure you rinse the conditioner out before drying. As part of the dog s bath make sure you: Brush teeth to remove food debris. Eighth Step: Put dog in kennel on towels and dry with a forced air dryer. Do Not Brush After Drying Ninth Step: If needed, separate cording by hand all the way down to the skin. For a neat appearance part the hair on the back from the base of skull to base of tail. Tenth Step: Use your shears to round off feet. 349
382 Eleventh Step: Spray coat with conditioner. You may also want to lightly spray coat with cologne. Final Step: Step away from the dog and take a final look at your work to make sure you are satisfied. After completing any finishing touches, place a bandana around the neck if a boy, or a ribbon if a girl. Make sure you compliment the dog on what a good dog they have been, and how handsome or beautiful he or she looks. Call the owner to have him/her picked up. You re done! *Make sure to register at and watch streaming videos on selected dog breeds! Become a Certified Pet Groomer Hands On Wag My Tail Pet Grooming School Wag-MyTail Online Order DVDs 350
383 Notes 351

384 PYRENEAN SHEPHERD Tools Needed Slicker Brush, Comb, Dematting Comb or Rake, Pin Brush Nail Clipper, Straight Shears Clipper, #10 blade, #15 or #40 blade Additional Items: ribbon or bandana. Ear cleaner, shampoo, crème rinse, conditioner, spray cologne, 352
385 First Step: Use cotton balls dampened with ear cleaner to clean the inside of the ears. Second Step: Use your nail clippers to cut the nails. Cut the tip of the nails being careful not to cut the quick. If you cut the quick, use your gel or powder blood stopper to stop the bleeding. Third Step: Use your #15 blade (Yvonne prefers #40 blade), on your clipper to remove the hair from between the pads. Fourth Step: For the sanitary trim, use your #10 blade on your clipper and clip the hair from the rectal area ½ inch on all sides of the rectum. Be careful not to touch the rectum area! Fifth Step: Use your #10 blade to trim the hair from the groin to the navel. Sixth Step: Use your slicker brush and brush entire coat thoroughly. If you encounter any matted areas, use your dematting comb or rake and remove all mats before bathing. Seventh Step: Bath Time Use your favorite shampoo. Wet the dog first and then apply the shampoo. Shampoo the dog creating a nice lather on entire body, head, legs, and feet. (Be careful not to get any water inside the ears.) Rinse the dog until lather is completely gone. Crème Rinse after rinsing shampoo out, making sure you rinse the crème rinse out before drying. As part of the dog s bath make sure you: Brush teeth to remove food debris. Eighth Step: After bathing, use a towel to remove any excess water. Then use your blow dryer to dry the dog thoroughly or cage dry. Ninth Step: Comb and fluff! Tenth Step: Use your shears to round off feet. 353
386 Eleventh Step: Spray coat with conditioner. Comb through. Brush with your pin brush to create a fluffy look. You may also want to lightly spray coat with cologne. Final Step: Step away from the dog and take a final look at your work to make sure you are satisfied. After completing any finishing touches, place a bandana around the neck if a boy, or a ribbon if a girl. Make sure you compliment the dog on what a good dog they have been, and how handsome or beautiful he or she looks. Call the owner to have him/her picked up. You re done! *Make sure to register at and watch streaming videos on selected dog breeds! Become a Certified Pet Groomer Hands On Wag My Tail Pet Grooming School Wag-MyTail Online Order DVDs 354
387 Notes 355

388 REDBONE COONHOUND Tools Needed Rubber Brush, Comb Nail Clipper, Straight Shears Additional Items: Ear cleaner, baby powder, shampoo, conditioner, spray cologne, ribbon or bandana First Step: Use cotton balls dampened with ear cleaner to clean the inside of the ears. 356
389 Second Step: Use your nail clippers to cut the nails. Cut the tip of the nails being careful not to cut the quick. If you cut the quick, use your gel or powder blood stopper to stop the bleeding. Third Step: Use your rubber brush and brush entire coat thoroughly. Fourth Step: Bath Time Use your favorite shampoo. Wet the dog first and then apply the shampoo. Shampoo the dog creating a nice lather on entire body, head, legs, and feet. Clean wrinkles on body. Wash any folds on face. (Be careful not to get any water inside the ears.) Rinse the dog until lather is completely gone. Condition (if desired) after rinsing, making sure you rinse the conditioner out before drying. As part of the dog s bath make sure you: Brush teeth to remove food debris. Option: De-Shed Treatment Fifth Step: After bathing, use a towel to remove any excess water. Then use your blow dryer to dry the dog thoroughly or cage dry. Sixth Step: Use your shears and clean up the whiskers and any long hair on the face, over the eyes and on the muzzle. Seventh Step: Hand rub conditioner onto coat. You may also want to lightly spray coat with cologne. Final Step: Step away from the dog and take a final look at your work to make sure you are satisfied. After completing any finishing touches, place a bandana around the neck if a boy, or a ribbon if a girl. Make sure you compliment the dog on what a good dog they have been, and how handsome or beautiful he or she looks. Call the owner to have him/her picked up. You re done! 357

390 RHODESIAN RIDGEBACK Tools Needed Rubber Brush Nail Clipper, Straight Shears Additional Items: Ear cleaner, shampoo, conditioner, spray cologne, ribbon or bandana 358
391 First Step: Use medicated powder lightly to dry ears. Gently pull out any dead hair. Use cotton balls dampened with ear cleaner to clean the inside of the ears. Second Step: Use your nail clippers to cut the nails. Cut the tip of the nails being careful not to cut the quick. If you cut the quick, use your gel or powder blood stopper to stop the bleeding. Third Step: Use your rubber brush and brush entire coat thoroughly. Fourth Step: Bath Time Use your favorite shampoo. Wet the dog first and then apply the shampoo. Shampoo the dog creating a nice lather on entire body, head, legs, and feet. (Be careful not to get any water inside the ears.) Rinse the dog until lather is completely gone. Condition (if desired) after rinsing, making sure you rinse the conditioner out before drying. As part of the dog s bath make sure you: Brush teeth to remove food debris. Option: De-Shed Treatment Fifth Step: After bathing, use a towel to remove any excess water. Then use your blow dryer to dry the dog thoroughly or cage dry. Sixth Step: Use your shears and clean up the whiskers and any long hair on the face, over the eyes and on the muzzle. Seventh Step: Spray coat with conditioner. Brush through. You may also want to lightly spray coat with cologne. Final Step: Step away from the dog and take a final look at your work to make sure you are satisfied. After completing any finishing touches, place a bandana around the neck if a boy, or a ribbon if a girl. Make sure you compliment the dog on what a good dog they have been, and how handsome or beautiful he or she looks. Call the owner to have him/her picked up. You re done! 359

392 ROTTWEILER Tools Needed Rubber Brush Nail Clipper, Straight Shears Additional Items: Ear cleaner, shampoo, conditioner, spray cologne, ribbon or bandana 360
393 First Step: Use cotton balls dampened with ear cleaner to clean the inside of the ears. Second Step: Use your nail clippers to cut the nails. Cut the tip of the nails being careful not to cut the quick. If you cut the quick, use your gel or powder blood stopper to stop the bleeding. Third Step: Use your rubber brush and brush entire coat thoroughly. Fourth Step: Bath Time Use your favorite shampoo. Wet the dog first and then apply the shampoo. Shampoo the dog creating a nice lather on entire body, head, legs, and feet. Wash any folds on face. (Be careful not to get any water inside the ears.) Rinse the dog until lather is completely gone. Condition (if desired) after rinsing, making sure you rinse the conditioner out before drying. As part of the dog s bath make sure you: Brush teeth to remove food debris. Option: De-Shed Treatment Fifth Step: After bathing, use a towel to remove any excess water. Then use your blow dryer to dry the dog thoroughly or cage dry. Sixth Step: Use your shears and clean up the whiskers and any long hair on the face, over the eyes and on the muzzle. Trim the edges of the ears. Seventh Step: Spray coat with conditioner. Brush through. You may also want to lightly spray coat with cologne. Final Step: Step away from the dog and take a final look at your work to make sure you are satisfied. After completing any finishing touches, place a bandana around the neck if a boy, or a ribbon if a girl. Make sure you compliment the dog on what a good dog they have been, and how handsome or beautiful he or she looks. Call the owner to have him/her picked up. You re done! 361
 or Curved Shears Additional Items: Ear cleaner, shampoo, conditioner, spray cologne, ribbon or bandana")
394 SAINT BERNARD Tools Needed Slicker Brush, Comb, Dematting Comb or Rake Nail Clipper, Straight Shears Thinning Shears (for a more natural look) or Curved Shears Additional Items: Ear cleaner, shampoo, conditioner, spray cologne, ribbon or bandana 362
395 First Step: Use cotton balls dampened with ear cleaner to clean the inside of the ears. Second Step: Use your nail clippers to cut the nails. Cut the tip of the nails being careful not to cut the quick. If you cut the quick, use your gel or powder blood stopper to stop the bleeding. Third Step: Use your slicker brush and brush entire coat thoroughly. If you encounter any matted areas, use your dematting comb or rake and remove all mats before bathing. Fourth Step: Bath Time Use your favorite shampoo. Wet the dog first and then apply the shampoo. Shampoo the dog creating a nice lather on entire body, head, legs, and feet. Wash any folds on face. (Be careful not to get any water inside the ears.) Rinse the dog until lather is completely gone. Condition (if desired) after rinsing, making sure you rinse the conditioner out before drying. As part of the dog s bath make sure you: Brush teeth to remove food debris. Option: De-Shed Treatment Fifth Step: After bathing, use a towel to remove any excess water. Then use your blow dryer to dry the dog thoroughly or cage dry. Sixth Step: Comb and fluff! Seventh Step: Use your shears and clean up the whiskers and any long hair on the face, over the eyes and on the muzzle. Eighth Step: Use your thinning shears to remove straggly hair on feet. Clean up area between hocks and feet. Round off feet. Ninth Step: Spray coat with conditioner. Brush through. You may also want to lightly spray coat with cologne. Final Step: Step away from the dog and take a final look at your work to make sure you are satisfied. You re done! 363

396 SALUKI Tools Needed Slicker Brush, Comb Nail Clipper, Straight Shears Additional Items: Ear cleaner, shampoo, conditioner, spray cologne, ribbon or bandana 364
397 First Step: Use cotton balls dampened with ear cleaner to clean the inside of the ears. Second Step: Use your nail clippers to cut the nails. Cut the tip of the nails being careful not to cut the quick. If you cut the quick, use your gel or powder blood stopper to stop the bleeding. Third Step: Use your slicker brush and brush entire coat thoroughly. Fourth Step: Bath Time Use your favorite shampoo. Wet the dog first and then apply the shampoo. Shampoo the dog creating a nice lather on entire body, head, legs, and feet. (Be careful not to get any water inside the ears.) Rinse the dog until lather is completely gone. Condition (if desired) after rinsing, making sure you rinse the conditioner out before drying. As part of the dog s bath make sure you: Brush teeth to remove food debris. Fifth Step: After bathing, use a towel to remove any excess water. Then use your blow dryer to dry the dog thoroughly or cage dry. Sixth Step: Comb and fluff up featherings on ears, tail and legs. Seventh Step: Use your shears and clean up the whiskers and any long hair on the face, over the eyes and on the muzzle. Eighth Step: Use your shears to even featherings on legs. Taper the tail fringe to the end of the tail starting wider at the base. Ninth Step: Use your shears to trim outside edges of the feet. Tenth Step: Spray coat with conditioner. Brush through. You may also want to lightly spray coat with cologne. You re done! 365

398 SAMOYED Tools Needed Slicker Brush, Comb, Dematting Comb or Rake Nail Clipper, Straight Shears Thinning Shears (for a more natural look) or Curved Shears Additional Items: Ear cleaner, shampoo, conditioner, spray cologne, ribbon or bandana First Step: Use cotton balls dampened with ear cleaner to clean the inside of the ears. Second Step: Use your nail clippers to cut the nails. Cut the tip of the nails being careful not to cut the quick. If you cut the quick, use your gel or powder blood stopper to stop the bleeding. 366
399 Third Step: Use your slicker brush and brush entire coat thoroughly. If you encounter any matted areas, use your dematting comb or rake and remove all mats before bathing. Fourth Step: Bath Time Use your favorite shampoo. Wet the dog first and then apply the shampoo. Shampoo the dog creating a nice lather on entire body, head, legs, and feet. (Be careful not to get any water inside the ears.) Rinse the dog until lather is completely gone. Condition (if desired) after rinsing, making sure you rinse the conditioner out before drying. As part of the dog s bath make sure you: Brush teeth to remove food debris. Option: De-Shed Treatment Fifth Step: After bathing, use a towel to remove any excess water. Then use your blow dryer to dry the dog thoroughly or cage dry. Sixth Step: Comb and fluff! Seventh Step: Use your shears and clean up the whiskers and any long hair on the face, over the eyes and on the muzzle. Eighth Step: Use your shears to clean up any straggly hair between the toes and around the paws. Ninth Step: Spray coat with conditioner. Comb through. You may also want to lightly spray coat with cologne. Final Step: Step away from the dog and take a final look at your work to make sure you are satisfied. After completing any finishing touches, place a bandana around the neck if a boy, or a ribbon if a girl. Make sure you compliment the dog on what a good dog they have been, and how handsome or beautiful he or she looks. Call the owner to have him/her picked up. You re done! 367

400 SCHIPPERKE Tools Needed Slicker Brush, Comb Nail Clipper, Straight Shears Additional Items: Ear cleaner, shampoo, conditioner, spray cologne, ribbon or bandana 368
401 First Step: Use cotton balls dampened with ear cleaner to clean the inside of the ears. Second Step: Use your nail clippers to cut the nails. Cut the tip of the nails being careful not to cut the quick. If you cut the quick, use your gel or powder blood stopper to stop the bleeding. Third Step: Use your slicker brush and brush entire coat thoroughly. Fourth Step: Bath Time Use your favorite shampoo. Wet the dog first and then apply the shampoo. Shampoo the dog creating a nice lather on entire body, head, legs, and feet. Clean wrinkles on body. Wash any folds on face. (Be careful not to get any water inside the ears.) Rinse the dog until lather is completely gone. Condition (if desired) after rinsing, making sure you rinse the conditioner out before drying. As part of the dog s bath make sure you: Brush teeth to remove food debris. Fifth Step: After bathing, use a towel to remove any excess water. Then use your blow dryer to dry the dog thoroughly or cage dry. Sixth Step: Comb and fluff! Seventh Step: Use your shears and clean up the whiskers and any long hair on the face, over the eyes and on the muzzle. Eighth Step: Use your shears to create an even slope on the underchest ending at the flank. Ninth Step: Use your thinning shears to round out the hindquarters. Tenth Step: Use your thinning shears to remove any straggly hair on the feet and between the toes. 369
402 Eleventh Step: Spray coat with conditioner. Brush through. You may also want to lightly spray coat with cologne. Final Step: Step away from the dog and take a final look at your work to make sure you are satisfied. After completing any finishing touches, place a bandana around the neck if a boy, or a ribbon if a girl. Make sure you compliment the dog on what a good dog they have been, and how handsome or beautiful he or she looks. Call the owner to have him/her picked up. You re done! *Make sure to register at and watch streaming videos on selected dog breeds! Become a Certified Pet Groomer Hands On Wag My Tail Pet Grooming School Wag-MyTail Online Order DVDs 370
403 Notes 371

404 SCHNAUZER (Giant) *Use for Standard & Miniature Tools Needed Slicker Brush, Comb Nail Clipper, Straight Shears Clipper, #5F #7F or #8 ½ blade, #10 blade, #15 or #40 blade Additional Items: Ear cleaner, medicated ear powder, shampoo, conditioner, spray cologne, ribbon or bandana 372
405 First Step: Use medicated powder lightly to dry ears. Gently pull out any dead hair. Use cotton balls dampened with ear cleaner to clean the inside of the ears. Second Step: Use your nail clippers to cut the nails. Cut the tip of the nails being careful not to cut the quick. If you cut the quick, use your gel or powder blood stopper to stop the bleeding. Third Step: Use your #15 blade (Yvonne prefers #40 blade), on your clipper to remove the hair from between the pads. Fourth Step: For the sanitary trim, use your #10 blade on your clipper and clip the hair from the rectal area ½ inch on all sides of the rectum. Be careful not to touch the rectum area! Fifth Step: Use your #10 blade to trim the hair from the groin to the navel. Sixth Step: Use your slicker brush and brush entire coat thoroughly. If you encounter any matted areas, use your comb and remove all mats before bathing. Seventh Step: Bath Time Use your favorite shampoo. Wet the dog first and then apply the shampoo. Shampoo the dog creating a nice lather on entire body, head, legs, and feet. (Be careful not to get any water inside the ears.) Rinse the dog until lather is completely gone. Condition (if desired) after rinsing, making sure you rinse the conditioner out before drying. As part of the dog s bath make sure you: Brush teeth to remove food debris. Eighth Step: After bathing, use a towel to remove any excess water. Then use your blow dryer to dry the dog thoroughly or cage dry. Ninth Step: Comb and fluff! 373
 Clip around entire tail using the same blade used for the body, so it will be smooth and blend in. 3) Clip the sides of the shoulders to the front elbows.")
406 Tenth Step: BODY/LEGS/TAIL Use your #5F, #7F or 8 ½ blade. 1) Clip the body starting at the base of the skull and clip the back, following the natural contours and ending at the base of the tail. 2) Clip around entire tail using the same blade used for the body, so it will be smooth and blend in. 3) Clip the sides of the shoulders to the front elbows. 4) Clip the rear legs to a point just above the hock. 5) Clip the sides of the body down to the flank. Using the elbow as your baseline measurement, create a shallow line inclining from the elbow to the flank. 6) Clip the neck down to the breastbone. 7) Use your thinning shears to lightly thin out the underchest, following the body contours. 8) Use your shears to make sure the entire body, legs and tail are blended smoothly together. 9) Use your thinning shears to lightly trim the leg furnishings. 10) Use your shears to round off feet. Eleventh Step: FACE/EARS 1) Use your #10 blade and clip the ears cleanly on both sides starting at the base. 2) Use your shears to neaten up the outside edges of the ears. 3) Use your #10 blade to trim the face by combing the hair forward and then trimming ¼ in. starting at the top of the and going to the base of the skull. Continue trimming from the eye up to the ears and down the cheeks. 4) Use your shears to trim the eyebrows. Comb forward and then start trimming at the outside corner, going diagonally to the center and creating a visor shape. Trim any straggly hair between the eyebrows at the stop, creating a V. 5) Use your shears to remove any extra hair from the beard, creating a long, straight look. Thin out the line that starts at the front corner of the mouth and ends at the corner of the eyebrow. 374
407 Twelfth Step: Spray coat with conditioner. Comb through. You may also want to lightly spray coat with cologne. Final Step: Step away from the dog and take a final look at your work to make sure you are satisfied. After completing any finishing touches, place a bandana around the neck if a boy, or a ribbon if a girl. Make sure you compliment the dog on what a good dog they have been, and how handsome or beautiful he or she looks. Call the owner to have him/her picked up. You re done! *Make sure to register at and watch streaming videos on selected dog breeds! Become a Certified Pet Groomer Hands On Wag My Tail Pet Grooming School Wag-MyTail Online Order DVDs 375

408 SCOTTISH DEERHOUND Tools Needed Slicker Brush, Comb Nail Clipper, Straight Shears Thinning Shears (for a more natural look) or Curved Shears Clipper, #15 or #40 blade Additional Items: Ear cleaner, shampoo, conditioner, spray cologne, ribbon or bandana First Step: Use medicated powder lightly to dry ears. Gently pull out any dead hair. Use cotton balls dampened with ear cleaner to clean the inside of the ears. 376
409 Second Step: Use your nail clippers to cut the nails. Cut the tip of the nails being careful not to cut the quick. If you cut the quick, use your gel or powder blood stopper to stop the bleeding. Third Step: Use your #15 blade (Yvonne prefers #40 blade), on your clipper to remove the hair from between the pads. Fourth Step: Use your slicker brush and brush entire coat thoroughly. Fifth Step: Bath Time Use your favorite shampoo. Wet the dog first and then apply the shampoo. Shampoo the dog creating a nice lather on entire body, head, legs, and feet. (Be careful not to get any water inside the ears.) Rinse the dog until lather is completely gone. Condition (if desired) after rinsing, making sure you rinse the conditioner out before drying. As part of the dog s bath make sure you: Brush teeth to remove food debris. Sixth Step: After bathing, use a towel to remove any excess water. Then use your blow dryer to dry the dog thoroughly or cage dry. Seventh Step: Use your thinning shears to clean up any straggly hair on the ears, head, cheek area, neck, throat and body. Eighth Step: Use your thinning shears to trim beard and whiskers. Leave them full and squared off. Ninth Step: Use your shears to round off feet. Tenth Step: Use your shears to even the tail featherings. Even the leg featherings by combing forward and trimming. Eleventh Step: Spray coat with conditioner. Comb through. You may also want to lightly spray coat with cologne. 377
410 Final Step: Step away from the dog and take a final look at your work to make sure you are satisfied. After completing any finishing touches, place a bandana around the neck if a boy, or a ribbon if a girl. Make sure you compliment the dog on what a good dog they have been, and how handsome or beautiful he or she looks. Call the owner to have him/her picked up. You re done! *Make sure to register at and watch streaming videos on selected dog breeds! Become a Certified Pet Groomer Hands On Wag My Tail Pet Grooming School Wag-MyTail Online Order DVDs 378
411 Notes 379

412 SCOTTISH TERRIER Tools Needed Slicker Brush, Comb Nail Clipper, Straight Shears Thinning Shears (for a more natural look) or Curved Shears Clipper, #5F blade, #7F, or #8 ½ blade, #10 blade, #15 or #40 blade Additional Items: Ear cleaner, medicated ear powder, shampoo, conditioner, spray cologne, ribbon or bandana First Step: Use medicated powder lightly to dry ears. Gently pull out any dead hair. Use cotton balls dampened with ear cleaner to clean the inside of the ears. 380
413 Second Step: Use your nail clippers to cut the nails. Cut the tip of the nails being careful not to cut the quick. If you cut the quick, use your gel or powder blood stopper to stop the bleeding. Third Step: Use your #15 blade (Yvonne prefers #40 blade), on your clipper to remove the hair from between the pads. Fourth Step: For the sanitary trim, use your #10 blade on your clipper and clip the hair from the rectal area ½ inch on all sides of the rectum. Be careful not to touch the rectum area! Fifth Step: Use your #10 blade to trim the hair from the groin to the navel. Sixth Step: Use your slicker brush and brush entire coat thoroughly. If you encounter any matted areas, use your comb and remove all mats before bathing. Seventh Step: Bath Time Use your favorite shampoo. Wet the dog first and then apply the shampoo. Shampoo the dog creating a nice lather on entire body, head, legs, and feet. (Be careful not to get any water inside the ears.) Rinse the dog until lather is completely gone. Condition (if desired) after rinsing, making sure you rinse the conditioner out before drying. As part of the dog s bath make sure you: Brush teeth to remove food debris. Eighth Step: After bathing, use a towel to remove any excess water. Then use your blow dryer to dry the dog thoroughly or cage dry. Ninth Step: Comb and fluff! Tenth Step: BODY/LEGS/TAIL Use your #5F, #7F or 8 ½ blade. 1) Trim the body starting at the base of the skull and go down the back ending at the base of the tail. 2) Trim the sides of the neck to halfway between the top of the shoulder and elbow. 3) Trim the forechest to right above the breastbone. 381
 Use your thinning shears to blend the hair anywhere the natural contours of the body change so the entire body looks smooth. 6) Use your shears to round off feet.")
414 4) Trim the top side of the tail. Use your shears to taper the tail to a point at the tip, leaving it wider at the base. 5) Use your thinning shears to blend the hair anywhere the natural contours of the body change so the entire body looks smooth. 6) Use your shears to round off feet. Eleventh Step: FACE/EARS 1) Use your #10 blade to trim the face by combing the hair forward and then trimming ¼ in. starting at the top of the eye (forehead) and going to the base of the skull. Continue trimming from the eye up to the ears and down the cheeks. 2) Use your #10 blade and trim the ears cleanly on both sides, going from the base outward. 3) Use your shears to neaten up the top outside edges of the ears leaving a tuft of hair on top and at the front inside edge of the ear. Leave hair at this location on both sides of the ear. 4) Fold the top half of the ear down and take your shears and trim the hair at the base of the ear, so that it is even with the folded edge. 4) Use your shears to trim the eyebrows into a visor shape. Comb forward and then start trimming at the outside corner, going to the center. 5) Use your thinning shears to remove any extra hair from the beard, creating a long, straight look. Thin out the line going from the corner of the mouth to the eyebrow so it s straight. Twelfth Step: Spray coat with conditioner. Comb through. You may also want to lightly spray coat with cologne. 382
415 Final Step: Step away from the dog and take a final look at your work to make sure you are satisfied. After completing any finishing touches, place a bandana around the neck if a boy, or a ribbon if a girl. Make sure you compliment the dog on what a good dog they have been, and how handsome or beautiful he or she looks. Call the owner to have him/her picked up. You re done! *Make sure to register at and watch streaming videos on selected dog breeds! Become a Certified Pet Groomer Hands On Wag My Tail Pet Grooming School Wag-MyTail Online Order DVDs 383

416 SEALYHAM TERRIER Tools Needed Slicker Brush, Comb Nail Clipper, Straight Shears Thinning Shears (for a more natural look) or Curved Shears Clipper, #5F, #7F, or #8 ½ blade, #10 blade, #15 or #40 blade Additional Items: Ear cleaner, medicated ear powder, shampoo, conditioner, spray cologne, ribbon or bandana First Step: Use medicated powder lightly to dry ears. Gently pull out any dead hair. Use cotton balls dampened with ear cleaner to clean the inside of the ears. 384
417 Second Step: Use your nail clippers to cut the nails. Cut the tip of the nails being careful not to cut the quick. If you cut the quick, use your gel or powder blood stopper to stop the bleeding. Third Step: Use your #15 blade (Yvonne prefers #40 blade), on your clipper to remove the hair from between the pads. Fourth Step: For the sanitary trim, use your #10 blade on your clipper and clip the hair from the rectal area ½ inch on all sides of the rectum. Be careful not to touch the rectum area! Fifth Step: Use your #10 blade to trim the hair from the groin to the navel. Sixth Step: Use your slicker brush and brush entire coat thoroughly. If you encounter any matted areas, use your comb and remove all mats before bathing. Seventh Step: Bath Time Use your favorite shampoo. Wet the dog first and then apply the shampoo. Shampoo the dog creating a nice lather on entire body, head, legs, and feet. (Be careful not to get any water inside the ears.) Rinse the dog until lather is completely gone. Condition (if desired) after rinsing, making sure you rinse the conditioner out before drying. As part of the dog s bath make sure you: Brush teeth to remove food debris. Eighth Step: After bathing, use a towel to remove any excess water. Then use your blow dryer to dry the dog thoroughly or cage dry. Ninth Step: Comb and fluff! Tenth Step: BODY/LEGS/TAIL Use your #5F, #7F or 8 ½ blade. 1) Trim the body starting at the base of the skull and trim the back, following the natural contours and ending at the base of the tail. 2) Trim around entire tail using the same blade used for the body so it will be smooth and blend. 385
 Use your shears to make sure the entire body, legs and tail are blended smoothly together. 6) Use your shears to round off feet.")
418 3) Trim the sides of the shoulders to the front elbows. 4) Use your shears to trim the forechest stopping right above the breastbone. 5) Use your shears to make sure the entire body, legs and tail are blended smoothly together. 6) Use your shears to round off feet. Eleventh Step: FACE/EARS 1) Use your #10 blade to trim the face by combing the hair forward and then trimming ¼ in. starting at the top of the eye (forehead) and going to the base of the skull. Continue trimming from the eye up to the ears and down the cheeks. 2) Use your #10 blade and trim the ears cleanly on both sides, going from the base outward.. 3) Use your shears to neaten up the outside edges of the ears. 4) Use your shears to trim the eyebrows. Comb forward and then start trimming at the outside corner, going to the center. Leave the eyebrows full and blend it into the hair on the face. 5) Use your thinning shears to remove any extra hair from the beard, creating a long, smooth look. Beard is left full, but not bushy. Thin out the line going from the corner of the mouth to the eyebrow so it s straight. 386
419 Twelfth Step: Spray coat with conditioner. Comb through. You may also want to lightly spray coat with cologne. Final Step: Step away from the dog and take a final look at your work to make sure you are satisfied. After completing any finishing touches, place a bandana around the neck if a boy, or a ribbon if a girl. Make sure you compliment the dog on what a good dog they have been, and how handsome or beautiful he or she looks. Call the owner to have him/her picked up. You re done! *Make sure to register at and watch streaming videos on selected dog breeds! 387

420 SHETLAND SHEEPDOG Tools Needed Slicker Brush, Comb, Dematting Comb or Rake Pin Brush, Soft Brush Nail Clipper, Straight Shears Thinning Shears (for a more natural look) or Curved Shears Additional Items: Ear cleaner, shampoo, conditioner, spray cologne, ribbon or bandana First Step: Use medicated powder lightly to dry ears. Gently pull out any dead hair. Use cotton balls dampened with ear cleaner to clean the inside of the ears. 388
421 Second Step: Use your nail clippers to cut the nails. Cut the tip of the nails being careful not to cut the quick. If you cut the quick, use your gel or powder blood stopper to stop the bleeding. Third Step: Use your slicker brush and brush entire coat thoroughly. If you encounter any matted areas, use your dematting comb or rake and remove all mats before bathing. Fourth Step: Bath Time Use your favorite shampoo. Wet the dog first and then apply the shampoo. Shampoo the dog creating a nice lather on entire body, head, legs, and feet. (Be careful not to get any water inside the ears.) Rinse the dog until lather is completely gone. Condition (if desired) after rinsing, making sure you rinse the conditioner out before drying. As part of the dog s bath make sure you: Brush teeth to remove food debris. Option: De-Shed Treatment Fifth Step: After bathing, use a towel to remove any excess water. Then use your blow dryer to dry the dog thoroughly or cage dry. Sixth Step: Comb and fluff! Comb out featherings. Seventh Step: Use your shears and clean up the whiskers and any long hair on the face, over the eyes and on the muzzle. Eighth Step: Use your thinning shears to thin out extra hair on top of the tail and near the ears. Ninth Step: Spray coat with conditioner. Brush through. Use your pin brush to lift up coat against grain to give it body. You may also want to lightly spray coat with cologne. Final Step: Step away from the dog and take a final look at your work to make sure you are satisfied. After completing any finishing touches, place a bandana around the neck if a boy, or a ribbon if a girl. Make sure you compliment the dog on what a good dog they have been, and how handsome or beautiful he or she looks. Call the owner to have him/her picked up. You re done! 389
 or Curved Shears Additional Items: Ear cleaner, shampoo, conditioner, spray cologne, ribbon or bandana")
422 SHIBA INU Tools Needed Slicker Brush, Comb, Dematting Comb or Rake Nail Clipper, Straight Shears Thinning Shears (for a more natural look) or Curved Shears Additional Items: Ear cleaner, shampoo, conditioner, spray cologne, ribbon or bandana 390
423 First Step: Use cotton balls dampened with ear cleaner to clean the inside of the ears. Second Step: Use your nail clippers to cut the nails. Cut the tip of the nails being careful not to cut the quick. If you cut the quick, use your gel or powder blood stopper to stop the bleeding. Third Step: Use your slicker brush and brush entire coat thoroughly. If you encounter any matted areas, use your dematting comb or rake and remove all mats before bathing. Fourth Step: Bath Time Use your favorite shampoo. Wet the dog first and then apply the shampoo. Shampoo the dog creating a nice lather on entire body, head, legs, and feet. (Be careful not to get any water inside the ears.) Rinse the dog until lather is completely gone. Condition (if desired) after rinsing, making sure you rinse the conditioner out before drying. As part of the dog s bath make sure you: Brush teeth to remove food debris. Option: De-Shed Treatment Fifth Step: After bathing, use a towel to remove any excess water. Then use your blow dryer to dry the dog thoroughly or cage dry. Sixth Step: Use your shears and clean up the whiskers and any long hair on the face, over the eyes and on the muzzle. Seventh Step: Use your thinning shears to trim any straggly hair around the paws and between the toes. Eighth Step: Spray coat with conditioner. Comb through to create sheen. You may also want to lightly spray coat with cologne. Final Step: Step away from the dog and take a final look at your work to make sure you are satisfied. After completing any finishing touches, place a bandana around the neck if a boy, or a ribbon if a girl. Make sure you compliment the dog on what a good dog they have been, and how handsome or beautiful he or she looks. You re done! 391

424 SHIH TZU Tools Needed Slicker Brush, Soft Brush, Comb, Dematting Comb or Rake Nail Clipper, Straight Shears Clipper, #10 blade, #15 or #40 blade Small Rubber Bands, small bows Additional Items: Ear cleaner, medicated ear powder, shampoo, crème rinse, conditioner, coat conditioner, spray cologne 392
425 First Step: Use medicated powder lightly to dry ears. Gently pull out any dead hair. Use cotton balls dampened with ear cleaner to clean the inside of the ears. Second Step: Use your nail clippers to cut the nails. Cut the tip of the nails being careful not to cut the quick. If you cut the quick, use your gel or powder blood stopper to stop the bleeding. Third Step: Use your #15 blade (Yvonne prefers #40 blade), on your clipper to remove the hair from between the pads. Fourth Step: For the sanitary trim, use your #10 blade on your clipper and clip the hair from the rectal area ½ inch on all sides of the rectum. Be careful not to touch the rectum area! Fifth Step: Use your #10 blade to trim the hair from the groin to the navel. Sixth Step: Use your slicker brush and brush entire coat thoroughly. If you encounter any matted areas, use your dematting comb or rake and remove all mats before bathing. Seventh Step: Bath Time Use your favorite shampoo. Wet the dog first and then apply the shampoo. Shampoo the dog creating a nice lather on entire body, head, legs, and feet. Clean wrinkles on body. Wash any folds on face. (Be careful not to get any water inside the ears.) Rinse the dog until lather is completely gone. Crème Rinse after rinsing shampoo out, leave in for a few minutes, making sure you rinse the crème rinse out before drying. As part of the dog s bath make sure you: Brush teeth to remove food debris. Eighth Step: After bathing, use a towel to remove any excess water. Then use your blow dryer to dry the dog thoroughly or cage dry. Ninth Step: Comb and fluff! 393
426 Tenth Step: Use your shears to round off feet. Eleventh: Spray coat with conditioner. Brush through. You may also want to lightly spray coat with cologne. Final Step: Step away from the dog and take a final look at your work to make sure you are satisfied. After completing any finishing touches, place a bandana around the neck if a boy, or a ribbon if a girl. Make sure you compliment the dog on what a good dog they have been, and how handsome or beautiful he or she looks. Call the owner to have him/her picked up. You re done! *Make sure to register at and watch streaming videos on selected dog breeds! Become a Certified Pet Groomer Hands On Wag My Tail Pet Grooming School Wag-MyTail Online Order DVDs 394
427 Notes 395

428 SIBERIAN HUSKY Tools Needed Slicker Brush, Comb, Dematting Comb or Rake Shedding Blade, Nail Clipper, Straight Shears Thinning Shears (for a more natural look) or Curved Shears Additional Items: Ear cleaner, shampoo, conditioner, spray cologne, ribbon or bandana First Step: Use cotton balls dampened with ear cleaner to clean the inside of the ears. 396
429 Second Step: Use your nail clippers to cut the nails. Cut the tip of the nails being careful not to cut the quick. If you cut the quick, use your gel or powder blood stopper to stop the bleeding. Third Step: Use your slicker brush and brush entire coat thoroughly. If you encounter any matted areas, use your dematting comb or rake and remove all mats before bathing. Fourth Step: Bath Time Use your favorite shampoo. Wet the dog first and then apply the shampoo. Shampoo the dog creating a nice lather on entire body, head, legs, and feet. (Be careful not to get any water inside the ears.) Rinse the dog until lather is completely gone. Condition (if desired) after rinsing, making sure you rinse the conditioner out before drying. As part of the dog s bath make sure you: Brush teeth to remove food debris. Option: De-Shed Treatment Fifth Step: After bathing, use a towel to remove any excess water. Then use your blow dryer to dry the dog thoroughly or cage dry. Sixth Step: Comb and fluff! Seventh Step: Use your shears and clean up the whiskers and any long hair on the face, over the eyes and on the muzzle. Eighth Step: Use your thinning shears to clean up straggly hair around paws and between the toes. Ninth Step: Spray coat with conditioner. Brush through. You may also want to lightly spray coat with cologne. Final Step: Step away from the dog and take a final look at your work to make sure you are satisfied. After completing any finishing touches, place a bandana around the neck if a boy, or a ribbon if a girl. Make sure you compliment the dog on what a good dog they have been, and how handsome or beautiful he or she looks. You re done! 397

430 SILKY TERRIER Tools Needed Slicker Brush, Comb, Soft Brush Nail Clipper, Straight Shears Thinning Shears (for a more natural look) or Curved Shears Clipper, #10 blade, #15 or #40 blade Additional Items: Ear cleaner, shampoo, coat dressing, conditioner, spray cologne, ribbon or bandana First Step: Use cotton balls dampened with ear cleaner to clean the inside of the ears. Second Step: Use your nail clippers to cut the nails. Cut the tip of the nails being careful not to cut the quick. If you cut the quick, use your gel or powder blood stopper to stop the bleeding. 398
431 Third Step: Use your #15 blade (Yvonne prefers #40 blade), on your clipper to remove the hair from between the pads. Fourth Step: Use your slicker brush and brush entire coat thoroughly. Fifth Step: Bath Time Use your favorite shampoo. Wet the dog first and then apply the shampoo. Shampoo the dog creating a nice lather on entire body, head, legs, and feet. (Be careful not to get any water inside the ears.) Rinse the dog until lather is completely gone. Crème Rinse Apply crème rinse after rinsing shampoo out. Rinse out crème rinse before drying. As part of the dog s bath make sure you: Brush teeth to remove food debris. Sixth Step: After bathing, use a towel to remove any excess water. Then use your blow dryer to dry the dog thoroughly or cage dry. Seventh Step: Comb and fluff! Eighth Step: Part the hair down the middle of the back from the top of the head to the base of the tail. Comb hair downward and use your coat dressing to keep part in place. Ninth Step: Use your thinning shears to trim the feathering on the tail to approximately ½ inch long. 399

432 Tenth Step: From the top of the head going down to the tip of the nose, part the hair in the middle and brush on both sides of the muzzle. Use your #10 blade to trim hair on the ears going slightly past the outline of the ears. Use shears to clean up the outside edges of the ears. Please refer to page on heads for common head trims. Eleventh Step: Use your shears to round off feet. 400
433 Twelfth Step: Spray coat with conditioner. Brush through. You may also want to lightly spray coat with cologne. Final Step: Step away from the dog and take a final look at your work to make sure you are satisfied. After completing any finishing touches, place a bandana around the neck if a boy, or a ribbon if a girl. Make sure you compliment the dog on what a good dog they have been, and how handsome or beautiful he or she looks. Call the owner to have him/her picked up. You re done! *Make sure to register at and watch streaming videos on selected dog breeds! Become a Certified Pet Groomer Hands On Wag My Tail Pet Grooming School Wag-MyTail Online Order DVDs 401

434 SKYE TERRIER Tools Needed Slicker Brush, Comb, Dematting Comb or Rake, Soft Brush Nail Clipper, Straight Shears Clipper, #10 blade, #15 or #40 blade Additional Items: Ear cleaner, shampoo, crème rinse, coat dressing, conditioner, spray cologne, ribbon or bandana First Step: Use cotton balls dampened with ear cleaner to clean the inside of the ears. Second Step: Use your nail clippers to cut the nails. Cut the tip of the nails being careful not to cut the quick. If you cut the quick, use your gel or powder blood stopper to stop the bleeding. 402
435 Third Step: Use your #15 blade (Yvonne prefers #40 blade), on your clipper to remove the hair from between the pads. Fourth Step: For the sanitary trim, use your #10 blade on your clipper and clip the hair from the rectal area ½ inch on all sides of the rectum. Be careful not to touch the rectum area! Fifth Step: Use your #10 blade to trim the hair from the groin to the navel. Sixth Step: Use your slicker brush and brush entire coat thoroughly. If you encounter any matted areas, use your dematting comb or rake and remove all mats before bathing. Seventh Step: Bath Time Use your favorite shampoo. Wet the dog first and then apply the shampoo. Shampoo the dog creating a nice lather on entire body, head, legs, and feet. (Be careful not to get any water inside the ears.) Rinse the dog until lather is completely gone. Crème Rinse Apply crème rinse and rinse out before drying. As part of the dog s bath make sure you: Brush teeth to remove food debris. Eighth Step: After bathing, use a towel to remove any excess water. Then use your blow dryer to dry the dog thoroughly or cage dry. Ninth Step: Comb and fluff! Tenth Step: Part the hair down the middle of the back from the top of the head to the base of the tail. Comb hair downward and use your coat dressing to keep part in place. Eleventh Step: Use your shears to taper the hair on the tail to a point. The fringe is kept long and heavy. Twelfth Step: Using your comb, comb from the top of the head going down to the tip of the nose, part the hair in the middle and brush on both sides of the muzzle. Comb the hair on the ears outward, giving a winged effect. 403
436 Thirteenth Step: Use your shears to round off feet. Fourteenth Step: Spray coat with conditioner. Brush through. You may also want to lightly spray coat with cologne. Final Step: Step away from the dog and take a final look at your work to make sure you are satisfied. After completing any finishing touches, place a bandana around the neck if a boy, or a ribbon if a girl. Make sure you compliment the dog on what a good dog they have been, and how handsome or beautiful he or she looks. Call the owner to have him/her picked up. You re done! *Make sure to register at and watch streaming videos on selected dog breeds! Become a Certified Pet Groomer Hands On Wag My Tail Pet Grooming School Wag-MyTail Online Order DVDs 404
437 Notes 405
 or Curved Scissors Additional Items: Ear cleaner, shampoo, conditioner, spray cologne, ribbon or")
438 SPINONE ITALIANO Tools Needed Slicker Brush, Comb Nail Clipper, Straight Shears Thinning Shears (for a more natural look) or Curved Scissors Additional Items: Ear cleaner, shampoo, conditioner, spray cologne, ribbon or bandana 406
439 First Step: Use cotton balls dampened with ear cleaner to clean the inside of the ears. Second Step: Use your nail clippers to cut the nails. Cut the tip of the nails being careful not to cut the quick. If you cut the quick, use your gel or powder blood stopper to stop the bleeding. Third Step: Use your slicker brush and brush entire coat thoroughly. Fourth Step: Bath Time Use your favorite shampoo. Wet the dog first and then apply the shampoo. Shampoo the dog creating a nice lather on entire body, head, legs, and feet. (Be careful not to get any water inside the ears.) Rinse the dog until lather is completely gone. Condition (if desired) after rinsing, making sure you rinse the conditioner out before drying. As part of the dog s bath make sure you: Brush teeth to remove food debris. Fifth Step: After bathing, use a towel to remove any excess water. Then use your blow dryer to dry the dog thoroughly or cage dry. Sixth Step: Comb and fluff! Seventh Step: Use your thinning shears and thin any straggly hair on the body, head and cheeks. Trim ears quite close. Eighth Step: Use your shears to even out the eyebrows. Ninth Step: Spray coat with conditioner. Comb through. You may also want to lightly spray coat with cologne. Final Step: Step away from the dog and take a final look at your work to make sure you are satisfied. After completing any finishing touches, place a bandana around the neck if a boy, or a ribbon if a girl. Make sure you compliment the dog on what a good dog they have been, and how handsome or beautiful he or she looks. You re done! 407

440 STAFFORDSHIRE BULL TERRIER Tools Needed Rubber Brush Nail Clipper, Straight Shears Additional Items: Ear cleaner, shampoo, conditioner, spray cologne, ribbon or bandana 408
441 First Step: Use cotton balls dampened with ear cleaner to clean the inside of the ears. Second Step: Use your nail clippers to cut the nails. Cut the tip of the nails being careful not to cut the quick. If you cut the quick, use your gel or powder blood stopper to stop the bleeding. Third Step: Use your rubber brush and brush entire coat thoroughly. Fourth Step: Bath Time Use your favorite shampoo. Wet the dog first and then apply the shampoo. Shampoo the dog creating a nice lather on entire body, head, legs, and feet. (Be careful not to get any water inside the ears.) Rinse the dog until lather is completely gone. Condition (if desired) after rinsing, making sure you rinse the conditioner out before drying. As part of the dog s bath make sure you: Brush teeth to remove food debris. Option: De-Shed Treatment Fifth Step: After bathing, use a towel to remove any excess water. Then use your blow dryer to dry the dog thoroughly or cage dry. Sixth Step: Use your shears and clean up the whiskers and any long hair on the face, over the eyes and on the muzzle. Seventh Step: Hand rub conditioner onto coat. Massage to create sheen. You may also want to lightly spray coat with cologne. Final Step: Step away from the dog and take a final look at your work to make sure you are satisfied. After completing any finishing touches, place a bandana around the neck if a boy, or a ribbon if a girl. Make sure you compliment the dog on what a good dog they have been, and how handsome or beautiful he or she looks. Call the owner to have him/her picked up. You re done! 409

442 SUSSEX SPANIEL Tools Needed Slicker Brush, Comb Nail Clipper, Straight Shears Thinning Shears (for a more natural look) or Curved Shears Clipper, #10 blade, #15 or #40 blade Additional Items: Ear cleaner, shampoo, conditioner, spray cologne, ribbon or bandana First Step: Use medicated powder lightly to dry ears. Gently pull out any dead hair. Use cotton balls dampened with ear cleaner to clean the inside of the ears. 410
443 Second Step: Use your nail clippers to cut the nails. Cut the tip of the nails being careful not to cut the quick. If you cut the quick, use your gel or powder blood stopper to stop the bleeding. Third Step: Use your #15 blade (Yvonne prefers #40 blade), on your clipper to remove the hair from between the pads. Fourth Step: For the sanitary trim, use your #10 blade on your clipper and clip the hair from the rectal area ½ inch on all sides of the rectum. Be careful not to touch the rectum area! Fifth Step: Use your #10 blade to trim the hair from the groin to the navel. Sixth Step: Use your slicker brush and brush entire coat thoroughly. If you encounter any matted areas, use your comb and remove all mats before bathing. Seventh Step: Bath Time Use your favorite shampoo. Wet the dog first and then apply the shampoo. Shampoo the dog creating a nice lather on entire body, head, legs, and feet. (Be careful not to get any water inside the ears.) Rinse the dog until lather is completely gone. Condition (if desired) after rinsing, making sure you rinse the conditioner out before drying. As part of the dog s bath make sure you: Brush teeth to remove food debris. Eighth Step: After bathing, use a towel to remove any excess water. Then use your blow dryer to dry the dog thoroughly or cage dry. Ninth Step: Comb and fluff! Tenth Step: Use your thinning shears to trim any straggle hair from the body, just enough so it looks smooth. Eleventh Step: Use your shears to even out leg furnishings. 411
444 Twelfth Step: Use your thinning shears to clean up any straggly hair from the ears, eyes, cheeks, face (only lightly) and muzzle. Thirteenth Step: Use your shears to clean up hair between toes and to round off feet. Fourteenth Step: Spray coat with conditioner. Comb through. You may also want to lightly spray coat with cologne. Final Step: Step away from the dog and take a final look at your work to make sure you are satisfied. After completing any finishing touches, place a bandana around the neck if a boy, or a ribbon if a girl. Make sure you compliment the dog on what a good dog they have been, and how handsome or beautiful he or she looks. Call the owner to have him/her picked up. You re done! *Make sure to register at and watch streaming videos on selected dog breeds! Become a Certified Pet Groomer Hands On Wag My Tail Pet Grooming School Wag-MyTail Online Order DVDs 412
445 Notes 413

446 SWEDISH VALHUND Tools Needed Slicker Brush, Comb, Shedding Blade Nail Clipper Additional Items: Ear cleaner, shampoo, conditioner, spray cologne, ribbon or bandana. First Step: Use cotton balls dampened with ear cleaner to clean the inside of the ears. Second Step: Use your nail clippers to cut the nails. Cut the tip of the nails being careful not to cut the quick. If you cut the quick, use your gel or powder blood stopper to stop the bleeding. Third Step: Use your slicker brush and brush entire coat thoroughly. Remove all dead hair with your shedding blade. 414
447 Fourth Step: Bath Time Use your favorite shampoo. Wet the dog first and then apply the shampoo. Shampoo the dog creating a nice lather on entire body, head, legs, and feet. (Be careful not to get any water inside the ears.) Rinse the dog until lather is completely gone. Condition (if desired) after rinsing, making sure you rinse the conditioner out before drying. As part of the dog s bath make sure you: Brush teeth to remove food debris. Option: De-Shed Treatment Fifth Step: After bathing, use a towel to remove any excess water. Then use your blow dryer to dry the dog thoroughly or cage dry. Sixth Step: Use your shears and clean up the whiskers and any long hair on the face, over the eyes and on the muzzle. Seventh Step: Spray coat with conditioner. Comb through. You may also want to spray coat with cologne. Final Step: Step away from the dog and take a final look at your work to make sure you are satisfied. After completing any finishing touches, place a bandana around the neck if a boy, or a ribbon if a girl. Make sure you compliment the dog on what a good dog they have been, and how handsome or beautiful he or she looks. Call the owner to have him/her picked up. You re done! 415

448 TIBETAN MASTIFF Tools Needed Slicker Brush, Comb, Shedding Blade Nail Clipper Additional Items: Ear cleaner, shampoo, conditioner, spray cologne, ribbon or bandana. 416
449 First Step: Use cotton balls dampened with ear cleaner to clean the inside of the ears. Second Step: Use your nail clippers to cut the nails. Cut the tip of the nails being careful not to cut the quick. If you cut the quick, use your gel or powder blood stopper to stop the bleeding. Third Step: Use your slicker brush and brush entire coat thoroughly. Remove all dead hair with your shedding blade. Fourth Step: Bath Time Use your favorite shampoo. Wet the dog first and then apply the shampoo. Shampoo the dog creating a nice lather on entire body, head, legs, and feet. (Be careful not to get any water inside the ears.) Rinse the dog until lather is completely gone. Condition (if desired) after rinsing, making sure you rinse the conditioner out before drying. As part of the dog s bath make sure you: Brush teeth to remove food debris. Option: De-Shed Treatment Fifth Step: After bathing, use a towel to remove any excess water. Then use your blow dryer to dry the dog thoroughly or cage dry. Sixth Step: Use your shears and clean up the whiskers and any long hair on the face, over the eyes and on the muzzle. Seventh Step: Spray coat with conditioner. Comb through. You may also want to spray coat with cologne. Final Step: Step away from the dog and take a final look at your work to make sure you are satisfied. After completing any finishing touches, place a bandana around the neck if a boy, or a ribbon if a girl. Make sure you compliment the dog on what a good dog they have been, and how handsome or beautiful he or she looks. Call the owner to have him/her picked up. You re done! 417

450 TIBETAN SPANIEL Tools Needed Slicker Brush, Comb, Dematting Comb or Rake Nail Clipper, Straight Shears Clipper, #10 blade, #15 or #40 blade Additional Items: Ear cleaner, shampoo, conditioner, spray cologne, ribbon or bandana First Step: Use cotton balls dampened with ear cleaner to clean the inside of the ears. Second Step: Use your nail clippers to cut the nails. Cut the tip of the nails being careful not to cut the quick. If you cut the quick, use your gel or powder blood stopper to stop the bleeding. Third Step: Use your #15 blade (Yvonne prefers #40 blade), on your clipper to remove the hair from between the pads. 418
451 Fourth Step: For the sanitary trim, use your #10 blade on your clipper and clip the hair from the rectal area ½ inch on all sides of the rectum. Be careful not to touch the rectum area! Fifth Step: Use your slicker brush and brush entire coat thoroughly. If you encounter any matted areas, use your dematting comb or rake and remove all mats before bathing. Sixth Step: Bath Time Use your favorite shampoo. Wet the dog first and then apply the shampoo. Shampoo the dog creating a nice lather on entire body, head, legs, and feet. (Be careful not to get any water inside the ears.) Rinse the dog until lather is completely gone. Condition (if desired) after rinsing, making sure you rinse the conditioner out before drying. As part of the dog s bath make sure you: Brush teeth to remove food debris. Seventh Step: After bathing, use a towel to remove any excess water. Then use your blow dryer to dry the dog thoroughly or cage dry. Eighth Step: Comb and fluff! Ninth Step: Spray coat with conditioner. Comb through, fluffing forechest. You may also want to lightly spray coat with cologne. Final Step: Step away from the dog and take a final look at your work to make sure you are satisfied. After completing any finishing touches, place a bandana around the neck if a boy, or a ribbon if a girl. Make sure you compliment the dog on what a good dog they have been, and how handsome or beautiful he or she looks. Call the owner to have him/her picked up. You re done! 419

452 TIBETAN TERRIER Tools Needed Slicker Brush, Comb, Dematting Comb or Rake Nail Clipper, Straight Shears Clipper, #15 or #40 blade Additional Items: Ear cleaner, medicated ear powder, shampoo, conditioner, spray cologne, ribbon or bandana 420
453 First Step: Use medicated powder lightly to dry ears. Gently pull out any dead hair. Use cotton balls dampened with ear cleaner to clean the inside of the ears. Second Step: Use your nail clippers to cut the nails. Cut the tip of the nails being careful not to cut the quick. If you cut the quick, use your gel or powder blood stopper to stop the bleeding. Third Step: If needed, use your #15 blade (Yvonne prefers #40 blade), on your clipper to remove the hair from between the pads. Fourth Step: Use your slicker brush and brush entire coat thoroughly. If you encounter any matted areas, use your dematting comb or rake and remove all mats before bathing. Fifth Step: Bath Time Use your favorite shampoo. Wet the dog first and then apply the shampoo. Shampoo the dog creating a nice lather on entire body, head, legs, and feet. (Be careful not to get any water inside the ears.) Rinse the dog until lather is completely gone. Condition (if desired) after rinsing, making sure you rinse the conditioner out before drying. As part of the dog s bath make sure you: Brush teeth to remove food debris. Sixth Step: After bathing, use a towel to remove any excess water. Then use your blow dryer to dry the dog thoroughly or cage dry. Seventh Step: Comb and fluff! Eighth Step: Spray coat with conditioner. Comb through. You may also want to lightly spray coat with cologne. Final Step: Step away from the dog and take a final look at your work to make sure you are satisfied. After completing any finishing touches, place a bandana around the neck if a boy, or a ribbon if a girl. Make sure you compliment the dog on what a good dog they have been, and how handsome or beautiful he or she looks. You re done! 421

454 TOY FOX TERRIER Tools Needed Slicker Brush, Comb, Shedding Blade Nail Clipper Additional Items: Ear cleaner, shampoo, conditioner, spray cologne, ribbon or bandana. First Step: Use cotton balls dampened with ear cleaner to clean the inside of the ears. 422
455 Second Step: Use your nail clippers to cut the nails. Cut the tip of the nails being careful not to cut the quick. If you cut the quick, use your gel or powder blood stopper to stop the bleeding. Third Step: Use your slicker brush and brush entire coat thoroughly. Remove all dead hair with your shedding blade. Fourth Step: Bath Time Use your favorite shampoo. Wet the dog first and then apply the shampoo. Shampoo the dog creating a nice lather on entire body, head, legs, and feet. (Be careful not to get any water inside the ears.) Rinse the dog until lather is completely gone. Condition (if desired) after rinsing, making sure you rinse the conditioner out before drying. As part of the dog s bath make sure you: Brush teeth to remove food debris. Option: De-Shed Treatment Fifth Step: After bathing, use a towel to remove any excess water. Then use your blow dryer to dry the dog thoroughly or cage dry. Sixth Step: Use your shears and clean up the whiskers and any long hair on the face, over the eyes and on the muzzle. Seventh Step: Spray coat with conditioner. cologne. Comb through. You may also want to spray coat with Final Step: Step away from the dog and take a final look at your work to make sure you are satisfied. After completing any finishing touches, place a bandana around the neck if a boy, or a ribbon if a girl. Make sure you compliment the dog on what a good dog they have been, and how handsome or beautiful he or she looks. Call the owner to have him/her picked up. You re done! 423

456 VIZSLA Tools Needed Rubber Brush Nail Clipper, Straight Shears Additional Items: Ear cleaner, shampoo, conditioner, spray cologne, ribbon or bandana 424
457 First Step: Use cotton balls dampened with ear cleaner to clean the inside of the ears. Second Step: Use your nail clippers to cut the nails. Cut the tip of the nails being careful not to cut the quick. If you cut the quick, use your gel or powder blood stopper to stop the bleeding. Third Step: Use your rubber brush and brush entire coat thoroughly. Fourth Step: Bath Time Use your favorite shampoo. Wet the dog first and then apply the shampoo. Shampoo the dog creating a nice lather on entire body, head, legs, and feet. Wash any folds on face. (Be careful not to get any water inside the ears.) Rinse the dog until lather is completely gone. Condition (if desired) after rinsing, making sure you rinse the conditioner out before drying. As part of the dog s bath make sure you: Brush teeth to remove food debris. Option: De-Shed Treatment Fifth Step: Use your shears and clean up the whiskers and any long hair on the face, over the eyes and on the muzzle. Sixth Step: Hand rub conditioner onto coat. Massage to create sheen. You may also want to lightly spray coat with cologne. Final Step: Step away from the dog and take a final look at your work to make sure you are satisfied. After completing any finishing touches, place a bandana around the neck if a boy, or a ribbon if a girl. Make sure you compliment the dog on what a good dog they have been, and how handsome or beautiful he or she looks. Call the owner to have him/her picked up. You re done! 425

458 WEIMARANER Tools Needed Rubber Brush Nail Clipper, Straight Shears Additional Items: Ear cleaner, shampoo, conditioner, spray cologne, ribbon or bandana 426
459 First Step: Use cotton balls dampened with ear cleaner to clean the inside of the ears. Second Step: Use your nail clippers to cut the nails. Cut the tip of the nails being careful not to cut the quick. If you cut the quick, use your gel or powder blood stopper to stop the bleeding. Third Step: Use your rubber brush and brush entire coat thoroughly. Fourth Step: Bath Time Use your favorite shampoo. Wet the dog first and then apply the shampoo. Shampoo the dog creating a nice lather on entire body, head, legs, and feet. Wash any folds on face. (Be careful not to get any water inside the ears.) Rinse the dog until lather is completely gone. Condition (if desired) after rinsing, making sure you rinse the conditioner out before drying. As part of the dog s bath make sure you: Brush teeth to remove food debris. Option: De-Shed Treatment Fifth Step: After bathing, use a towel to remove any excess water. Then use your blow dryer to dry the dog thoroughly or cage dry. Sixth Step: Use your shears and clean up the whiskers and any long hair on the face, over the eyes and on the muzzle. Seventh Step: Hand rub conditioner onto coat. Massage to create sheen. You may also want to lightly spray coat with cologne. Final Step: Step away from the dog and take a final look at your work to make sure you are satisfied. After completing any finishing touches, place a bandana around the neck if a boy, or a ribbon if a girl. Make sure you compliment the dog on what a good dog they have been, and how handsome or beautiful he or she looks. Call the owner to have him/her picked up. You re done! 427

460 WELSH SPRINGER SPANIEL Tools Needed Slicker Brush, Comb Nail Clipper, Straight Shears Thinning Shears (for a more natural look) or Curved Shears Clipper, #10 blade, #15 or #40 blade Additional Items: Ear cleaner, shampoo, conditioner, spray cologne, ribbon or bandana 428
461 First Step: Use cotton balls dampened with ear cleaner to clean the inside of the ears. Second Step: Use your nail clippers to cut the nails. Cut the tip of the nails being careful not to cut the quick. If you cut the quick, use your gel or powder blood stopper to stop the bleeding. Third Step: Use your #15 blade (Yvonne prefers #40 blade), on your clipper to remove the hair from between the pads. Fourth Step: For the sanitary trim, use your #10 blade on your clipper and clip the hair from the rectal area ½ inch on all sides of the rectum. Be careful not to touch the rectum area! Fifth Step: Use your #10 blade to trim the hair from the groin to the navel. Sixth Step: Use your slicker brush and brush entire coat thoroughly. Seventh Step: Bath Time Use your favorite shampoo. Wet the dog first and then apply the shampoo. Shampoo the dog creating a nice lather on entire body, head, legs, and feet. (Be careful not to get any water inside the ears.) Rinse the dog until lather is completely gone. Condition (if desired) after rinsing, making sure you rinse the conditioner out before drying. As part of the dog s bath make sure you: Brush teeth to remove food debris. Eighth Step: After bathing, use a towel to remove any excess water. Then use your blow dryer to dry the dog thoroughly or cage dry. Ninth Step: Comb and fluff! Tenth Step: Use your thinning shears to trim even out any unruly hair on the coat. 429
462 Eleventh Step: Use your shears and clean up the whiskers and any long hair on the face, over the eyes and on the muzzle. Twelfth Step: Use thinning shears to clean up any straggly hair on ears and cheeks. Thirteenth Step: Use your shears to even out leg furnishings on the ends. Use your shears to round off feet. Fourteenth Step: Spray coat with conditioner. Comb through. You may also want to lightly spray coat with cologne. Final Step: Step away from the dog and take a final look at your work to make sure you are satisfied. After completing any finishing touches, place a bandana around the neck if a boy, or a ribbon if a girl. Make sure you compliment the dog on what a good dog they have been, and how handsome or beautiful he or she looks. Call the owner to have him/her picked up. You re done! 430
463 Notes 431

464 WELSH TERRIER Tools Needed Slicker Brush, Comb Nail Clipper, Straight Shears Thinning Shears (for a more natural look) or Curved Shears Clipper, #5F, #7F, or #8 ½ blade, #10 blade, #15 or #40 blade Additional Items: Ear cleaner, medicated ear powder, shampoo, conditioner, spray cologne, ribbon or bandana First Step: Use medicated powder lightly to dry ears. Gently pull out any dead hair. Use cotton balls dampened with ear cleaner to clean the inside of the ears. Second Step: Use your nail clippers to cut the nails. Cut the tip of the nails being careful not to cut the quick. If you cut the quick, use your gel or powder blood stopper to stop the bleeding. 432
465 Third Step: Use your #15 blade (Yvonne prefers #40 blade), on your clipper to remove the hair from between the pads. Fourth Step: For the sanitary trim, use your #10 blade on your clipper and clip the hair from the rectal area ½ inch on all sides of the rectum. Be careful not to touch the rectum area! Fifth Step: Use your #10 blade to trim the hair from the groin to the navel. Sixth Step: Use your slicker brush and brush entire coat thoroughly. If you encounter any matted areas, use your comb and remove all mats before bathing. Seventh Step: Bath Time Use your favorite shampoo. Wet the dog first and then apply the shampoo. Shampoo the dog creating a nice lather on entire body, head, legs, and feet. Clean wrinkles on body. Wash any folds on face. (Be careful not to get any water inside the ears.) Rinse the dog until lather is completely gone. Condition (if desired) after rinsing, making sure you rinse the conditioner out before drying. As part of the dog s bath make sure you: Brush teeth to remove food debris. Eighth Step: After bathing, use a towel to remove any excess water. Then use your blow dryer to dry the dog thoroughly or cage dry. Ninth Step: Comb and fluff! Tenth Step: BODY/LEGS/TAIL Use your #5F, #7F or #8 ½ blade. 1) Trim the body starting at the base of the skull and go down the back ending at the base of the tail. Trim the tail close to the body. 2) Trim the sides of the neck to halfway between the top of the shoulder and elbow. 3) Trim the sides of the back to the flank at the rear and to the hips at the rear legs. 4) Trim the chest and shoulders to the arm in front and the elbow at the side, using the breastbone as your baseline measurement to insure chest is even. 5) Use your shears to trim under the underchest creating a shallow incline from the elbow to the flank. Follow the body contours. 433
466 7) Use your shears to trim the front legs into a tubular shape so they are straight. 8) Use your shears to trim the rear legs going with the contours of the legs and showing the bend in the stifle. 9) Use your shears to make sure the entire body, legs and tail are blended smoothly together. 10) Use your shears to round off feet. Eleventh Step: FACE/EARS 1) Use your #10 blade to trim the face by combing the hair forward and then trimming ¼ in. starting at the top of the eye (forehead) and going to the base of the skull. Continue trimming from the eye up to the ears and down the cheeks. 2) Use your #10 blade and trim the ears cleanly on both sides, going from the base outward. 3) Use your shears to neaten up the outside edges of the ears. 4) Use your shears to trim the eyebrows into a V shape. Comb forward and then start trimming at the outside corner, going diagonally to the center. At the stop, remove any straggly hair between the eyebrows. 5) Use your thinning shears to trim straggly hair on the muzzle. 5) Use your shears to remove any extra hair from the beard, creating a long, smooth look. Beard is left full, but not bushy. Twelfth Step: Spray coat with conditioner. Comb through. You may also want to lightly spray coat with cologne. Final Step: Step away from the dog and take a final look at your work to make sure you are satisfied. After completing any finishing touches, place a bandana around the neck if a boy, or a ribbon if a girl. Make sure you compliment the dog on what a good dog they have been, and how handsome or beautiful he or she looks. Call the owner to have him/her picked up. You re done! 434
467 Notes 435

468 WEST HIGHLAND WHITE TERRIER Tools Needed Slicker Brush, Comb Nail Clipper, Straight Shears Thinning Shears (for a more natural look) or Curved Shears Clipper, #5F, #7F, or #8 ½ blade,#10 blade, #15 or #40 blade Additional Items: Ear cleaner, medicated ear powder, shampoo, conditioner, spray cologne, ribbon or bandana 436
469 First Step: Use medicated powder lightly to dry ears. Gently pull out any dead hair. Use cotton balls dampened with ear cleaner to clean the inside of the ears. Second Step: Use your nail clippers to cut the nails. Cut the tip of the nails being careful not to cut the quick. If you cut the quick, use your gel or powder blood stopper to stop the bleeding. Third Step: Use your #15 blade (Yvonne prefers #40 blade), on your clipper to remove the hair from between the pads. Fourth Step: For the sanitary trim, use your #10 blade on your clipper and clip the hair from the rectal area ½ inch on all sides of the rectum. Be careful not to touch the rectum area! Fifth Step: Use your #10 blade to trim the hair from the groin to the navel. Sixth Step: Use your slicker brush and brush entire coat thoroughly. If you encounter any matted areas, use your dematting comb or rake and remove all mats before bathing. Seventh Step: Bath Time Use your favorite shampoo. Wet the dog first and then apply the shampoo. Shampoo the dog creating a nice lather on entire body, head, legs, and feet. (Be careful not to get any water inside the ears.) Rinse the dog until lather is completely gone. Condition (if desired) after rinsing, making sure you rinse the conditioner out before drying. As part of the dog s bath make sure you: Brush teeth to remove food debris. Eighth Step: After bathing, use a towel to remove any excess water. Then use your blow dryer to dry the dog thoroughly or cage dry. Ninth Step: Comb and fluff! 437
470 Tenth Step: BODY/LEGS/TAIL Use your #5F, #7F or #8 ½ blade. 1) Trim the body starting at the base of the skull and go down the back ending at the base of the tail. 2) Trim the sides of the neck to halfway between the top of the shoulder and elbow. 3) Trim the sides of the back to the flank at the rear and to the hips at the rear legs, and following the contours of the body. 4) Trim the forechest to right above the breastbone. 5) Trim the tail on the top side from the base to the tip. Leave the hair longer on the underside. Use your shears to taper the tail from wider at the base and narrower at the tip. 6) Use your shears to make sure the entire body, legs and tail are blended smoothly together. 7) Use your shears to round off feet. Eleventh Step: FACE/EARS 1) Use your #10 blade to trim the top ¼ of the ears on both sides. 2) Use your shears to neaten up the outside edges of the ears. 3) Use your thinning shears to trim the eyebrows into an awning shape without division between them. 4) Use your thinning shears to style the head into a rounded shape. 5) Use your thinning shears to thin any straggly or extra hair under the eyes. Twelfth Step: Spray coat with conditioner. Comb through. You may also want to lightly spray coat with cologne. Final Step: Step away from the dog and take a final look at your work to make sure you are satisfied. After completing any finishing touches, place a bandana around the neck if a boy, or a ribbon if a girl. Make sure you compliment the dog on what a good dog they have been, and how handsome or beautiful he or she looks. Call the owner to have him/her picked up. You re done! 438
471 Notes 439

472 WHEATEN TERRIER (Soft Coated) Tools Needed Slicker Brush, Comb, Dematting Comb or Rake Nail Clipper, Straight Shears Thinning Shears (for a more natural look) or Curved Shears Clipper, #10 blade, #15 or #40 blade Additional Items: Ear cleaner, medicated ear powder, shampoo, conditioner, spray cologne, ribbon or bandana 440
473 First Step: Use medicated powder lightly to dry ears. Gently pull out any dead hair. Use cotton balls dampened with ear cleaner to clean the inside of the ears. Second Step: Use your nail clippers to cut the nails. Cut the tip of the nails being careful not to cut the quick. If you cut the quick, use your gel or powder blood stopper to stop the bleeding. Third Step: Use your #15 blade (Yvonne prefers #40 blade), on your clipper to remove the hair from between the pads. Fourth Step: For the sanitary trim, use your #10 blade on your clipper and clip the hair from the rectal area ½ inch on all sides of the rectum. Be careful not to touch the rectum area! Fifth Step: Use your #10 blade to trim the hair from the groin to the navel. Sixth Step: Use your slicker brush and brush entire coat thoroughly. If you encounter any matted areas, use your dematting comb or rake and remove all mats before bathing. Seventh Step: Bath Time Use your favorite shampoo. Wet the dog first and then apply the shampoo. Shampoo the dog creating a nice lather on entire body, head, legs, and feet. (Be careful not to get any water inside the ears.) Rinse the dog until lather is completely gone. Condition (if desired) after rinsing, making sure you rinse the conditioner out before drying. As part of the dog s bath make sure you: Brush teeth to remove food debris. Eighth Step: After bathing, use a towel to remove any excess water. Then use your blow dryer to dry the dog thoroughly or cage dry. Ninth Step: Comb and fluff! 441
474 Tenth Step: HEAD On top of head, comb hair up and use shears to trim hair to 1 ½ in. Eleventh Step: EARS Use your #10 blade to trim hair on ears on both sides outward from base. Use your shears to neaten up outside edges of ears. Twelfth Step: FACE/BEARD Trim sides of face until hair lays flat on cheeks leaving hair longer closer to the eyes. Use your thinning shears to neaten uneven hair from beard by combing it forward and trimming. Thirteenth Step: THROAT/NECK Use your thinning shears to blend the ruff or collar into the longer hair on back of neck and into the shorter hair on the throat and chest area. Start right behind the ears and go under the throat and neck gradually blending. Fourteenth Step: BODY Use your thinning shears to smooth and reduce bushy areas on neck, chest, sides and legs. Fifteenth Step: Use your shears to round off feet. 442
475 Sixteenth Step: Spray coat with conditioner. Comb through. You may also want to lightly spray coat with cologne. Final Step: Step away from the dog and take a final look at your work to make sure you are satisfied. After completing any finishing touches, place a bandana around the neck if a boy, or a ribbon if a girl. Make sure you compliment the dog on what a good dog they have been, and how handsome or beautiful he or she looks. Call the owner to have him/her picked up. You re done! *Make sure to register at and watch streaming videos on selected dog breeds! Become a Certified Pet Groomer Hands On Wag My Tail Pet Grooming School Wag-MyTail Online Order DVDs 443

476 WHIPPET Tools Needed Bristle Brush Nail Clipper, Straight Shears Thinning Shears (for a more natural look) or Curved Shears Additional Items: Ear cleaner, shampoo, conditioner, spray cologne, ribbon or bandana 444
477 First Step: Use cotton balls dampened with ear cleaner to clean the inside of the ears. Second Step: Use your nail clippers to cut the nails. Cut the tip of the nails being careful not to cut the quick. If you cut the quick, use your gel or powder blood stopper to stop the bleeding. Third Step: Use your slicker brush and brush entire coat thoroughly. Fourth Step: Bath Time Use your favorite shampoo. Wet the dog first and then apply the shampoo. Shampoo the dog creating a nice lather on entire body, head, legs, and feet. (Be careful not to get any water inside the ears.) Rinse the dog until lather is completely gone. Condition (if desired) after rinsing, making sure you rinse the conditioner out before drying. As part of the dog s bath make sure you: Brush teeth to remove food debris. Fifth Step: After bathing, use a towel to remove any excess water. Then use your blow dryer to dry the dog thoroughly or cage dry. Sixth Step: Use your shears and clean up the whiskers and any long hair on the face, over the eyes and on the muzzle. Seventh Step: Spray coat with conditioner. Brush through. You may also want to lightly spray coat with cologne. Final Step: Step away from the dog and take a final look at your work to make sure you are satisfied. After completing any finishing touches, place a bandana around the neck if a boy, or a ribbon if a girl. Make sure you compliment the dog on what a good dog they have been, and how handsome or beautiful he or she looks. You re done! 445

478 WIRE FOX TERRIER Tools Needed Slicker Brush, Comb Nail Clipper, Straight Shears Thinning Shears (for a more natural look) or Curved Shears Clipper, #5F, #7F, or 8 ½ blade, #10 blade, #15 or #40 blade Additional Items: Ear cleaner, medicated ear powder, shampoo, conditioner, spray cologne, ribbon or bandana First Step: Use medicated powder lightly to dry ears. Gently pull out any dead hair. Use cotton balls dampened with ear cleaner to clean the inside of the ears. 446
479 Second Step: Use your nail clippers to cut the nails. Cut the tip of the nails being careful not to cut the quick. If you cut the quick, use your gel or powder blood stopper to stop the bleeding. Third Step: Use your #15 blade (Yvonne prefers #40 blade), on your clipper to remove the hair from between the pads. Fourth Step: For the sanitary trim, use your #10 blade on your clipper and clip the hair from the rectal area ½ inch on all sides of the rectum. Be careful not to touch the rectum area! Fifth Step: Use your #10 blade to trim the hair from the groin to the navel. Sixth Step: Use your slicker brush and brush entire coat thoroughly. If you encounter any matted areas, use your comb and remove all mats before bathing. Seventh Step: Bath Time Use your favorite shampoo. Wet the dog first and then apply the shampoo. Shampoo the dog creating a nice lather on entire body, head, legs, and feet. (Be careful not to get any water inside the ears.) Rinse the dog until lather is completely gone. Condition (if desired) after rinsing, making sure you rinse the conditioner out before drying. As part of the dog s bath make sure you: Brush teeth to remove food debris. Eighth Step: After bathing, use a towel to remove any excess water. Then use your blow dryer to dry the dog thoroughly or cage dry. Ninth Step: Comb and fluff! Tenth Step: BODY/LEGS/TAIL Use your #5F, #7F or #8 ½ blade. 1) Trim the body starting at the base of the skull and go down the back ending at the base of the tail. 2) Trim the sides of the back to the flank at the rear and to the hips at the rear legs. 3) Trim the sides of the neck to halfway between the top of the shoulder and elbow. 447
480 4) Trim the chest and shoulders to the arm in front and the elbow at the side, using the breastbone as your baseline measurement to insure chest is even. 5) Trim the underchest, creating a shallow incline line from the elbow to the hip by and following the contours of the body. 6) Use your shears to trim the chest so it blends in smoothly starting at the neck and going downward. 7) Use your shears to trim the front legs into a tubular shape that looks straight.. Leave the front legs fuller and more rounded than the rear legs. 8) Use your shears to trim the rear legs going with the contours of the legs and showing the bend in the stifle. 9) Use your shears to make sure the entire body, legs and tail are blended smoothly together. 10) Use your shears to round off feet. Eleventh Step: FACE/EARS 1) Use your #10 blade to trim the face by combing the hair forward and then trimming ¼ in. starting at the top of the eye (forehead) and going to the base of the skull. Continue trimming from the eye up to the ears and down the cheeks. 2) Use your #10 blade and trim the ears cleanly on both sides, going from the base outward.. 3) Use your shears to neaten up the outside edges of the ears. 4) Use your shears to trim the eyebrows into a V shape. Comb forward and then start trimming at the outside corner, going diagonally to the center. At the stop, remove any straggly hair between the eyebrows. Eyebrows should look like small triangles. 5) Use your thinning shears to trim straggly hair on the muzzle. 6) Use your shears to remove any extra hair from the beard, creating a long, smooth look. Beard is left full, but not bushy. 7) Use your thinning shears to remove any extra hair from the beard, creating a long look. Beard is left full, but not bushy. Thin out the line going from the corner of the mouth to the eyebrow so it s straight. 448

481 Twelfth Step: Spray coat with conditioner. Comb through. You may also want to lightly spray coat with cologne. Final Step: Step away from the dog and take a final look at your work to make sure you are satisfied. After completing any finishing touches, place a bandana around the neck if a boy, or a ribbon if a girl. Make sure you compliment the dog on what a good dog they have been, and how handsome or beautiful he or she looks. Call the owner to have him/her picked up. You re done! 449
 or Curved Shears Additional Items: Ear cleaner, shampoo, conditioner, spray cologne, ribbon or bandana")
482 WIREHAIRED POINTING GRIFFON Tools Needed Slicker Brush, Comb Nail Clipper, Straight Shears Thinning Shears (for a more natural look) or Curved Shears Additional Items: Ear cleaner, shampoo, conditioner, spray cologne, ribbon or bandana 450
483 First Step: Use cotton balls dampened with ear cleaner to clean the inside of the ears. Second Step: Use your nail clippers to cut the nails. Cut the tip of the nails being careful not to cut the quick. If you cut the quick, use your gel or powder blood stopper to stop the bleeding. Third Step: Use your slicker brush and brush entire coat thoroughly. Fourth Step: Bath Time Use your favorite shampoo. Wet the dog first and then apply the shampoo. Shampoo the dog creating a nice lather on entire body, head, legs, and feet. (Be careful not to get any water inside the ears.) Rinse the dog until lather is completely gone. Condition (if desired) after rinsing, making sure you rinse the conditioner out before drying. As part of the dog s bath make sure you: Brush teeth to remove food debris. Fifth Step: After bathing, use a towel to remove any excess water. Then use your blow dryer to dry the dog thoroughly or cage dry. Sixth Step: Comb and fluff! Seventh Step: Use your thinning shears and clean up any straggly hair on body, head and cheek. Eighth Step: Use your thinning shears to trim hair close on the ears. Ninth Step: Use your shears to even out eyebrows. Tenth Step: Spray coat with conditioner. Comb through. You may also want to lightly spray coat with cologne. Final Step: Step away from the dog and take a final look at your work to make sure you are satisfied. You re done! 451

484 YORKSHIRE TERRIER Tools Needed Slicker Brush, Comb, Soft Brush Nail Clipper, Straight Shears Clipper, #10 blade, #15 or #40 blade Small Rubber Bands, Bows Additional Items: Ear cleaner, medicated powder, shampoo, conditioner, spray cologne 452
Janet Allen Elliott Weiss Mary Ann Alston Jean Fournier Peggy Haas Elaine Mathis Robert Indeglia Chris Walkowicz Janet Allen Elliott Weiss
 Sunday, December 12, 2010 Best in Show Group 1 (Sporting) Group 2 (Hound) Group 3 (Working) Group 4 (Terrier) Group 5 (Toy) Group 6 (Non-Sporting) Group 7 (Herding) Misc. Class Junior Showmanship Sporting
Terrier AIRDALE TERRIER
 AFFENPINSCHER Toy Hound AFGHAN HOUND Terrier AIRDALE TERRIER Working AKITA Working Alaskan Malamute Non-Sporting AMERICAN ESKIMO DOG AMERICAN STAFFORDSHIRE TERRIER Terrier Sporting AMERICAN WATER SPANIEL
Escapes at the Ledges Owners Association Pet Policy Amendment
 Escapes at the Ledges Owners Association Pet Policy Amendment Pet Limitation. No animal shall be raised, bred, or kept in any Unit, except that of usual household pets such as domestic dogs, cats, fish,
Table of Contents. Parts of a Dog 8. External Parts 9. Internal Organs 10. Skeletal Parts
 Table of Contents Information and Rules Breed Identification 1. Herding Group 2. Hound Group 3. Non-Sporting Group 4. Sporting Group 5. Terrier Group 6. Toy Group 7. Working Group Parts of a Dog 8. External
Dog Grooming Prices. The price range I give you is only valid if the dog is groomed on a regular basis of
 Dog Grooming Prices The price range I give you is only valid if the dog is groomed on a regular basis of at least every 6-8 weeks. If the dog isn t groomed regularly then the price will be adjusted according
Furry Friends Beauty Shop Price List
 Price Categories BATH TRIM BLADE CUT DESIGN Extra 20.00 26.00 31.00 35.00 Extra 22.00 26.00 31.00 35.00 24.00 30.00 40.00 44.00 25.00 31.00 41.00 45.00 27.00 33.00 43.00 47.00 30.00 36.00 48.00 52.00 32.00
Breed Bath Face Feet Fanny Full Body Cut
 Bath Includes: Wash, Toenail Trim, Ear Care, and Anal Glands Face Feet & Fanny Includes: Wash, Toenail Trim, Ear Care, Anal Glands, Face, Feet, and Fanny trim Full Body Cut Includes: Wash, Toenail Trim,
Bath Only: Bath, Brush, Ears, Nails, Pads, Sanitary, Feet Neatened, In Front of Eyes Trimmed, Bow or Bandana
 Bath Only: Bath, Brush, Ears, Nails, Pads, Sanitary, Feet Neatened, In Front of Eyes Trimmed, Bow or Bandana Full Groom: Haircut or Trimming, plus everything listed under Bath Nails Only: $10.00 Includes
SOUTH WALES KENNEL ASSOCIATION. 7th - 9th October 2016
 SOUTH WALES KENNEL ASSOCIATION 7th - 9th October 2016 SUMMARY OF ENTRIES GUNDOG GROUP Bracco Italiano 24 33 Brittany 15 17 English Setter 63 78 German Shorthaired Pointer 45 64 German Wirehaired Pointer
SOUTH WALES KENNEL ASSOCIATION. 6th - 8th October 2017
 SOUTH WALES KENNEL ASSOCIATION 6th - 8th October 2017 SUMMARY OF ENTRIES HOUND GROUP Afghan Hound 70 82 Basenji 2 2 Basset Fauve de Bretagne 17 29 Basset Griffon Vendeen (Grand) 12 16 Basset Griffon Vendeen
SCOTTISH KENNEL CLUB. 18th - 20th May 2018
 SCOTTISH KENNEL CLUB 18th - 20th May 2018 SUMMARY OF ENTRIES WORKING GROUP Alaskan Malamute 46 54 Bernese Mountain Dog 43 46 Bouvier des Flandres 17 22 Boxer 121 131 Bullmastiff 29 33 Canadian Eskimo Dog
Tues., Fri., Sun. Phone (785)
") Grooming Pricing Hours of Operation for Grooming Mon., Wed., Thurs. 11 am-6 pm Sat. 11 am-4 pm Tues., Fri., Sun. Closed Phone (785) 242-2967 #1 : Wash, Toenail Trim, Ear Care, and Anal Glands #2: Wash,
Grooming Pricing Hours of Operation for Grooming Mon., Wed., Thurs. 11 am-6 pm Sat. 11 am-4 pm Tues., Fri., Sun. Closed Phone (785) 242-2967 #1 : Wash, Toenail Trim, Ear Care, and Anal Glands #2: Wash,
Paw Prints - Mobile Grooming Starting Rates + Add $5 Travel Fee
 Paw Prints - Mobile Grooming Starting Rates + Add Travel Fee Updated 1/1/2017 Breed Bath Basic Full Shed Less Breed Bath Basic Full Shed Less Affenpinscher 5 $60 $65 Chihuahua - Long Hair 0 5 $65 Afghan
SALON 4 Week 6 Week New/Over 6 Week Affenpinscher Clipdown/Scissor Full Service Bath 25.00
 Affenpinscher Clipdown/Scissor 42.00 46.00 51.00 Afghan Hound Bath & Comb 105.00+ 115.00+ 132.00+ Clipdown 83.00 90.00 105.00 Scissor 105.00+ 116.00+ 132.00+ Airedale Terrier Clipdown 72.00 79.00 90.00
GROUP No. 1 SPORTING BREEDS. GROUP No. 1 SPORTING BREEDS
 No. 1 SPORTING BREEDS No. 1 SPORTING BREEDS BARBET BRAQUE FRANCAIS GRIFFON (Wiredhaired Pointing) KLEINER MUNSTERLANDER LAGOTTO ROMAGNOLO POINTER POINTER (German Longhaired) POINTER (German Shorthaired)
DOG GROOMING PRICES. Each dog will be assessed on an individual basis and prices adjusted accordingly.
 DOG GROOMING PRICES The price list is only a guideline, and prices may vary depending on several contributing factors. e.g: the size of your dog, coat condition, and behaviour. These factors all add to
SALON 4 Week 6 Week New/Over 6 Week. MOBILE Affenpinscher Clipdown/Scissor Full Service Bath
 Affenpinscher Clipdown/Scissor 38.00 42.00 46.00 60.00 Afghan Hound Bath & Comb 95.00+ 105.00+ 120.00+ 150.00+ Clipdown 82.00 95.00 115.00 Scissor 95.00+ 105.00+ 120.00+ 150.00+ Full Service Bath 40.00
CRUFTS. 7th - 10th March 2019
 CRUFTS 7th - 10th March 2019 SUMMARY OF ENTRIES GUNDOG GROUP Bracco Italiano 65 69 Brittany 34 36 English Setter 141 150 German Longhaired Pointer 13 14 German Shorthaired Pointer 65 79 German Wirehaired
CRUFTS. 9th - 12th March 2017
 CRUFTS 9th - 12th March 2017 SUMMARY OF ENTRIES TERRIER GROUP Airedale Terrier 92 104 Australian Terrier 23 23 Bedlington Terrier 78 81 Border Terrier 250 275 Bull Terrier 48 51 Bull Terrier (Miniature)
Breed Numbers of Entries of. Bracco Italiano Brittany English Setter
 FD066 Show Figures for CRUFTS Breed Numbers of Entries of DOG BITCH TOTAL DOG BITCH TOTAL Bracco Italiano 29 36 65 32 37 69 Brittany 20 14 34 20 16 36 English Setter 65 76 141 70 80 150 German Longhaired
CRUFTS. 8th - 11th March 2018
 CRUFTS 8th - 11th March 2018 SUMMARY OF ENTRIES WORKING GROUP Alaskan Malamute 151 174 Bernese Mountain Dog 203 223 Bouvier des Flandres 41 45 Boxer 222 233 Bullmastiff 172 180 Canadian Eskimo Dog 14 14
Wendy & Richard Paquette Box 640 Azilda ON P0M 1B0 Canada
 FCI GROUPS As of November 2005 Group 1 SHEEPDOGS AND CATTLE DOGS (except Swiss Cattle Dogs) & Paquette wenrick@wenrick.ca Box 640 Azilda ON P0M 1B0 Canada Australian Kelpie Corgi (Pembroke) Australian
BERKS COUNTY KENNEL CLUB Preliminary Entry Breakdown
 BERKS COUNTY KENNEL CLUB Preliminary Entry Breakdown BREED DOGS SWEEPS BREAKDOWN MISC D B Brittany 10 ( - ) 2-2 ( 3-3 ) Lagotto Romagnolo 6 ( - ) 1-3 ( 2-0 ) Nederlandse Kooikerhondje 0 ( - ) - ( - ) Pointer
AUSTRALIAN NATIONAL KENNEL COUNCIL LIMITED NATIONAL ANIMAL REGISTRATION ANALYSIS
 GROUP 1 TOYS 2010 2011 2012 2013 2014 2015 2016 2017 2018 2019 Affenpinscher 17 33 28 51 30 27 25 Australian Silky Terrier 273 277 253 237 199 202 134 Bichon Frise 445 412 445 366 471 465 465 Cavalier
AUSTRALIAN NATIONAL KENNEL COUNCIL LIMITED NATIONAL ANIMAL REGISTRATION ANALYSIS
 GROUP 1 TOYS 2010 2011 2012 2013 2014 2015 2016 2017 2018 2019 Affenpinscher 17 33 28 51 30 27 25 32 Australian Silky Terrier 273 277 253 237 199 202 134 197 Bichon Frise 445 412 445 366 471 465 465 420
BOARDWALK KENNEL CLUB OF CAPE MAY COUNTY (SATURDAY) Preliminary Entry Breakdown
 Preliminary Entry Breakdown") BOARDWALK KENNEL CLUB OF CAPE MAY COUNTY (SATURDAY) Preliminary Entry Breakdown BREED DOGS SWEEPS BREAKDOWN MISC D B Brittany 4 ( - ) 0-2 ( 0-2 ) Lagotto Romagnolo - ( - ) Nederlandse Kooikerhondje - (
BOARDWALK KENNEL CLUB OF CAPE MAY COUNTY (SATURDAY) Preliminary Entry Breakdown BREED DOGS SWEEPS BREAKDOWN MISC D B Brittany 4 ( - ) 0-2 ( 0-2 ) Lagotto Romagnolo - ( - ) Nederlandse Kooikerhondje - (
SOUTH JERSEY KENNEL CLUB Preliminary Entry Breakdown
 SOUTH JERSEY KENNEL CLUB Preliminary Entry Breakdown BREED DOGS SWEEPS BREAKDOWN MISC D B Brittany 1 ( - ) 0-0 ( 1-0 ) Lagotto Romagnolo 4 ( - ) 0-2 ( 2-0 ) Nederlandse Kooikerhondje - ( - ) Pointer 3
Tested in 15 years Tested in Breed
 Dog Health Group report 2014 HIP SCORES BY BREED Data Calculated to 01/11/14 The following is an annual summary that is now prepared for the BVA, covering all breeds, using data from the current approximated
FCI group: 1. Kyivska Rus Crystal Cup of Ukraine 2018
 FCI group: 1 BORDER COLLIE 5 4 9 MAREMMA AND THE ABRUZZES SHEEPDOG 9 11 20 WELSH CORGI PEMBROKE 39 31 70 SLOVAKIAN CHUVACH 1 1 2 GERMAN SHEPHERD DOG / Long coat 9 14 23 AUSTRALIAN SHEPHERD 7 3 10 GERMAN
1998 EVENT AND TITLE STATISTICS
 1998 EVENT AND TITLE STATISTICS Abbreviations are as follows: CH (champion), CD (companion dog), CDX (companion dog excellent), UD (utility dog), UDX (utility dog excellent), OTCH (obedience trial champion),
SAND & SEA KENNEL CLUB (THURSDAY) Preliminary Entry Breakdown
 Preliminary Entry Breakdown") SAND & SEA KENNEL CLUB (THURSDAY) Preliminary Entry Breakdown BREED ENTRY SWEEPS BREAKDOWN MISC D B Brittany 3 ( - ) 1-0 ( 0-2 ) Pointer 3 ( - ) 0-0 ( 1-2 ) Pointer (German Shorthaired) 10 ( - ) 2-6 (
SAND & SEA KENNEL CLUB (THURSDAY) Preliminary Entry Breakdown BREED ENTRY SWEEPS BREAKDOWN MISC D B Brittany 3 ( - ) 1-0 ( 0-2 ) Pointer 3 ( - ) 0-0 ( 1-2 ) Pointer (German Shorthaired) 10 ( - ) 2-6 (
Amazing Dogs of God's
 Amazing Dogs of God's Creation Writing Pages Pack All about dogs creation facts, anatomy pages, pockets, breed identification cards, clipart & writing papers to help compliment any study of dogs. " The
MONTICELLO NEW YORK KENNEL CLUB (FRIDAY) Preliminary Entry Breakdown. MONTICELLO NEW YORK KENNEL CLUB (SATURDAY) Preliminary Entry Breakdown
 Preliminary Entry Breakdown. MONTICELLO NEW YORK KENNEL CLUB (SATURDAY) Preliminary Entry Breakdown") MONTICELLO NEW YORK KENNEL CLUB (FRIDAY) Preliminary Entry Breakdown OBEDIENCE RALLY Novice A 4 Novice A (RB) 8 Novice B 17 Open A 11 Novice B (RC) 21 Open B 18 Utility A 7 Intermediate (RD) 16 Utility
MONTICELLO NEW YORK KENNEL CLUB (FRIDAY) Preliminary Entry Breakdown OBEDIENCE RALLY Novice A 4 Novice A (RB) 8 Novice B 17 Open A 11 Novice B (RC) 21 Open B 18 Utility A 7 Intermediate (RD) 16 Utility
1HP 110V AC 10 A (MAX) 60 cm 20 kg 41 cm x 73.5 cm 1-12 km/hr NO NO YES (Infra-red spectrum) 53 cm x 110 cm x 38 cm 63 cm x 119 cm x 27 cm 28.
 60 cm 20 kg 41 cm x 73.5 cm 1-12 km/hr NO NO YES (Infra-red spectrum) 53 cm x 110 cm x 38 cm 63 cm x 119 cm x 27 cm 28.") PR700 SMALL The PR 700 is recommended for small dogs, less than 24 long and weighing up to 44lbs. $589.00 60 cm 20 kg 41 cm x 73.5 cm (Infra-red spectrum) 53 cm x 110 cm x 38 cm 63 cm x 119 cm x 27 cm
PR700 SMALL The PR 700 is recommended for small dogs, less than 24 long and weighing up to 44lbs. $589.00 60 cm 20 kg 41 cm x 73.5 cm (Infra-red spectrum) 53 cm x 110 cm x 38 cm 63 cm x 119 cm x 27 cm
AUSTRALIAN NATIONAL KENNEL COUNCIL LIMITED NATIONAL ANIMAL REGISTRATION ANALYSIS
 GROUP 1 TOYS 2010 2011 2012 2013 2014 2015 2016 2017 2018 2019 Affenpinscher 17 33 28 51 30 27 25 32 42 Australian Silky Terrier 273 277 253 237 199 202 134 197 180 Bichon Frise 445 412 445 366 471 465
CANADIAN KENNEL CLUB CLUB CANIN CANADIEN
 CANADIAN KENNEL CLUB CLUB CANIN CANADIEN 200 RONSON DRIVE, SUITE 400, ETOBICOKE, ONTARIO M9W 5Z9 TEL (416) 675-5511 1 (855) 364-7252 FAX (416) 675-6506 www.ckc.ca ALL BREED JUDGING PANEL APPLICATION Name
Wisdom Panel Dog Breeds
 Wisdom Panel Dog Breeds Asian: Akita Alaskan Klee Kai Alaskan Malamute Canadian Eskimo Dog Chinese Shar-Pei Chow Chow Jindo Samoyed Shiba Inu Siberian Husky Tibetan Mastiff Companion: American Eskimo Dog
1. Visit your local Petco or Petsmart store and purchase the tools needed. 2. Call me to receive a comprehensive set of tools: Wag-MyTail.
 Greetings, Dear Student: Here is what you'll need to do to earn your certificates: What tools to get? Where to find dogs? How to study? When to send pictures and how many? When to take the test? When will
1 ページ. Supplementary Table 1 The Number of each breed and sex in Japan and the United States
 Comparison of owner-reported behavioral characteristics among genetically clustered breeds of dog (Canis familiaris). Akiko Tonoike, Miho Nagasawa, Kazutaka Mogi, James A. Serpell, Hisashi Ohtsuki, Takefumi
KUSA Statistics. Page 1
 Statistics for Calender years 2016 and 2017 Breed 2017 2016 1 BULLDOG 1317 1278 2 ROTTWEILER 1188 1140 3 BULL TERRIER 889 855 4 STAFFORDSHIRE BULL TERRIER 878 908 5 RETRIEVER (LABRADOR) 774 1144 6 RETRIEVER
A bespoke harness is currently from just 3 extra
 IMPORTANT NOTE: Please be aware that the sizes given within this document are intended as a guide only and based on GIRTH measurement. We cannot guarantee any sizing will be accurate due to the many size
CRUFTS 2018 PROVISIONAL ORDER OF JUDGING. DAY 1 - WORKING AND PASTORAL GROUP THURSDAY 8 th MARCH 2018
 CRUFTS 2018 PROVISIONAL ORDER OF JUDGING LB LUNCH BREAK, NL NO LUNCH BREAK TO BE TAKEN DURING JUDGING DAY 1 - WORKING AND PASTORAL GROUP THURSDAY 8 th MARCH 2018 WORKING GROUP JUDGING 18.35 1925 Collecting
SocioBiological Musings
 Share Report Abuse Next Blog» Create Blog Sign In SocioBiological Musings Monday, September 26, 2011 Dog IQ: How Smart is your Dog? Here's a listing of dog IQs by breed. Dogs have undergone artificial
APRIL 5, 6 & 7, 2013
 THE RED DEER AND DISTRICT KENNEL CLUB Our 26 th, 27 th, & 2 th Annual Shows 3 ALL BREED CHAMPIONSHIP SHOWS 3 LICENSED OBEDIENCE TRIALS 3 LICENSED RALLY O TRIALS APRIL 5, 6 & 7, 203 FEATURING: Thursday
Table S1. Rank, breed, proportion (%) of bitches in different breeds that had developed
 of bitches in different breeds that had developed") Table S1. Rank, breed, proportion (%) of bitches in different breeds that had developed pyometra by the age of ten years. The 0 breeds are listed in ranking order. Rank Breed % 1 2 3 4 5 9 1 Bernese Mountain
Table S1. Rank, breed, proportion (%) of bitches in different breeds that had developed pyometra by the age of ten years. The 0 breeds are listed in ranking order. Rank Breed % 1 2 3 4 5 9 1 Bernese Mountain
British Veterinary Association / Kennel Club Hip Dysplasia Scheme
 British Veterinary Association / Kennel Club Hip Dysplasia Scheme Specific Statistics 1 January 2001 to 31 December 2016 Hip scores should be considered along with other criteria as part of a responsible
STATISTICS 01 SEPTEMBER AUGUST 2017
 STATISTICS 0 SEPTEMBER 206 3 AUGUST 207 TOP 0 REGISTERED BREEDS BREED 206/207 205/206 204/205 203/204 202/203 20/202 200/20 2009/200 2008/2009 BULLDOG 278 35() 244(2) 66(2) 093(4) 20(3) 275(3) 46(3) 475(3)
KAMLOOPS & DISTRI CT KENNEL CLUB
 Official Judging Schedule KAMLOOPS & DISTRI CT KENNEL CLUB 46th Annual Show AUGUST 30, 31, SEPTEMBER 1, 2, 2013 4 All Breed Championship Shows Kuvasz Club of Canada National Specialty Western Boxer Club
15 Alberta Shetland Sheepdog & Collie Assoc. 16 Flat-Coated Retriever Society of Alberta 17 Newfoundland Dog Club of Canada 18 Golden Retriever Club
 15 Alberta Shetland Sheepdog & Collie Assoc. 16 Flat-Coated Retriever Society of Alberta 17 Newfoundland Dog Club of Canada 18 Golden Retriever Club of Alberta 49 Terrier Breeders Assoc.of Canada 62 Doberman
Bermuda Domestic Animal Registry Counts of Live Dogs and Cats, in Bermuda, by Breed
 GOVERNMENT OF BERMUDA Ministry of Health and Environment Department of Environmental Protection Dogs Unspecified 302 3.7% Affenpinscher 1 0.0% Afghan 1 0.0% Airedale Terrier 14 0.2% Akita 23 0.3% Alaskan
Wildwood Kennel Club Thursday, February 7, 2019 to Sunday, February 10, 2019 JUDGING SCHEDULE
 Wildwood Kennel Club Thursday, February 7, 2019 to Sunday, February 10, 2019 JUDGING SCHEDULE WOODSTOCK FAIRGROUNDS 875 Nellis Street Woodstock, Ontario N4S 4C6 The building will be open for handlers/exhibitors
Summary of Entries No. of Dogs
 Summary of Entries No. of Dogs Dogs Bitches Group 1 Australian Shepherd Dog 2 3 B S Dog Groenendael 1 0 Belgian Shepherd Dog Laekenois 0 2 Belgian Shepherd Dog Malinois 0 1 Bouvier Des Flandres 4 2 Collie
3 Great Lakes Whippet Club 35 Alberta Shetland Sheepdog & Collie Assoc. 36 Canadian Rockies Siberian Husky Club 52 Newfoundland Dog Club of Canada 66
 3 Great Lakes Whippet Club 35 Alberta Shetland Sheepdog & Collie Assoc. 36 Canadian Rockies Siberian Husky Club 52 Newfoundland Dog Club of Canada 66 Collie Club of Canada 67 Shetland Sheepdog Club of
25 Alberta Shetland Sheepdog & Collie Assoc. 26 Old English Sheepdog Fanciers of Alberta 27 Golden Retriever Club of Alberta 43 Doberman Pinscher
 25 Alberta Shetland Sheepdog & Collie Assoc. 26 Old English Sheepdog Fanciers of Alberta 27 Golden Retriever Club of Alberta 43 Doberman Pinscher Club of B.C. 55 Siberian Husky Club of Ontario 56 Terrier
OBEDIENCE OVERLOAD ON SATURDAY Please see attached Judging Schedule Per rules withdrawn entries must be received prior to start of trial
 JUDGING SCHEDULE BATTLE RIVER CANINE ASSOCIATION OCTOBER 26, 27 & 28, 2012 CAROSE REGIONAL EXHIBITION East end of Camrose on Highway 13 Camrose, Alberta BOOSTERS American Cocker Spaniel Club of Canada
EVELYN KENNY KENNEL & OBEDIENCE CLUB THREE ALL BREED CHAMPIONSHIP SHOWS February 4, 5, and 6, 2011 held at the Big Four Building, Stampede Park
 EVELYN KENNY KENNEL & OBEDIENCE CLUB THREE ALL BREED CHAMPIONSHIP SHOWS February 4, 5, and 6, 2011 held at the Big Four Building, Stampede Park along Macleod Trail between 12 Avenue S.E. and 25 Avenue
L HORAIRE JUDGING SCHEDULE
 United Kennel Club Inc. vendredi le 2 novembre à dimanche le 4 novembre Friday, November 2, 2018 to Sunday, November 4, 2018 L HORAIRE JUDGING SCHEDULE Complexe Sportif St-Lazare 1850, rue des Loisirs
November 6, 7 & 8, 2015
 THE RED DEER AND DISTRICT KENNEL CLUB Our 23 st, 232 nd & 233 rd Annual Shows 3 ALL BREED CHAMPIONSHIP SHOWS 3 LICENSED OBEDIENCE TRIALS 3 LICENSED RALLY O TRIALS November 6, 7 & 8, 205 FEATURING: RDDKC
Hurtta Hygienehöschen Größenübersicht
 nübersicht Affenpinscher 1 Afghane 5 Airedale Terrier 5 Akita 6 Alaskan Malamute 6 American Akita 6 American Cocker Spaniel 4 American Hairless Terrier 3 American Foxhound 5 American Staffordshire Terrier
Code of Ethics Guidelines. Addendum to the Code of Ethics Guidelines Code of Ethics Project Thank You
 Code of Ethics Guidelines Code of Ethics Guidelines Addendum to the Code of Ethics Guidelines Code of Ethics Project Thank You Code of Ethics Guidelines The AKC Delegates Parent Club Committee Guide to
At Isle of Dogs we have created a Coat Check that is as individual as the dog and its coat.
 A dog s coat is a vital barometer of his well being. Unlike their human counterparts, our canine friends coats cover not just their heads, but their entire bodies. Their skin and coat are what separates
18 Alberta Shetland Sheepdog & Collie Assoc. 44 Shetland Sheepdog Club of B.C. 59 Regroupement des Amateurs de Terriers du Quebec 60 Rottweiler Club
 18 Alberta Shetland Sheepdog & Collie Assoc. 44 Shetland Sheepdog Club of B.C. 59 Regroupement des Amateurs de Terriers du Quebec 60 Rottweiler Club of Quebec 61 Miniature Schnauzer Club of Canada 74 Newfoundland
Ontario Breeders Association Fri, Mar 3, 2017 to Sun, Mar 5, 2017 JUDGING SCHEDULE
 Ontario Breeders Association Fri, Mar 3, 2017 to Sun, Mar 5, 2017 JUDGING SCHEDULE LINDSAY CENTRAL EXHIBITION GROUNDS THE COMMONWELL MUTUAL BUILDING 354 Angeline Street South, Lindsay, ON K9V 4W9 Please
THE GEORGINA KENNEL & OBEDIENCE CLUB
 JUDGING SCHEDULE THE GEORGINA KENNEL & OBEDIENCE CLUB Friday, November 10, 2017 Saturday, November 11, 2017 Sunday, November 12, 2017 LINDSAY CENTRAL EXHIBITION GROUNDS THE FARMERS MUTUAL EXHIBITION BUILDING
LIMESTONE CITY OBEDIENCE AND KENNEL CLUB MAP
 LIMESTONE CITY OBEDIENCE AND KENNEL CLUB MAP THURSDAY, JULY 22, 2010 RING 1 - Judge: Mr. T. Burke 10:00 a.m. 4 Boston Terrier 1-3-0-0 3 Chinese Shar-Pei 1-1-0-1 1 Chow Chow 0-0-1-0 1 Dalmatian 0-0-1-0
"SPOOKTACULAR EVENT "
 Official Judging Schedule Battle River Canine Association (These events held under The Rules of the Canadian Kennel Club Unbenched and unexamined) October 27, 28, and 29, 2017 in Camrose, Alberta Lets
United Kennel Club Inc. Friday, November 3, 2017 to Sunday, November 5, 2017 Vendredi 3 novembre à dimanche 5 novembre 2017 JUDGING SCHEDULE
 United Kennel Club Inc. Friday, November 3, 2017 to Sunday, November 5, 2017 Vendredi 3 novembre à dimanche 5 novembre 2017 JUDGING SCHEDULE Complexe Sportif St-Lazare 1850, rue des Loisirs St-Lazare,
KINGSTON & DISTRICT KENNEL CLUB
 Friday, June 15 #1 GROUP 1 - RING 1 8:00 am 1 Griffon (WHP) 1-0-0-0 3 Pointers 0-0-1-2 4 Retriever (Flat-Coat) 0-3-1-0 5 Retriever (Golden) 2-1-1-1 4 Retriever (Labrador) 3-1-0-0 1 Retriever (NSDT) 0-0-1-0
Ontario County Kennel Club Friday, June 8, 2018 to Sunday, June 10, 2018 JUDGING SCHEDULE. ORONO FAIRGROUNDS 2 Princess St. Orono, Ontario L0B 1M0
 Ontario County Kennel Club Friday, June 8, 2018 to Sunday, June 10, 2018 JUDGING SCHEDULE ORONO FAIRGROUNDS 2 Princess St. Orono, Ontario L0B 1M0 Eastlake Cavalier Club All Breed Sanction Match Friday,
REGULATIONS FOR THE CONDUCT OF A FCI CACIB EVENT. The FCI groups are as follows (see the detailed list below for your breed):
:") REGULATIONS FOR THE CONDUCT OF A FCI CACIB EVENT The FCI groups are as follows (see the detailed list below for your breed): Group 1 Sheepdogs and Cattle- Dogs (except Swiss Cattle Dogs) Group 2 Pinschers
REGULATIONS FOR THE CONDUCT OF A FCI CACIB EVENT The FCI groups are as follows (see the detailed list below for your breed): Group 1 Sheepdogs and Cattle- Dogs (except Swiss Cattle Dogs) Group 2 Pinschers
VETERANS OBEDIENCE Veteran Obedience Saturday. SCENT HURDLING Teams - 3 Saturday March 22, 2014 following completion of Shows & Trials
 JUDGING SCHEDULE BATTLE RIVER CANINE ASSOCIATION ARCH 21, 22 & 23, 2014 CAROSE REGIONAL EXHIBITION East end of Camrose on Highway 13 Camrose, Alberta BOOSTERS American Cocker Spaniel Saturday Australian
Champlain Dog Club. Friday, Apr 21, 2017 to Sunday, Apr 23, 2017 JUDGING SCHEDULE. Petawawa Civic Centre 16 Civic Centre Rd Petawawa, Ontario K8H 3H5
 Champlain Dog Club Friday, Apr 21, 2017 to Sunday, Apr 23, 2017 JUDGING SCHEDULE Petawawa Civic Centre 16 Civic Centre Rd Petawawa, Ontario K8H 3H5 1 Conformation - Friday, April 21, 2017 - Show #1 Group
Official Judging Schedule THREE ALL BREED CHAMPIONSHIP SHOWS. We re back at our old show grounds!!! * NUNNS CREEK PARK * July 30, 31 & August 1, 2011
 Official Judging Schedule THREE ALL BREED CHAMPIONSHIP SHOWS We re back at our old show grounds!!! * NUNNS CREEK PARK * July 30, 31 & August 1, 2011 Juvenile Sweepstakes 2 Junior Males 3 Senior Males Sunday,
Hochelaga Kennel Club Samedi le 19 mai à lundi le 21 mai, 2018 Saturday, May 19, 2018 to Monday, May 21, 2018 JUDGING SCHEDULE
 Hochelaga Kennel Club Samedi le 19 mai à lundi le 21 mai, 2018 Saturday, May 19, 2018 to Monday, May 21, 2018 JUDGING SCHEDULE Complexe Sportif St-Lazare 1850, rue des Loisirs St-Lazare, Quebec J7T 3B4
Official Judging Schedule SEPTEMBER 4, 5, 6 & 7, All Breed Championship Shows
 Official Judging Schedule KAMLOOPS & DISTRICT KENNEL CLUB 48th Annual Show SEPTEMBER 4, 5, 6 & 7, 2015 4 All Breed Championship Shows Rhodesian Ridgeback Club of British Columbia Regional Specialty Dogwood
PLEASE REMEMBER: VISIT REN S PET DEPOT, KITCHENER, 1525 VICTORIA STREET NORTH - 3 MINUTES FROM THE SHOW.
 JUDGING SCHEDULE Thursday, December 27, 2018 Friday, December 28, 2018 Saturday, December 29, 2018 BINGEMANS 425 Bingemans Centre Drive Kitchener, Ontario N2B 3X7 PLEASE REMEMBER: THE BUILDING WILL BE
THE RED DEER AND DISTRICT KENNEL CLUB. Our 213 th, 214 th & 215 th Annual Shows
 THE RED DEER AND DISTRICT KENNEL CLUB Our 23 th, 24 th & 25 th Annual Shows 3 ALL BREED CHAMPIONSHIP SHOWS 3 LICENSED OBEDIENCE TRIALS 3 LICENSED RALLY O TRIALS November 2, 3 & 4, 202 FEATURING: Veteran
Arnprior Canine Association Fri, May 12, 2017 to Sun, May 14, 2017 JUDGING SCHEDULE. NICK SMITH CENTER 77 James St.
 Arnprior Canine Association Fri, May 12, 2017 to Sun, May 14, 2017 JUDGING SCHEDULE NICK SMITH CENTER 77 James St. Arnprior, Ontario Sanction Match Sponsored by OVASA Saturday following BIS CANADA 150
Official Judging Schedule For
 Official Judging Schedule For Elsie Murray Canine Centre Society Two All Breed Championship Shows November 12 & 13, 2017 Two All Breed Licenced Obedience Trials November 11 & 12, 2017 Junior Handling Held
FRIDAY, FEBRUARY 22, 2019 SATURDAY, FEBRUARY 23, 2019 SUNDAY, FEBRUARY 24, 2019
 JUDGING SCHEDULE ANNUAL ALL BREED CHAMPIONSHIP DOG SHOWS OXFORD AUDITORIUM 875 Nellis Street Woodstock, Ontario FRIDAY, FEBRUARY 22, 2019 SATURDAY, FEBRUARY 23, 2019 SUNDAY, FEBRUARY 24, 2019 NO PRIVATE
Conformation Judging Schedule Kars Dog Club Kars Fairgrounds, Kars Ontario
 Conformation Judging Schedule Kars Dog Club Kars Fairgrounds, Kars Ontario July 15, 16 & 17, 2016 GENERAL: Exhibitors and dogs will be permitted onto the grounds after 12:00 NOON on Thursday July 14, 2016
Cornwall District Kennel Club Thursday, August 30, 2018 to Sunday, September 2, 2018 JUDGING SCHEDULE
 Cornwall District Kennel Club Thursday, August 30, 2018 to Sunday, September 2, 2018 JUDGING SCHEDULE Farran Park 14704 County Road 2 Ingleside, Ontario Conformation - Thursday, August 30, 2018 12:00 PM
DOGS NSW presents THE ROYAL CANIN INTERNATIONAL SPRING FAIR
 Entries Close 27 July 2014 DOGS NSW presents THE ROYAL CANIN INTERNATIONAL SPRING FAIR Obedience Trial, Speciality Shows, Agility Trial, Herding Trial & 3 Championship Shows on the one weekend Thursday
PLEASE WATCH FOR YOUR BREED JUDGING. SOME BREEDS ARE NOT JUDGED WITH THEIR GROUPS
 Official Judging Schedule KAMLOOPS & DISTRICT KENNEL CLUB 47th Annual Show AUGUST 29, 30, 31, SEPTEMBER 1, 2014 4 All Breed Championship Shows Flat Coat Retriever Club Canada National Specialty Afghan
FRIDAY, MARCH 8, 2019 SATURDAY, MARCH 9, 2019 SUNDAY, MARCH 10, 2019
 JUDGING SCHEDULE FRIDAY, MARCH 8, 2019 SATURDAY, MARCH 9, 2019 SUNDAY, MARCH 10, 2019 Orangeville Agriculture Building Orangeville Fairgrounds, 247090 5th Sideroad, Mono ON THE BUILDING WILL BE OPEN TO
JUDGING SCHEDULE JULY 12, 13, 14 & 15, 2018
 JUDGING SCHEDULE JULY, 3, 4 & 5, 08 NOTICE OF JUDGING CHANGE Please note the following change of judges: FRIDAY Group Dachshund (Miniature Longhaired) will now be judged by. Group 3 Great Dane and Schnauzer
CALENDAR COLLECTION. BrownTrout Publishers, Inc. Connecting People to Their Passions
 PET BOUTIQUE CALENDAR COLLECTION BrownTrout Publishers, Inc. Connecting People to Their Passions THE PET GOLD STANDARD BrownTrout Publishers is pleased to present our brand new Pet Boutique Collection.
Red Deer & District Kennel Club Official Judging Schedule December 7-9, 2018
 Red Deer & District Kennel Club Official Judging Schedule December 7-9, 2018 Events 3 All Breed Conformation Shows o Baby Puppy all 3 days in Conformation o Brace Saturday December 8th o Veterans - Friday
Red Deer & District Kennel Club Official Judging Schedule April 6 8, 2018
 Red Deer & District Kennel Club Official Judging Schedule April 6 8, 2018 Events 3 All Breed Conformation Shows o Baby Puppy all 3 days in Conformation o Brace Saturday April 7 th o Veterans - Friday April
Saturday, December 2, Sunday, December 3, 2017
 JUDGING SCHEDULE CANINE CHRISTMAS CLASSIC Saturday, December 2, 2017 Sunday, December 3, 2017 BRANTFORD & DISTRICT CIVIC CENTRE 69 MARKET STREET SOUTH BRANTFORD, ONTARIO THE BUILDING WILL OPEN FOR EXHIBITORS
March 23, 24 and 25, 2018 in Camrose, Alberta
 Official Judging Schedule Battle River Canine Association March 23, 24 and 25, 2018 in Camrose, Alberta All-breed Championship Shows (Fri, Sat, & Sunday) All-breed Obedience Trials (Fri, Sat, & Sunday)
Judging Schedule Saturday & Sunday March 22, 23, 2014 St. Clair College of Applied Arts & Technology, 2000 Talbot Rd. W., Windsor, Ontario.
 WINDSOR ALL BREED T & T CLUB Judging Schedule Saturday & Sunday March 22, 23, 2014 St. Clair College of Applied Arts & Technology, 2000 Talbot Rd. W., Windsor, Ontario. Canada DIRECTIONS TO THE SHOW SITE
JUDGING SCHEDULE. Friday, September 9, 2016 Saturday, September 10, 2016 Sunday, September 11, 2016
 JUDGING SCHEDULE Friday, September 9, 2016 Saturday, September 10, 2016 Sunday, September 11, 2016 INTERNATIONAL CENTRE - HALLS 3 & 4 6900 Airport Road, Mississauga ON The site will be open for exhibitors
EXPECTED STARTING TIMES
 The Irish Kennel Club All Breed International Championship Show 6 th October 2018 Proposed Order of Judging Ring 1 Judge: Mr. I. Vyguzov Junior Handling (15) 09:00 Followed by Judge: Junior Stakes Brace
PROPOSED ORDER OF JUDGING CLOGHRAN ALL BREED CHAMPIONSHIP SHOW 25 TH November Havanese, Setter English, Lakeland Terrier, King Charles Spaniel,
 PROPOSED ORDER OF JUDGING CLOGHRAN ALL BREED CHAMPIONSHIP SHOW 25 TH November 2017 Ring1 Judge: Ms L Coulter Dandie Dinmont Mr L Grogan Ring 8 Judge: Ms K Savage Portuguese Pointing Dog, Junior Handling
Numbers will be confirmed with the official judging schedule.
 Unofficial Breed Counts - Mt. Cheam Canine Assoc. - Friday Feb 22 nd, 2019 (418) SPORTING (116) 1 - Pointer - GSH 1-0-0-0 2 - Retriever - Flat Coated 1-0-0-0 V1 25 - Retriever - Golden 8-10-4-2 V1 25 -
PRINCE ALBERT KENNEL & OBEDIENCE CLUB
 PRINCE ALBERT KENNEL & OBEDIENCE CLUB The members of the PAKOC thank you for attending their shows and hope you find them interesting and enjoyable. If there is a problem come and speak to us. If you enjoyed
Ottawa Kennel Club Fri, May 25, 2018 to Sun, May 27, 2018 JUDGING SCHEDULE. Richmond Agricultural Fairgrounds 6107 Perth St. Richmond, Ontario K0A 2T0
 Ottawa Kennel Club Fri, May 25, 2018 to Sun, May 27, 2018 JUDGING SCHEDULE Richmond Agricultural Fairgrounds 6107 Perth St. Richmond, Ontario K0A 2T0 CHANGE OF JUDGE Saturday, May 26th & Sunday May 27th
JUDGING SCHEDULE FRIDAY, SEPTEMBER 21, 2018 SATURDAY, SEPTEMBER 22, 2018 SUNDAY, SEPTEMBER 23, 2018
 JUDGING SCHEDULE FRIDAY, SEPTEMBER 21, 2018 SUNDAY, SEPTEMBER 23, 2018 WEST NIAGARA FAIRGROUNDS 7402 Mud Street Grassie, Ontario L0R 1M0 SHOW SECRETARY MJN Show Services 9 Samya Court Scarborough ON M1R
Richmond Agricultural Fairgrounds 6107 Perth St. Richmond, Ontario K0A 2T0 ONSITE CAMPING AND ELECTRIC DAY USE
 Ottawa Kennel Club Fri, May 26, 2017 to Sun, May 28, 2017 JUDGING SCHEDULE Richmond Agricultural Fairgrounds 6107 Perth St. Richmond, Ontario K0A 2T0 ONSITE CAMPING AND ELECTRIC DAY USE Camping will only